

D365 Business Central: OAuth2 Setup and Automation – Part 2
Yo! Right after publishing Part 1, I jumped into drafting this follow-up not to overload you, but I wish to keep things flowing without dumping everything at once. (I know how it feels to absorb too much at once, so I’m breaking this tutorial into smaller, bite-sized parts.)
Think LEGO style each piece builds on the last, just like we always do.
If you’re reading this, I’ll assume you’ve already gone through Part 1: Register Your Entra App, Assign Business Central Permissions, and Prepare for OAuth2 Token Testing. If not, check that out first, it sets the stage, and everything here will make sense. Promise.
Before we dive in, here’s a quick preview of what you’ll get from this post. That way, you know what’s coming and how it fits into the bigger picture.
Overview: What You’ll Learn
- What happens after OAuth2 registration specifically, how to configure your Entra Application in Business Central.
- How to test the connection in multiple ways (yes, even the ones most people skip).
- How to run the full flow using Postman, end to end, detail by detail, from request to response.
- How to start assigning your token to a variable (just the basics for now)
Sounds good? So, Grab your snorkel and we’re diving into the abyss most guides leave untouched. No shortcuts, no surface level walkthroughs. Just the real stuff.
What You’ll Need Checklist
- Postman installed
- Your Tenant ID
- Client ID and Secret from your Entra App
- A basic understanding of OAuth2 covered in Part 1: Register Your Entra App, Assign Business Central Permissions, and Prepare for OAuth2 Token Testing
Why This Matters
Once your OAuth2 setup is working:
- You won’t need to redo it every time, just call the same endpoint when the token expires and it’ll refresh automatically.
- You can connect other apps to Business Central without exposing secrets or guessing what’s broken.
- You’ll have a working setup you can test, reuse, and build on, no surprises, no manual patchwork.
Registering a Microsoft Entra Application in Business Central
1. Open your Business Central environment.
2. On the top-right, click the magnifying glass icon to open the search bar.
![]()
3. A pop-up titled "Tell me what you want to do" will appear.
4. Type and search for Microsoft Entra Applications (formerly Azure Active Directory Applications).
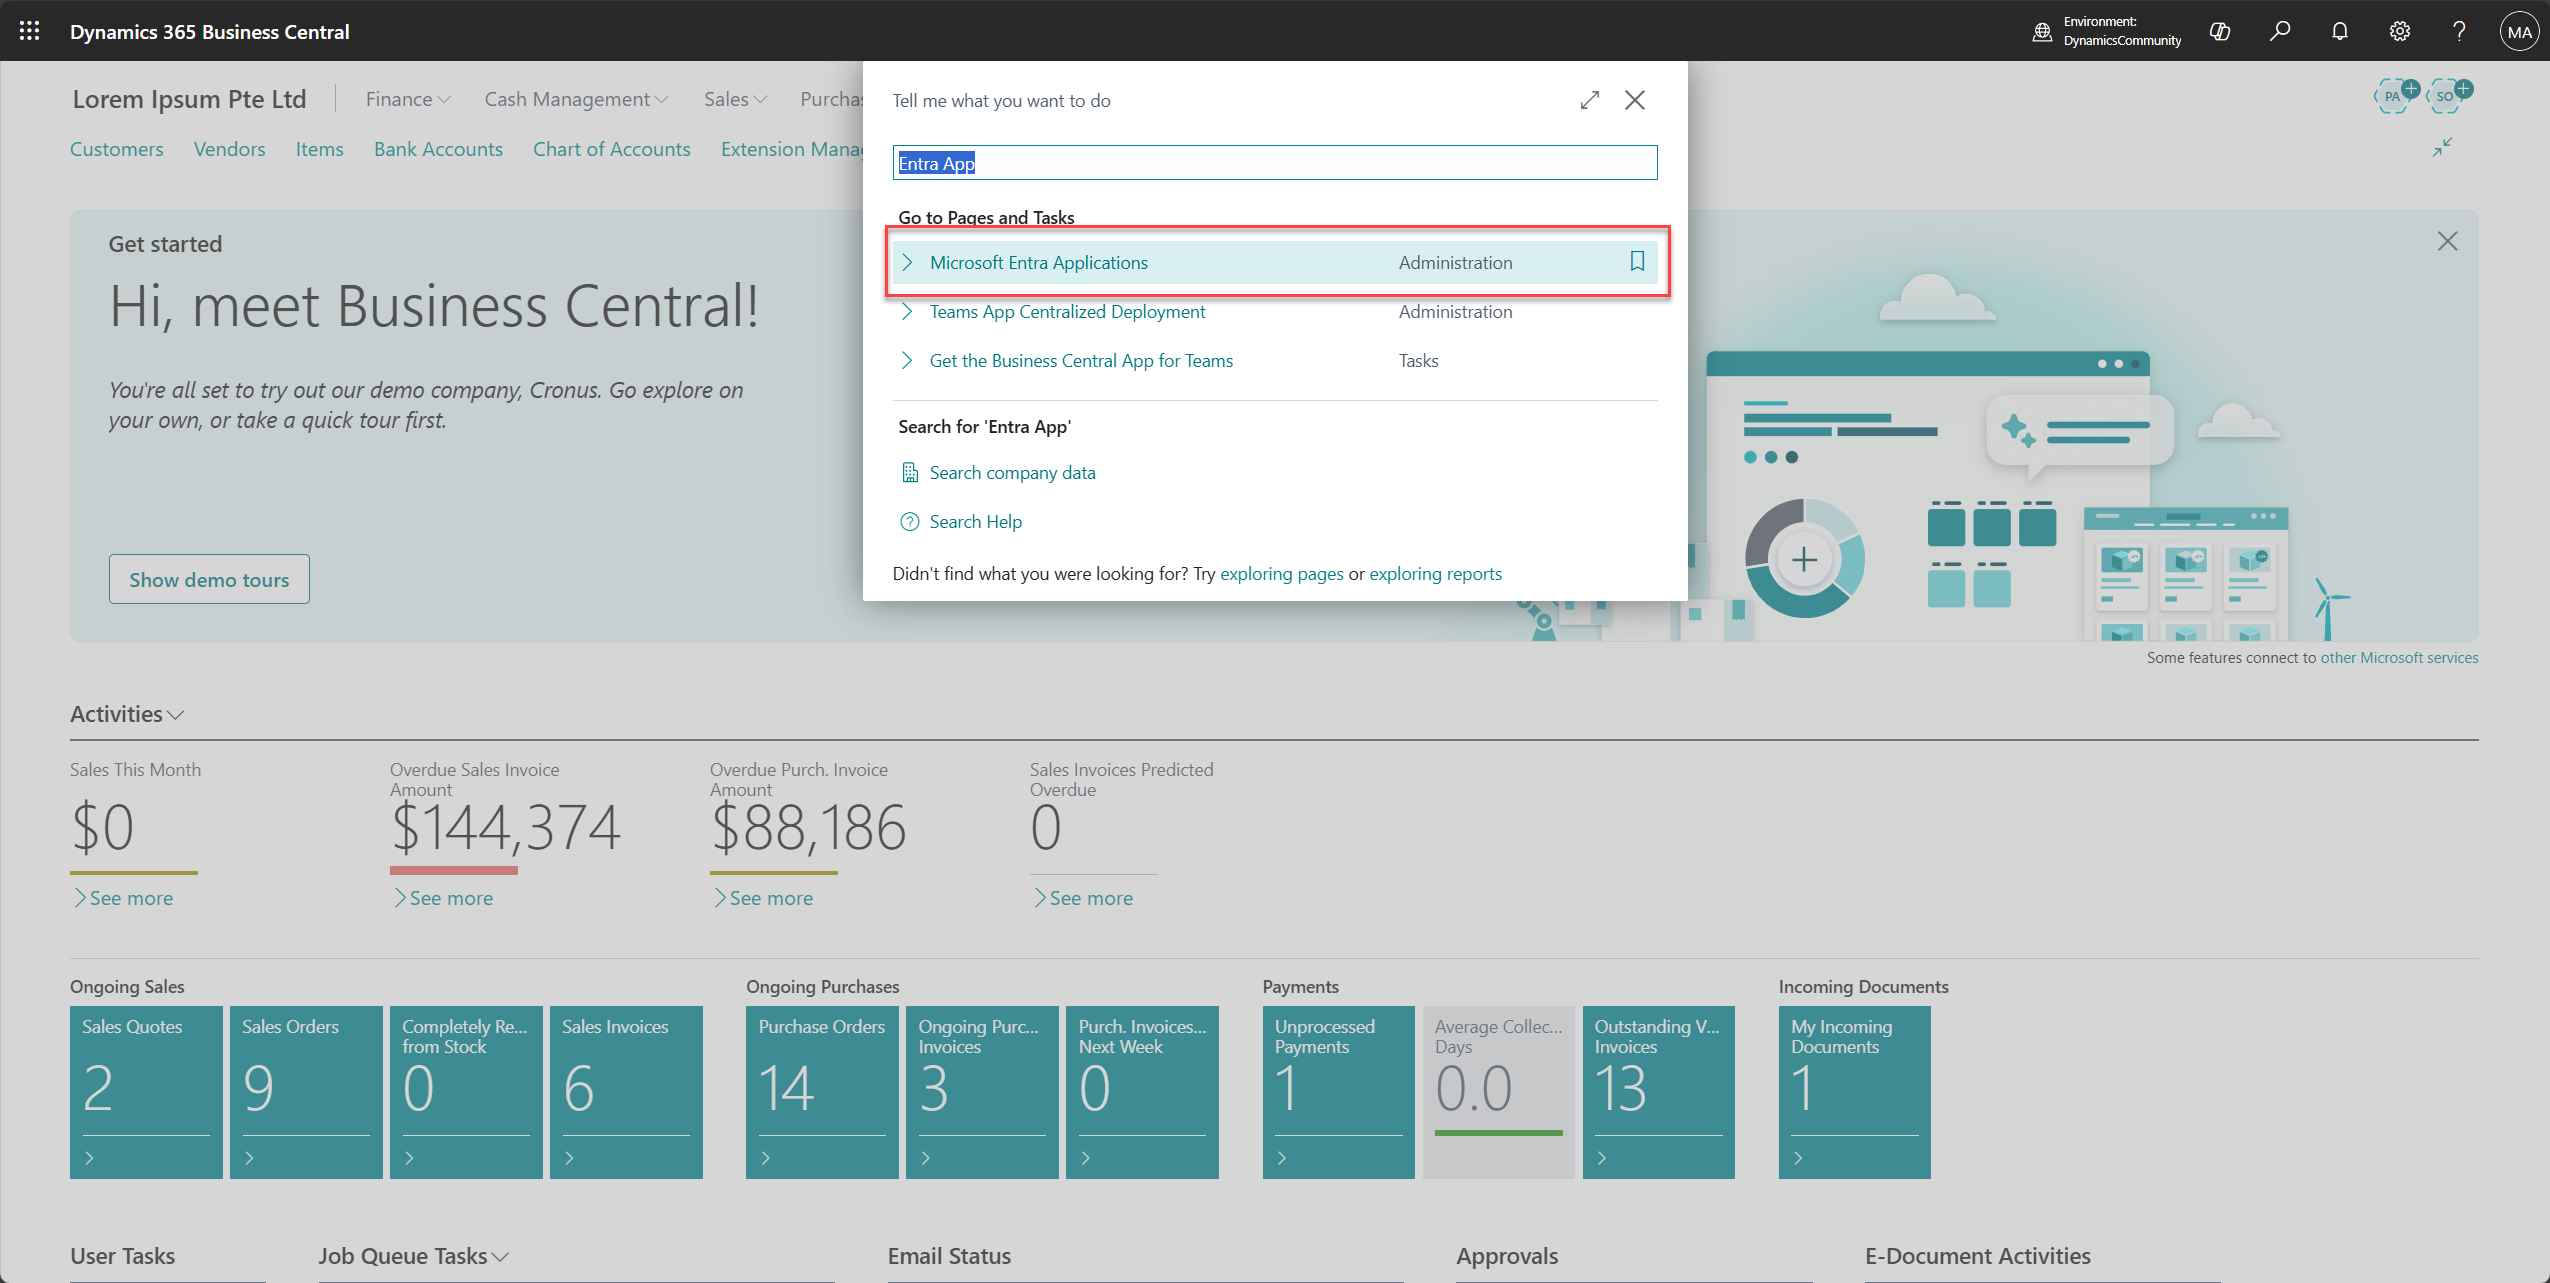
5. Click the page titled Microsoft Entra Applications.
6. On the Entra Applications page, click New to register a new application.
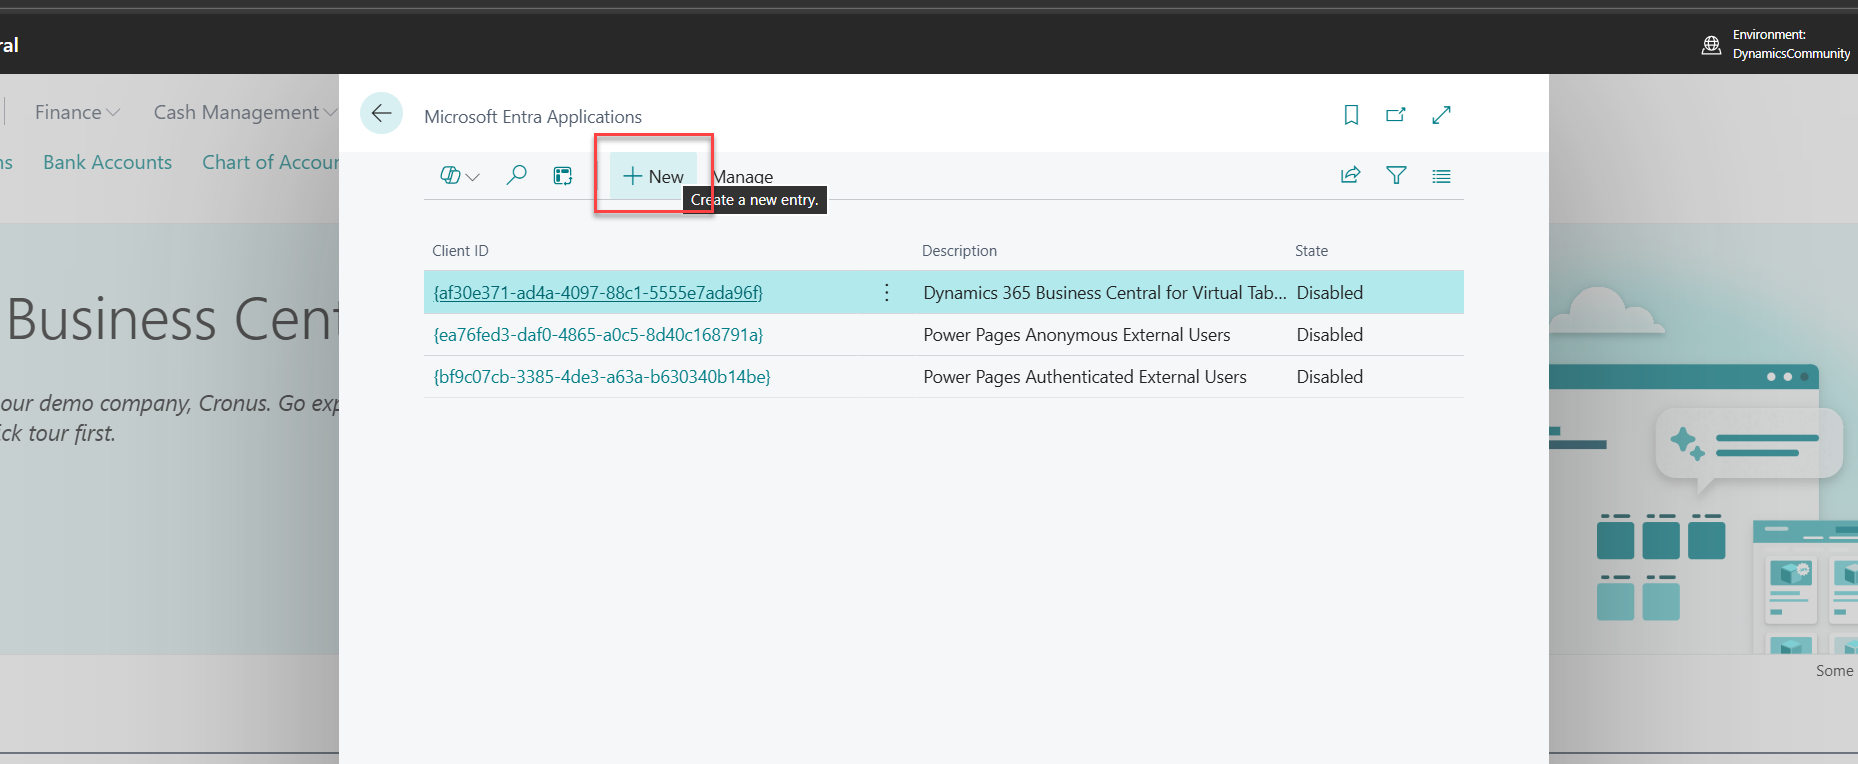
7. A card will appear titled Microsoft Entra Application Card.
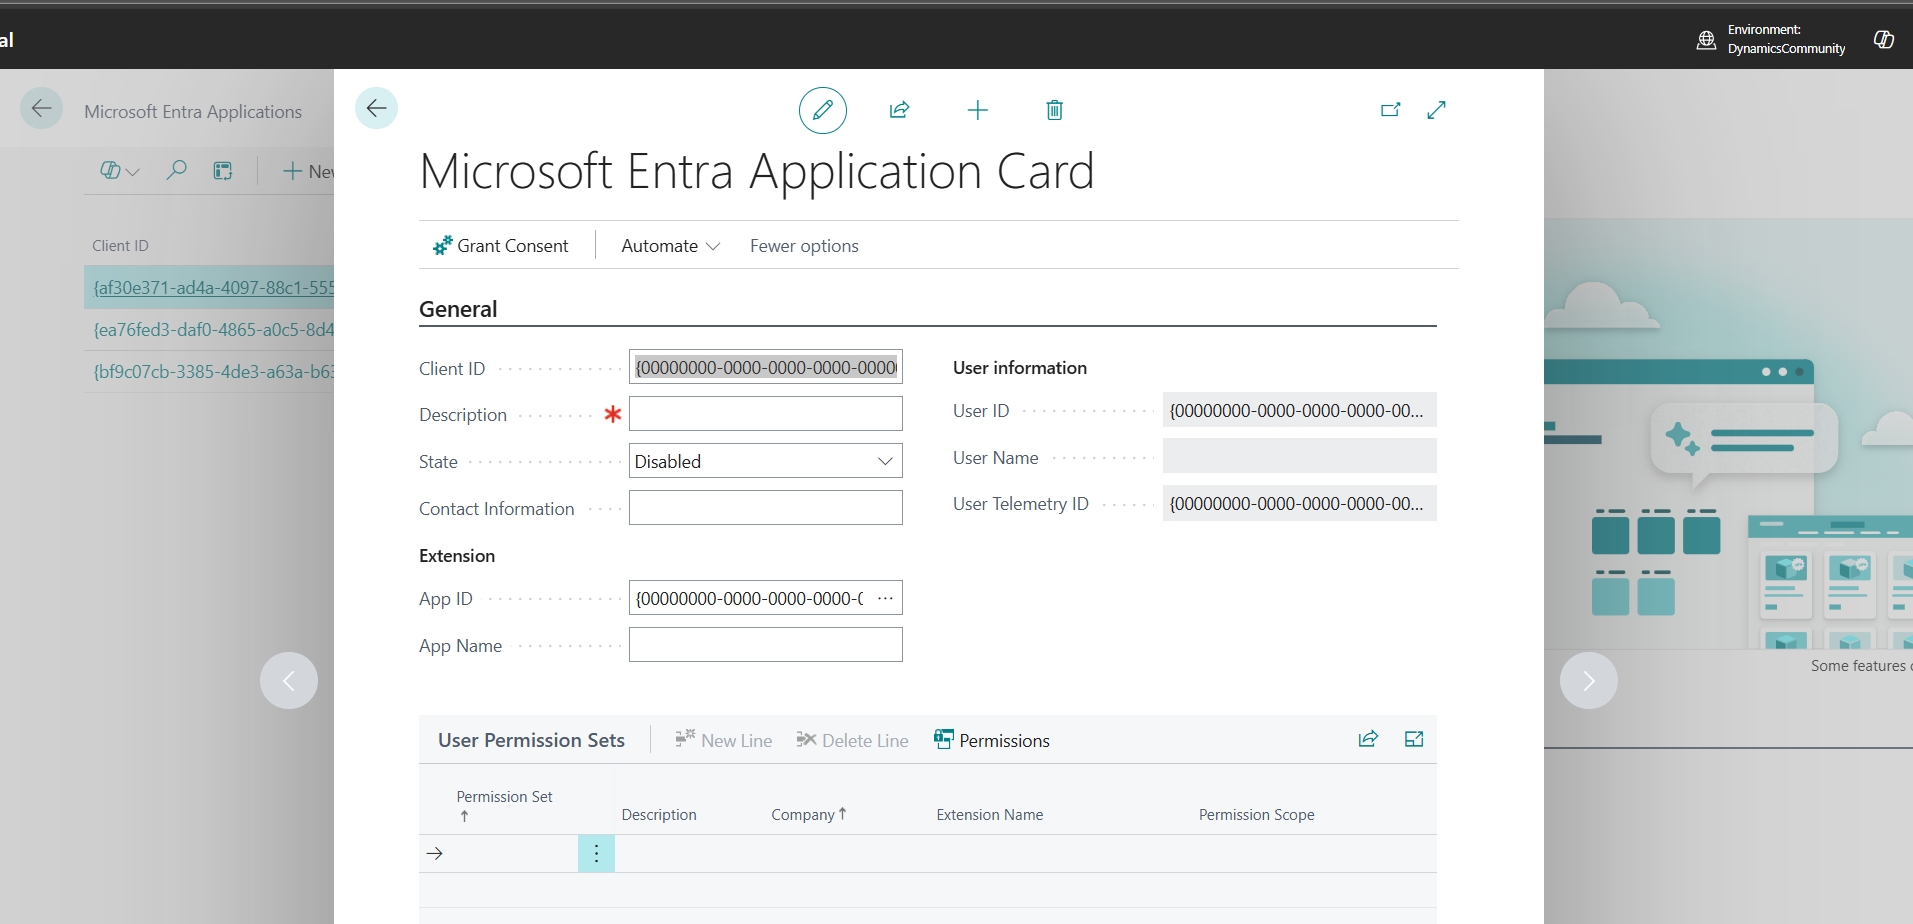
Fill in the following details:
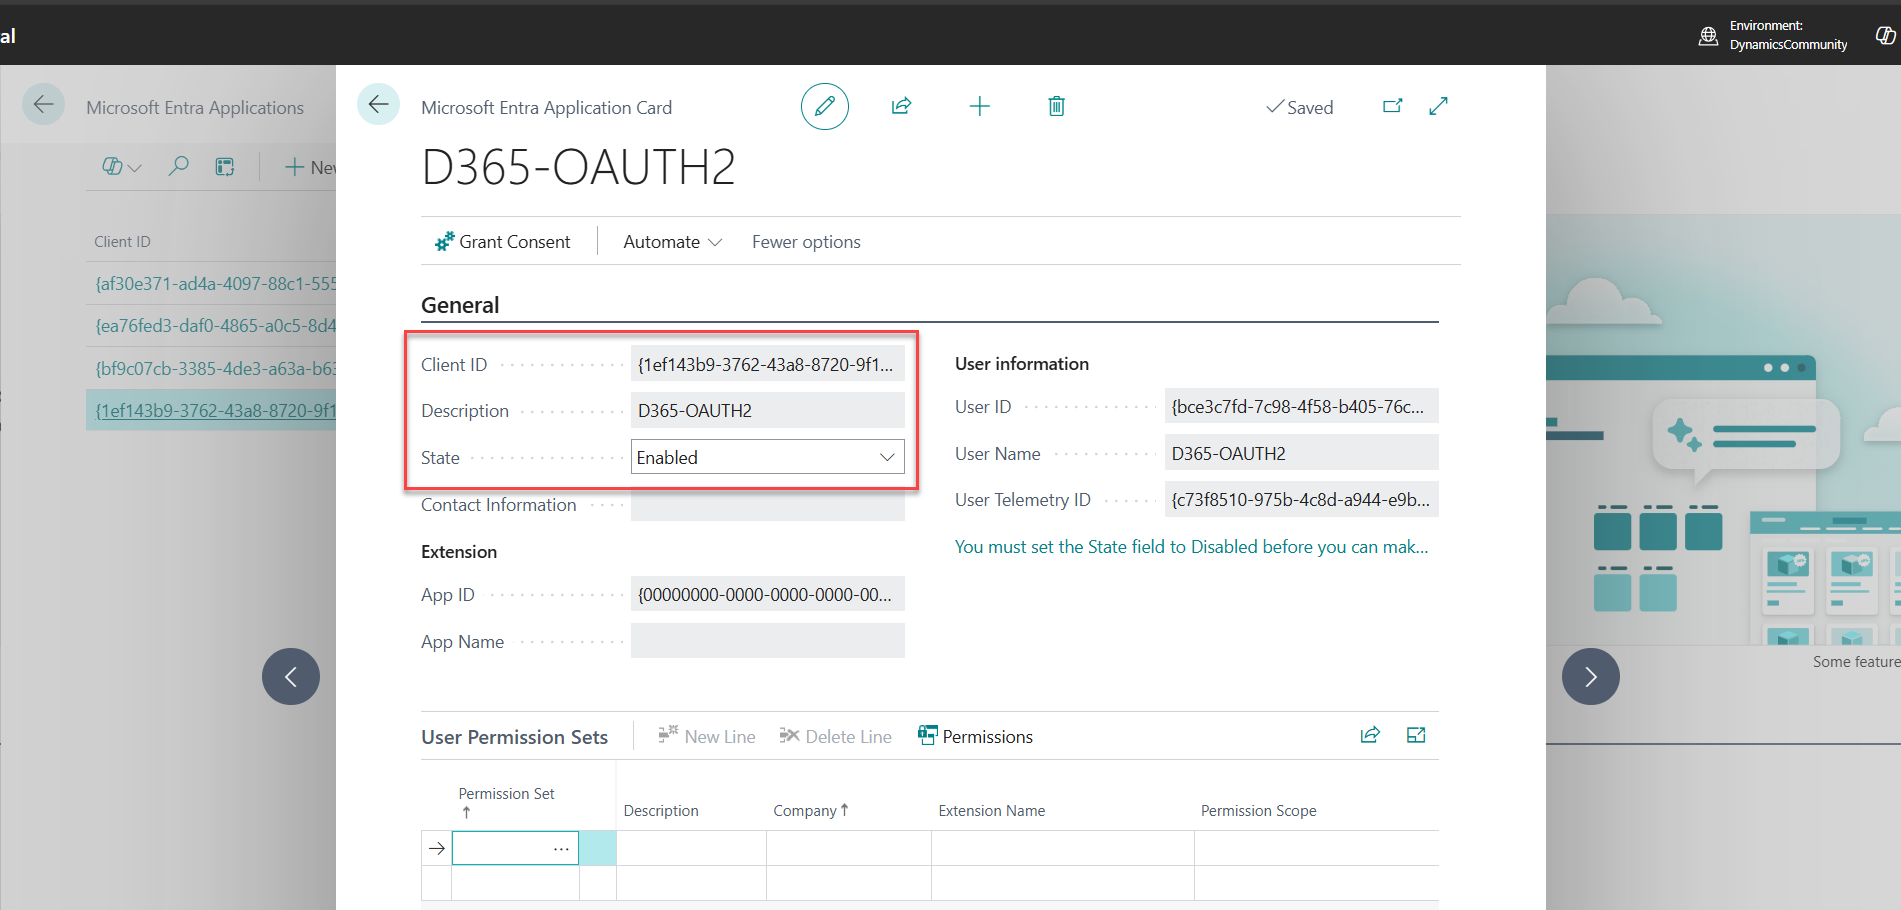
Once enabled, Business Central will link this app registration and allow permission assignment.
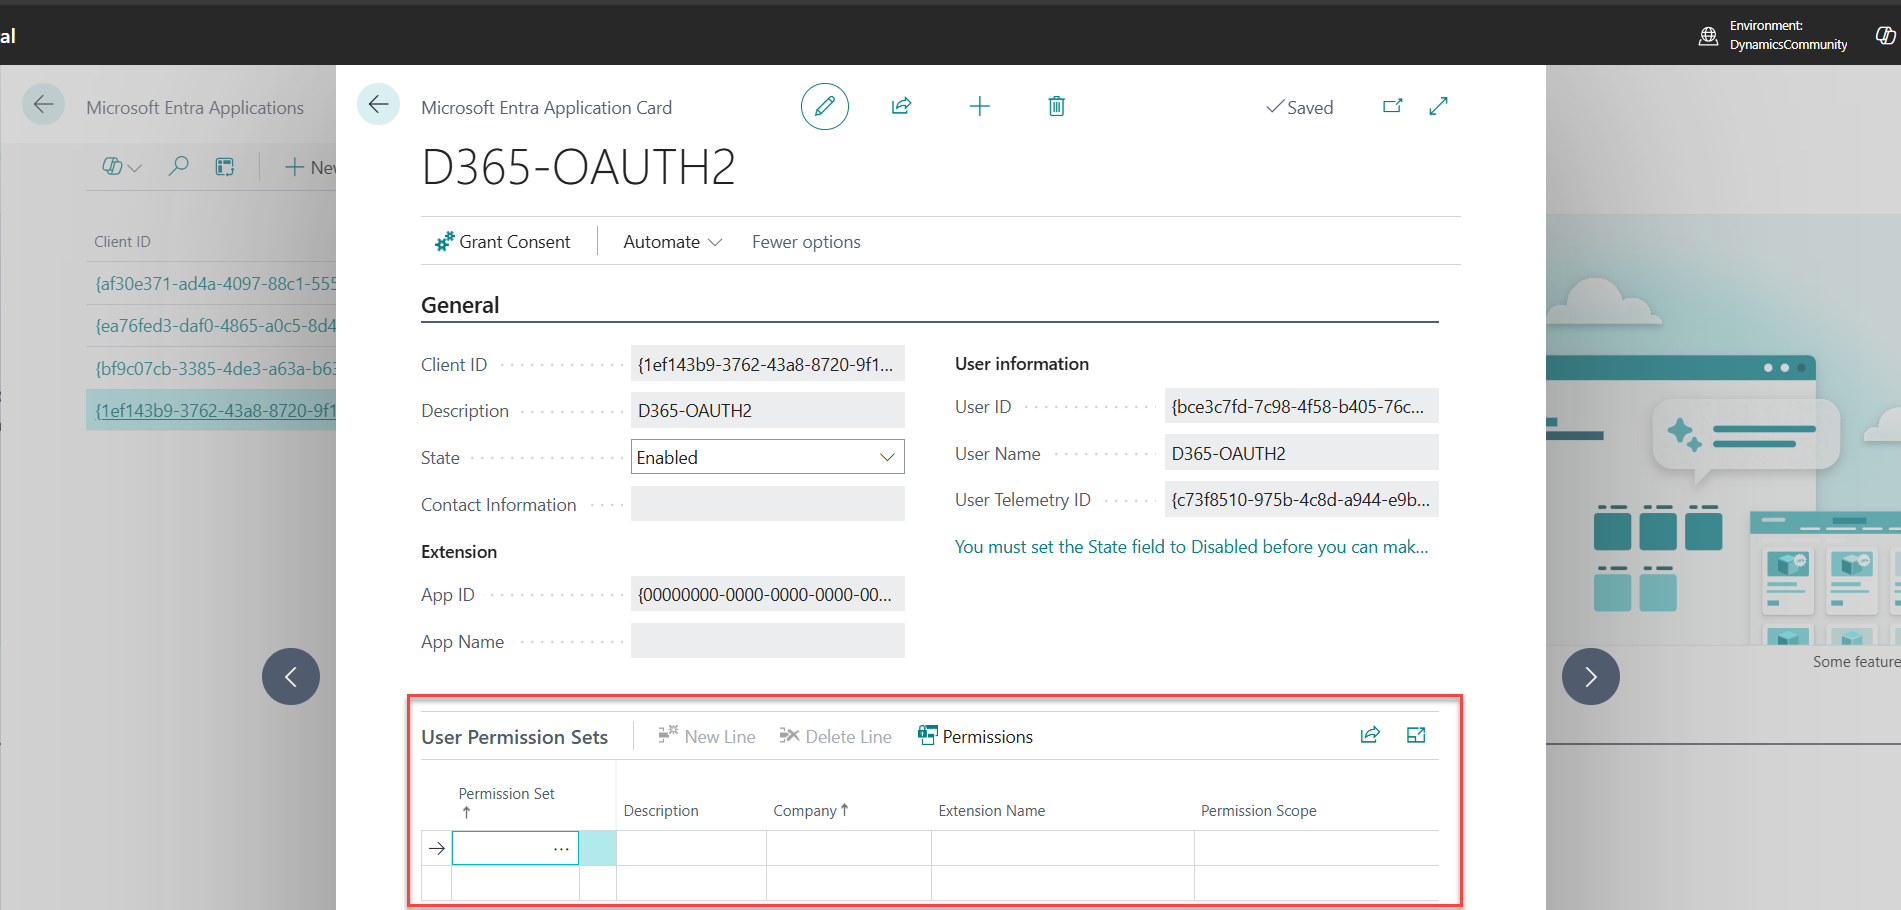
8. A prompt will appear: "A user named D365-OAUTH2 will be created. Do you want to continue?" Click Yes.
9. The User Permission Sets subpage will now be visible.
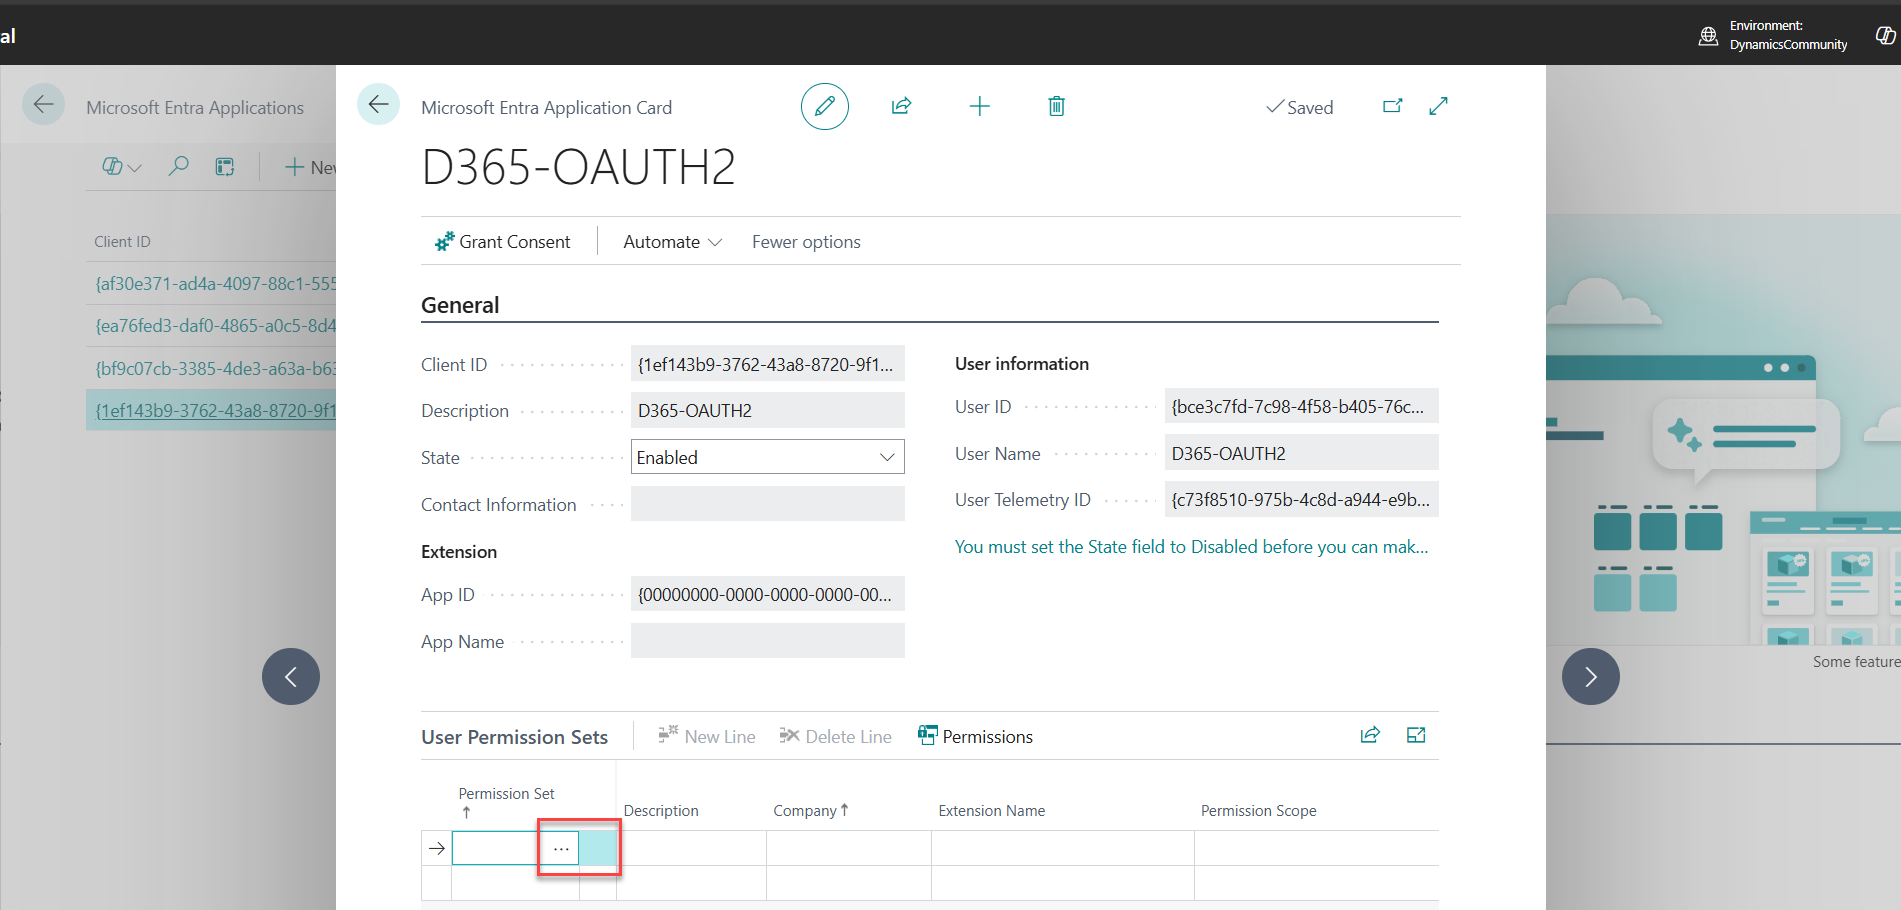
10. Click the three-dot icon (called AssistEdit in BC) to assign permission sets.
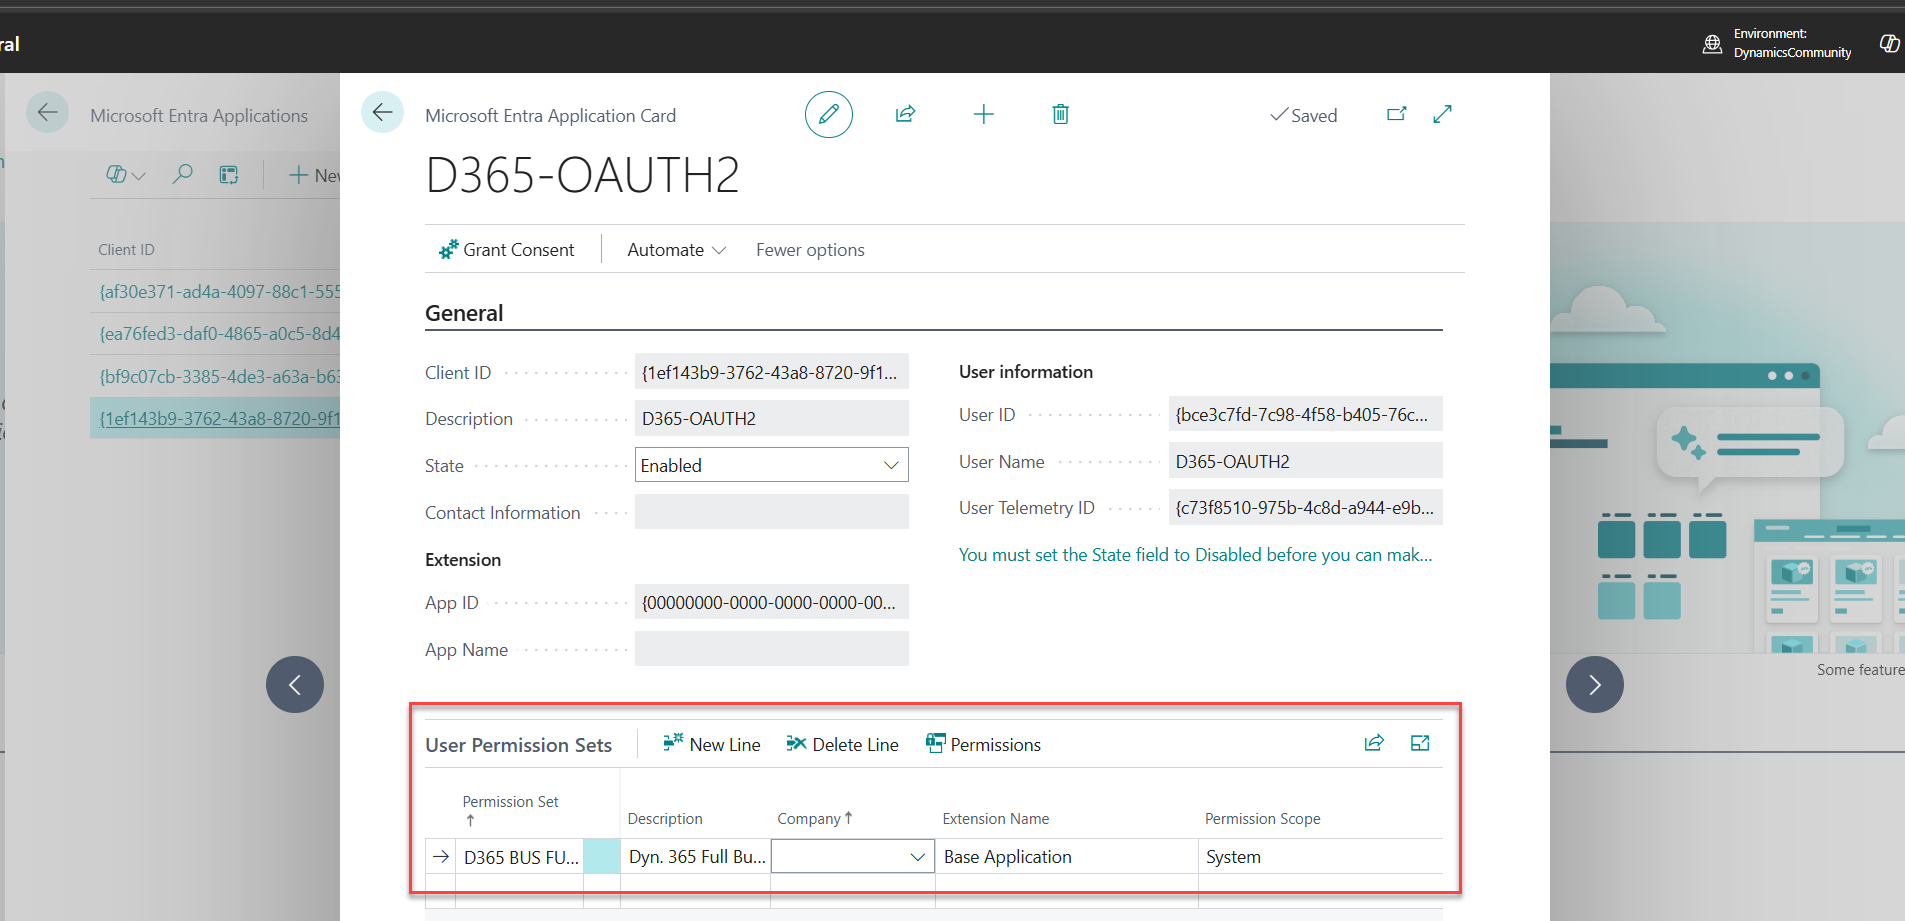
11. Now, Assign a Permission Sets e.g. D365 BUS FULL ACCESS (for comparison of which suits you, see below deep dive)
✨ Note (a.k.a. Don’t Even Try It):
You can’t assign SUPER to an application user. If you do, Postman will clap back with this:
“You cannot assign 'SUPER' permission set to an application. Consider assigning less encompassing permission sets that are specifically designed for the intended purpose.”
It’s not being rude, it’s just protecting your environment. Use a scoped permission set that fits the job, not the nuclear option.
Recommended Permission Sets (highest possible for app users):
- D365 BUS FULL ACCESS
- D365 BUS PREMIUM
- D365 FULL ACCESS
At first, I assumed assigning *FULL would be enough. But after digging deeper, I found three distinct tiers, each with its own scope. Here’s a breakdown to help you choose what fits best. (and of course, you will need to add your custom permission set if you do have PTE's installed or a dependencies to other PTE's and other AppSource Apps)
Let's compare so you will decide which is suitable
✨ Fun Fact (a.k.a. Don’t Panic Yet):
This page doesn’t validate your credentials right away. It just stores them quietly in the background, waiting to be used when you actually request a token. So if things feel suspiciously silent, don’t worry, that’s expected.
So Here's "the million-dollar question" thing, How do we test if this thing works?
Unfortunately, the Microsoft Entra Application page in Business Central doesn’t offer a “Test Connection” button (yet). So we rely on external tools to validate the setup. Obviously, There are plenty of API testing tools out there, just name it:
- curl (for CLI lovers)
- REST Client (VS Code extension)
- Thunder Client (VS Code extension, Postman-like)
- And of course, Postman, our pick for now, and probably the most widely used among Business Central developers.
Test with Postman
Now that we've handled OAUTH2 registration and added the details to your Business Central Entra Application Setup, Let's go into the not so booooooooooooooooooooooring part of this blog post.
Before we dive in, I'll assume you've got Postman installed on your local machine, If not, no worries, I'm not gonna bite you, so here's the download link Download Postman
For now, I'll walk you through the basics of Postman. We’ll save the deep dive for a separate guide, this one’s all about getting your first token and seeing it work.
Creating a Postman Workspace (You can skip this step if you already have a workspace or don’t plan to organize your requests.)
1. Open up your Postman.
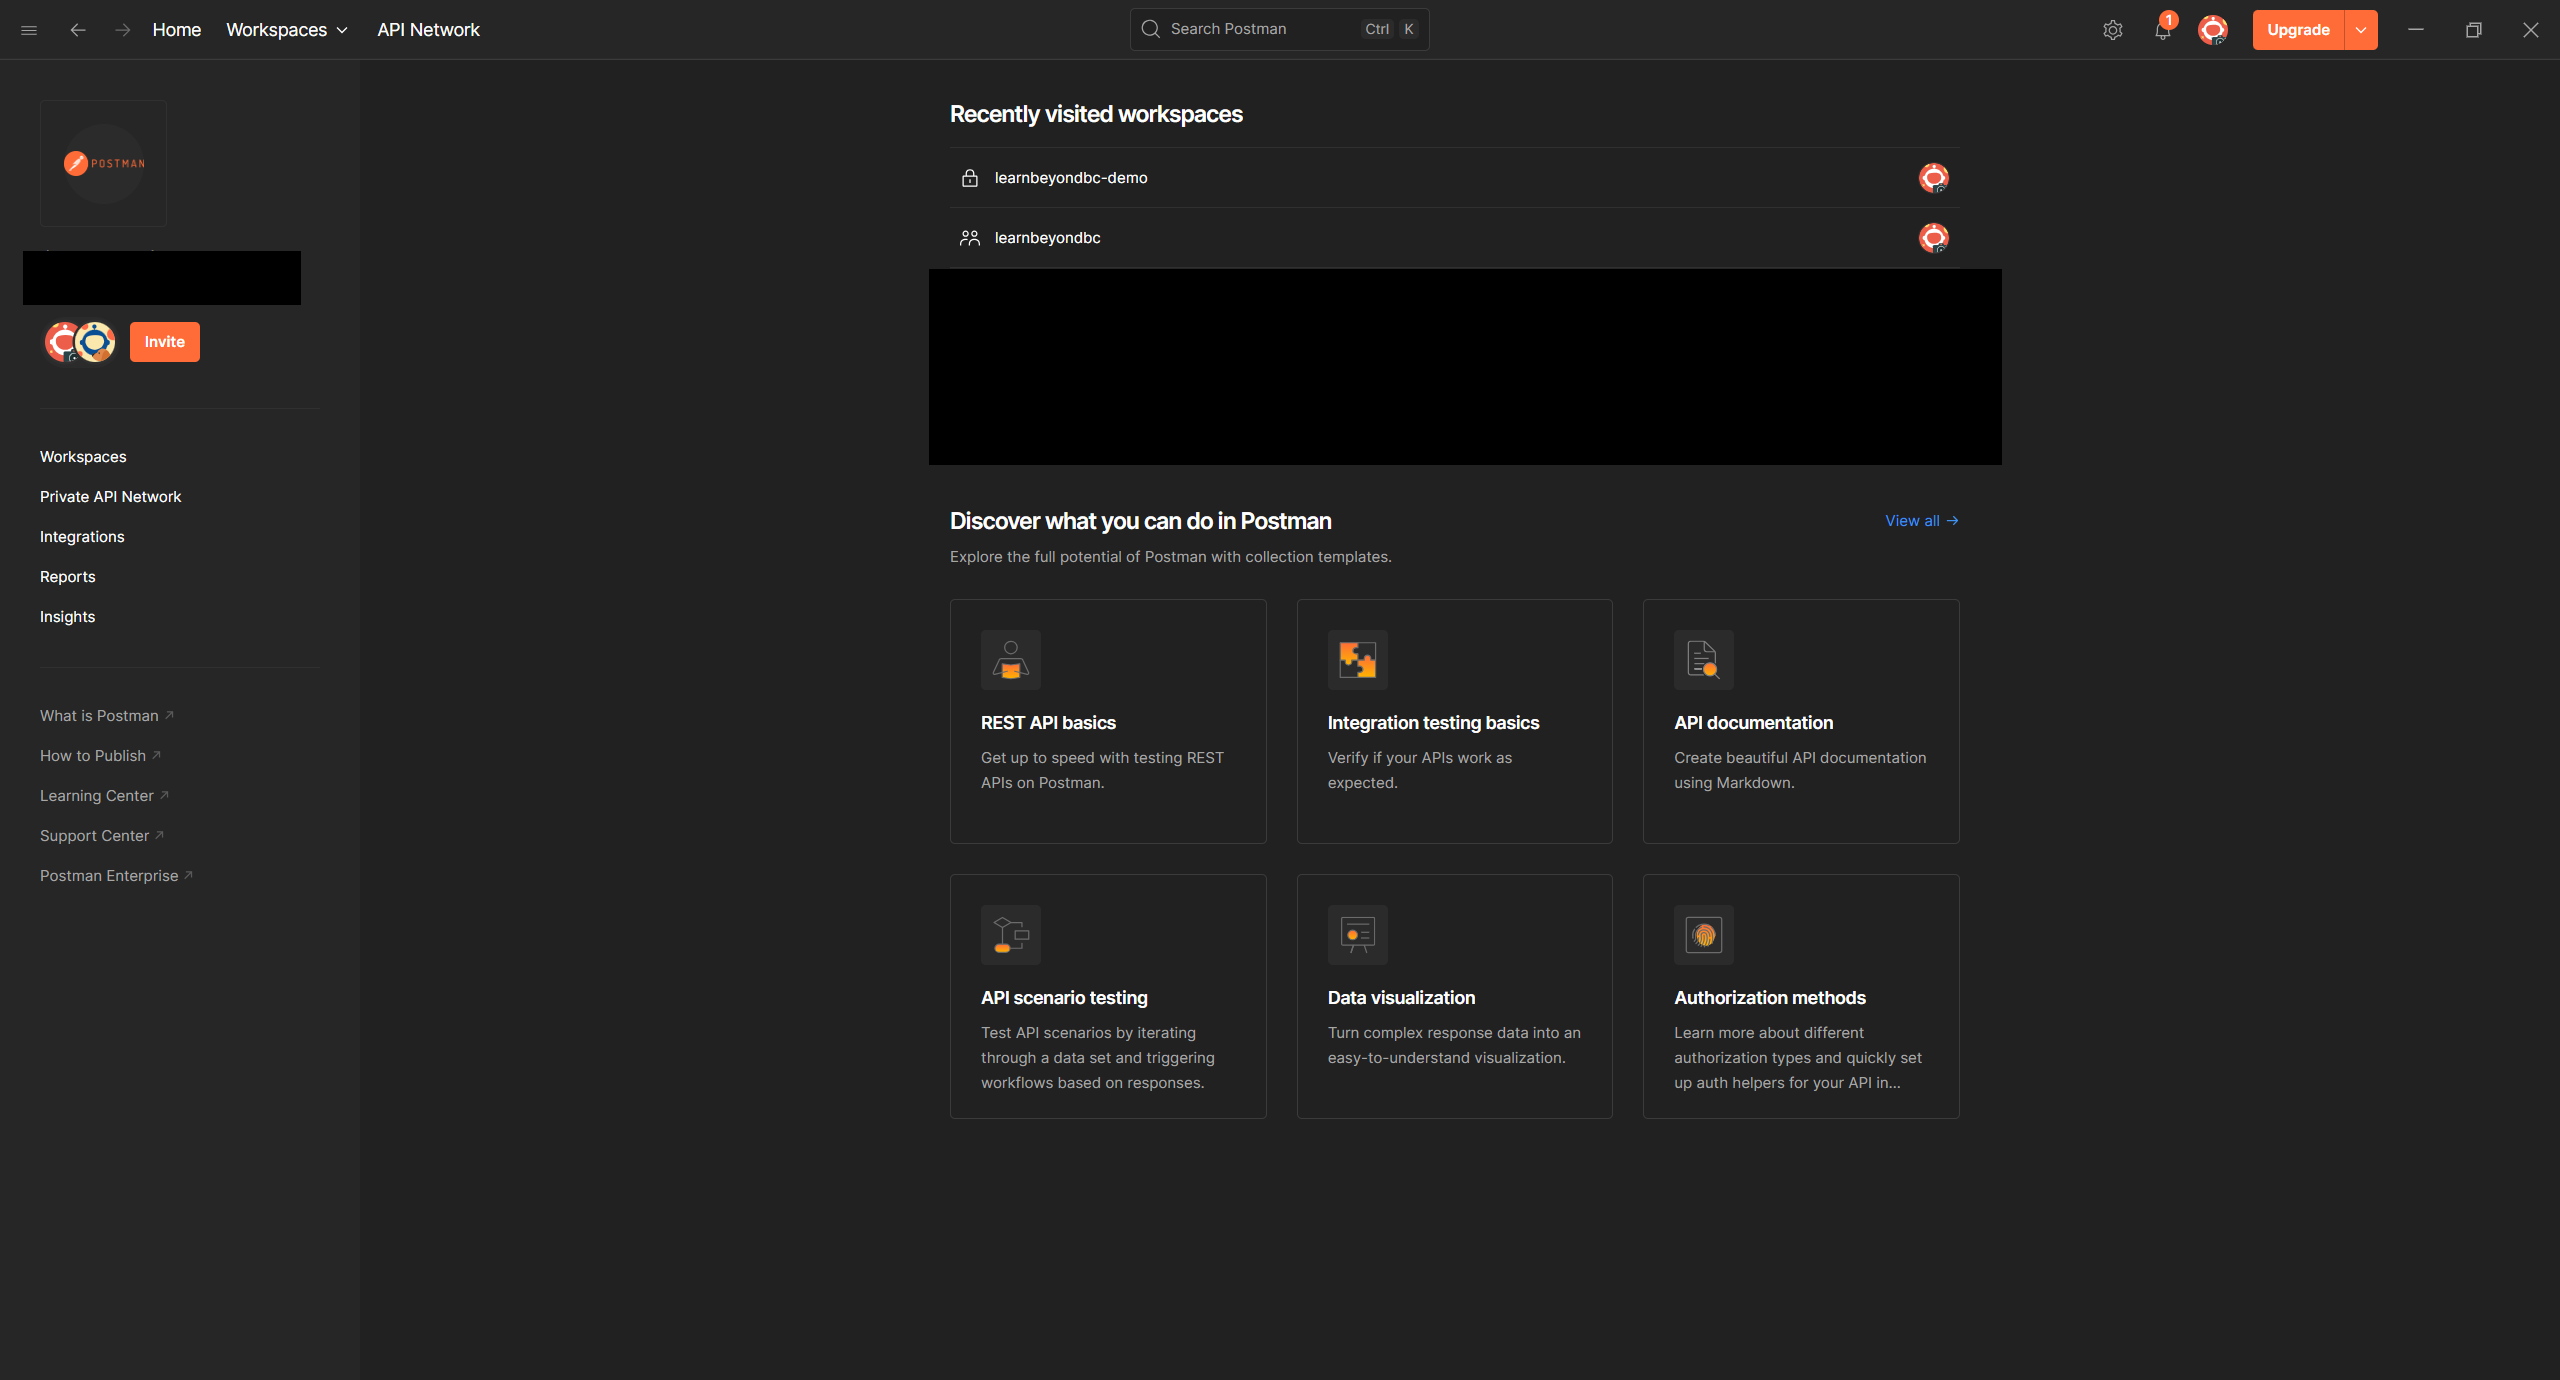
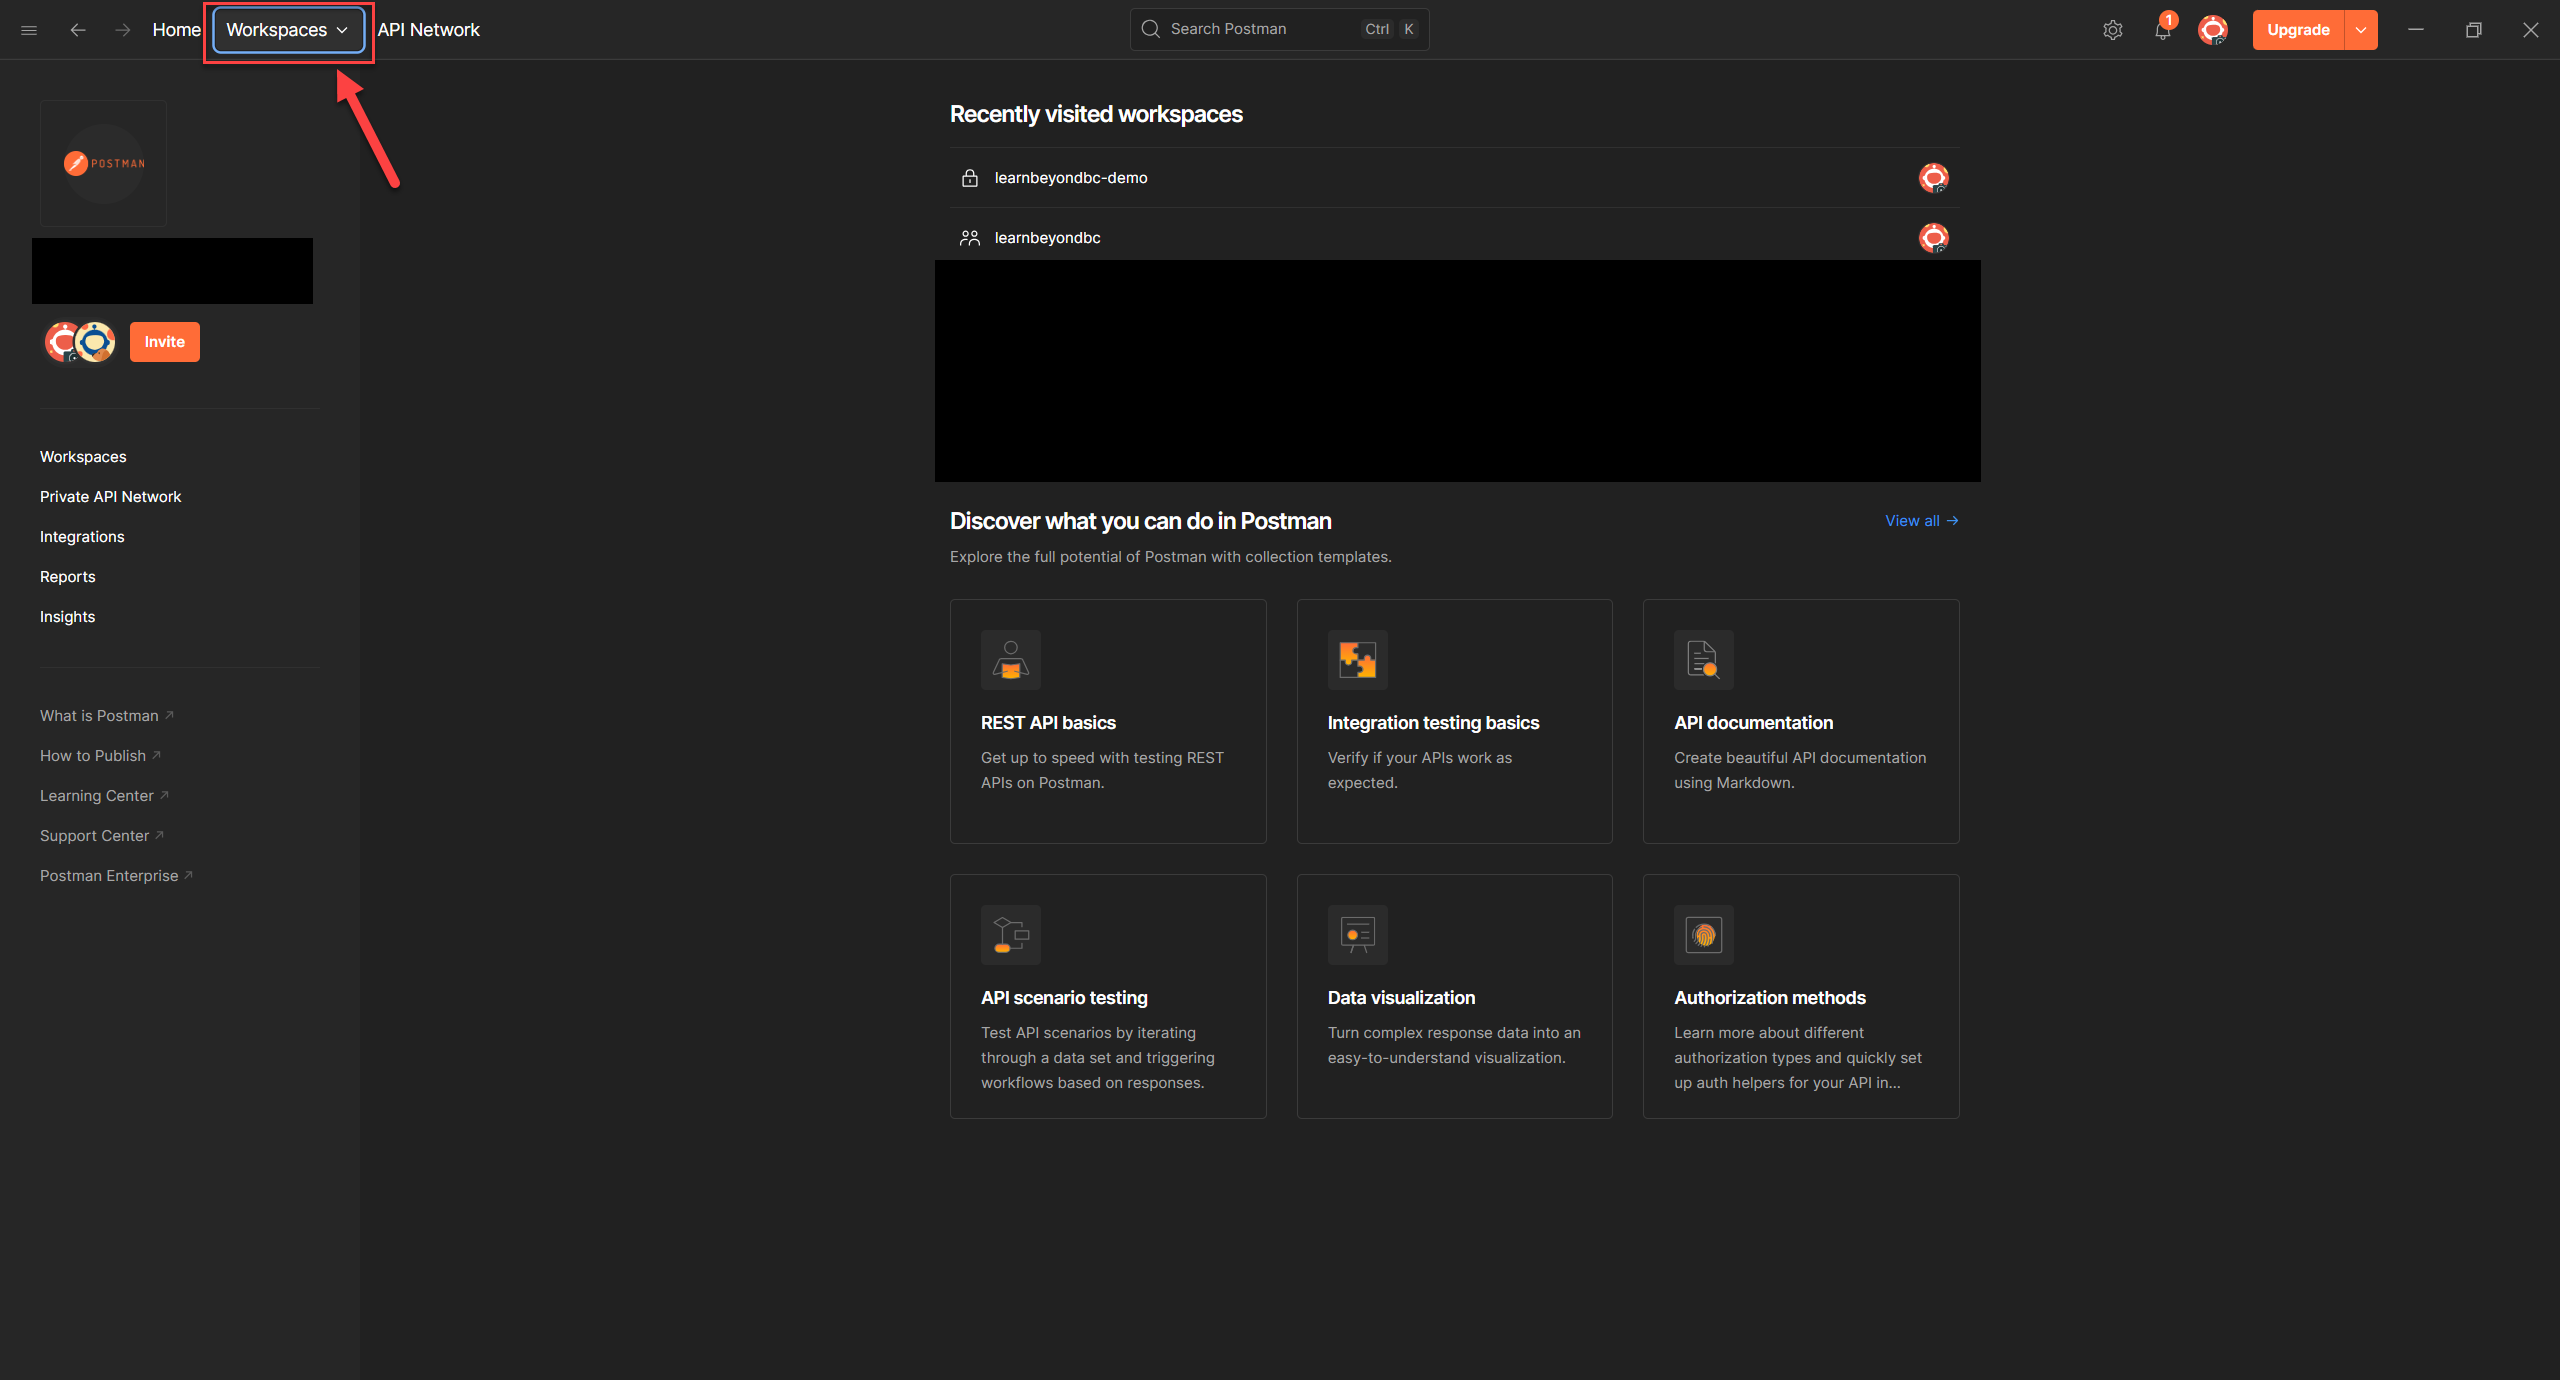
2. In the top-left corner, click Workspaces to view the ones you’ve already created (if any).
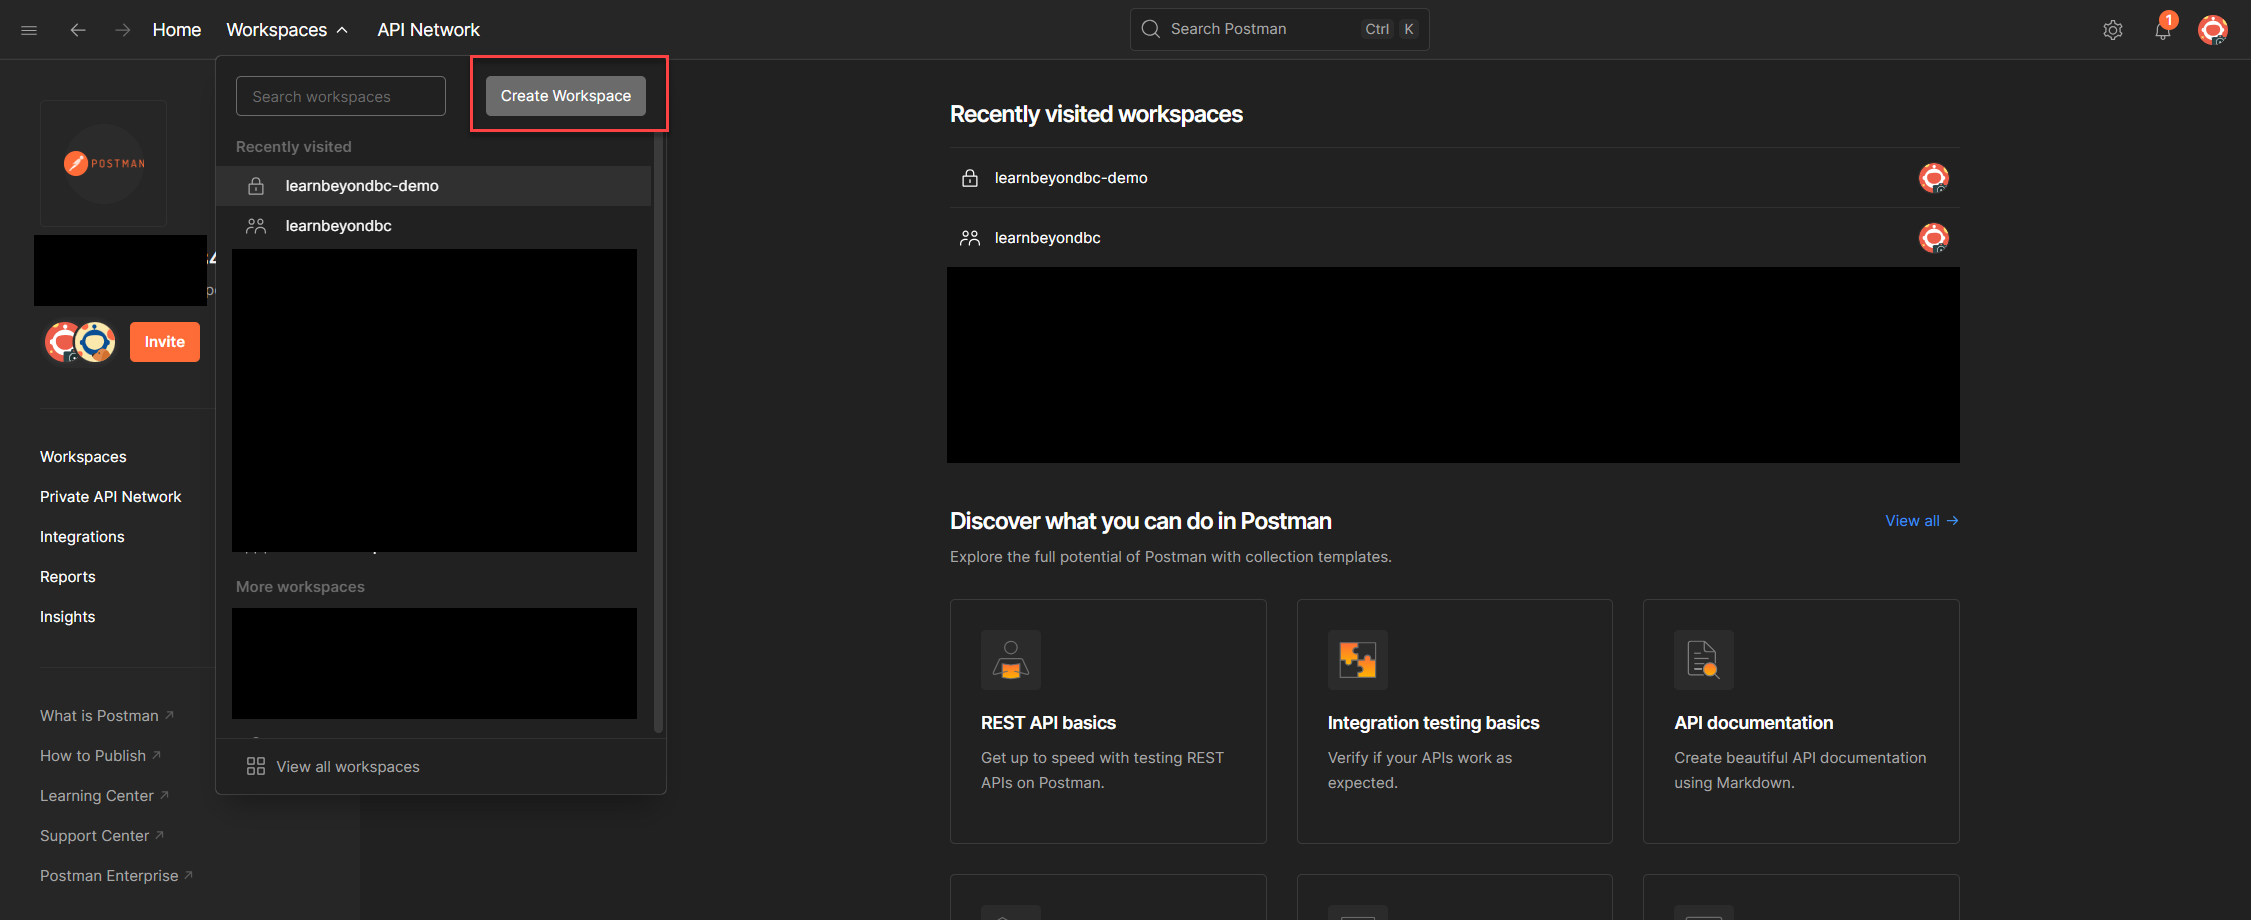
3. Click the Create Workspace button, it's usually near the top-right corner of the Workspaces view.
4. In the setup modal, choose Blank Workspace and click Next.
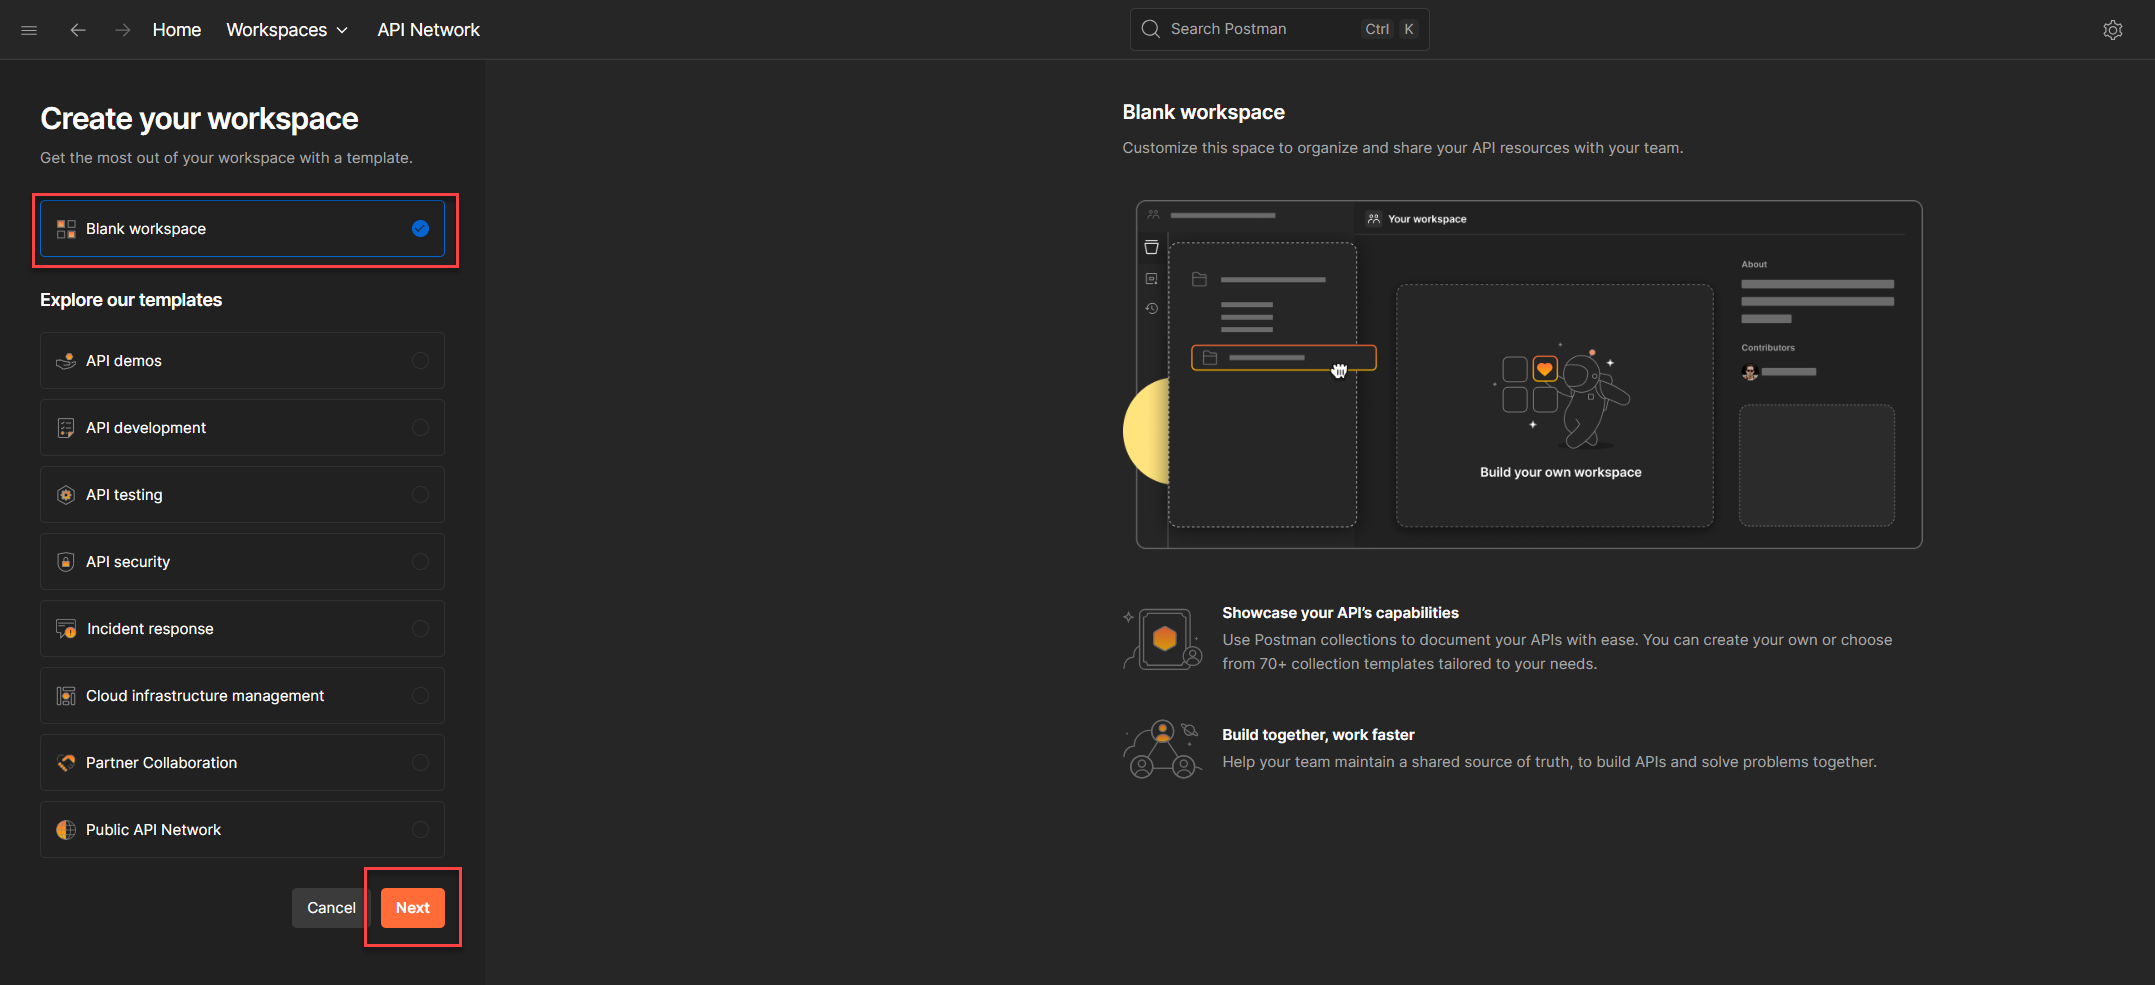
5. In the Name field, give your workspace a meaningful label. Most teams use their company name or project name. For this blog, let’s go with a dummy company: Lorem Ipsum Pte Ltd.
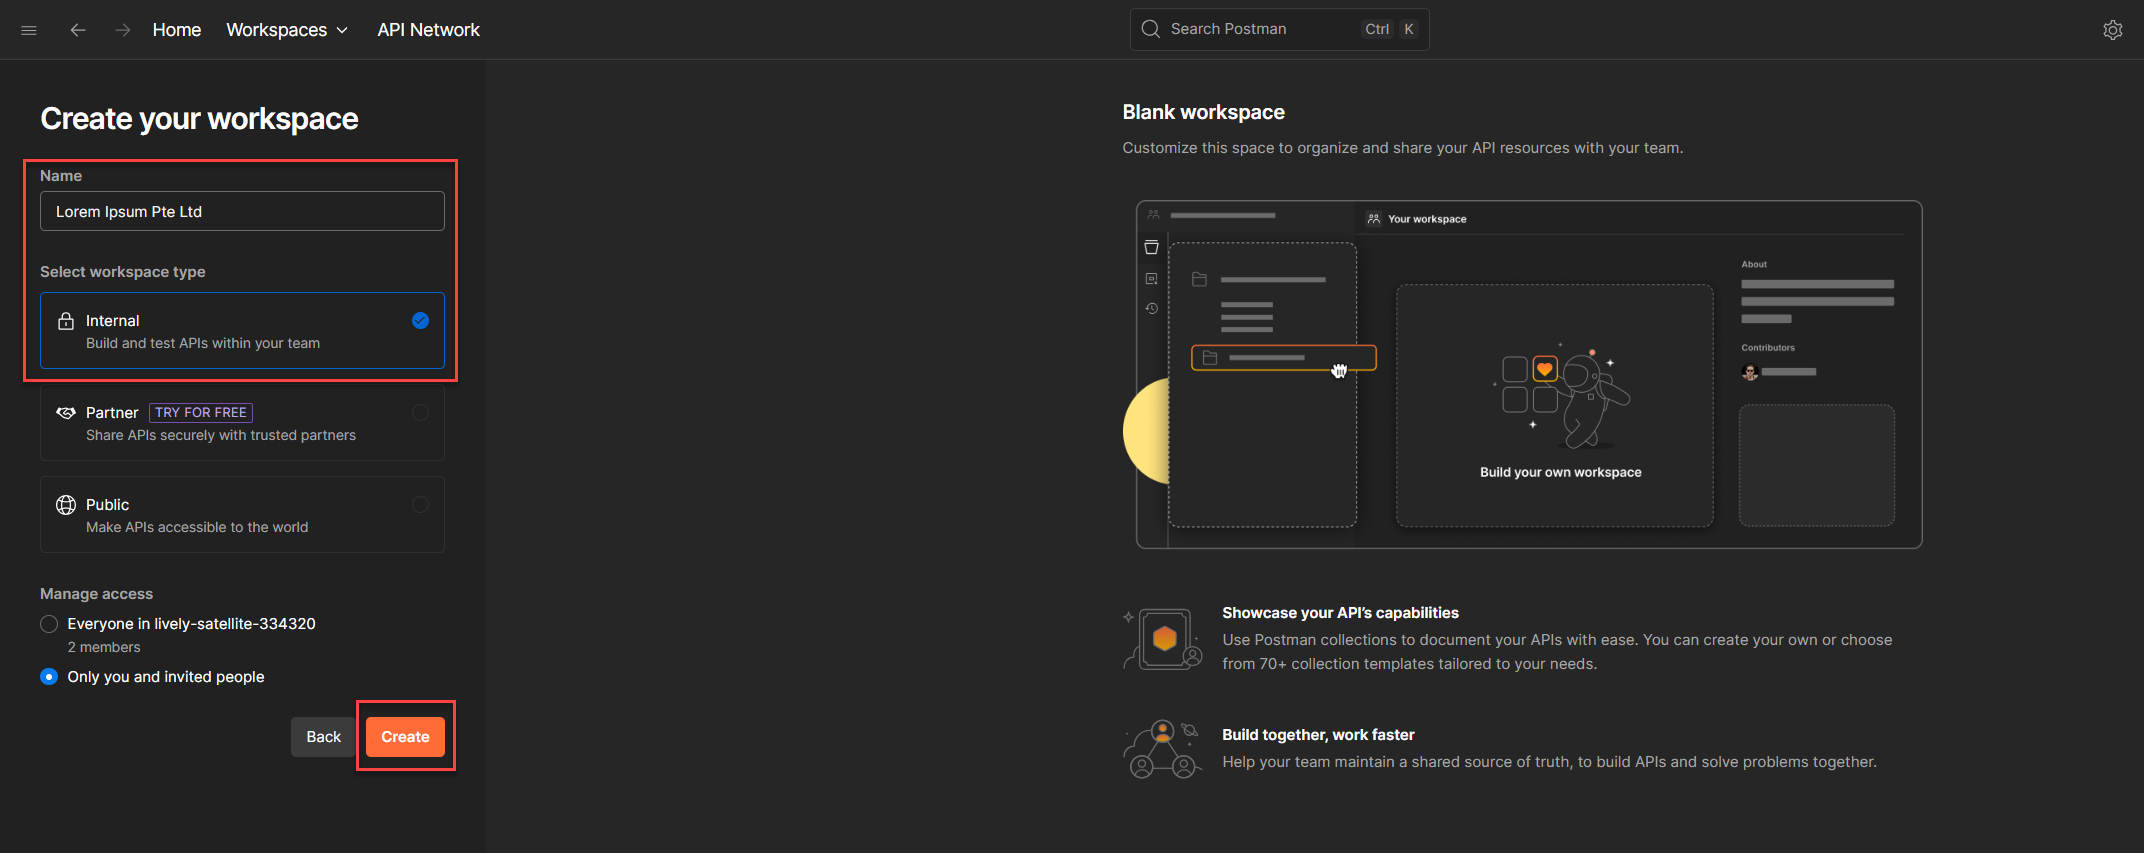

💡 Not so boooooooooooring Tip: Use the Internal type unless you intentionally want to expose your collection publicly. Internal workspaces are private to your team and hidden from Postman’s public API network.
Creating a Postman Collection
So, we’ve got our workspace set up. Now let’s move on to creating a collection.
But before we jump in, let’s pause for a second: What exactly is a Postman Collection?
Think of it as your API playbook. It’s a structured set of requests, grouped together, that you can run, test, document, and share. Whether you’re debugging a single endpoint or scaffolding a full integration suite, your collection becomes the home base for everything.
It’s where your token lives. It’s where your headers get reused. It’s where contributors can jump in and say, “Ah, I see what’s going on here.”
What’s Inside a Postman Collection?
Now that we’ve created the workspace and talked about what a collection is, let’s take a closer look at what actually lives inside it. These aren’t just features, they’re the tools that help you stay organized, avoid hardcoding, and make your API flow repeatable and understandable.
- Requests
Each one targets a specific endpoint likeGET /customersorPOST /invoices. You define the method, URL, headers, and body. - Environment Variables
These hold your token, base URL, client ID, and other values you don’t want to hardcode. Change it once, and every request updates. - Pre-request Scripts
Run logic before sending a request, like generating a token or setting a timestamp. - Tests
Validate responses automatically. You can check if the status is200, if a field exists, or if the payload matches expectations. - Documentation
Add notes, examples, and usage tips to each request. It helps anyone understand what’s happening, even months later.
Let’s Create a Postman Collection
Now that you know what a Postman Collection is, not just by definition, but by purpose, let’s go ahead and create one.
1. On the top-left of your Postman screen, right next to your workspace name, click New.
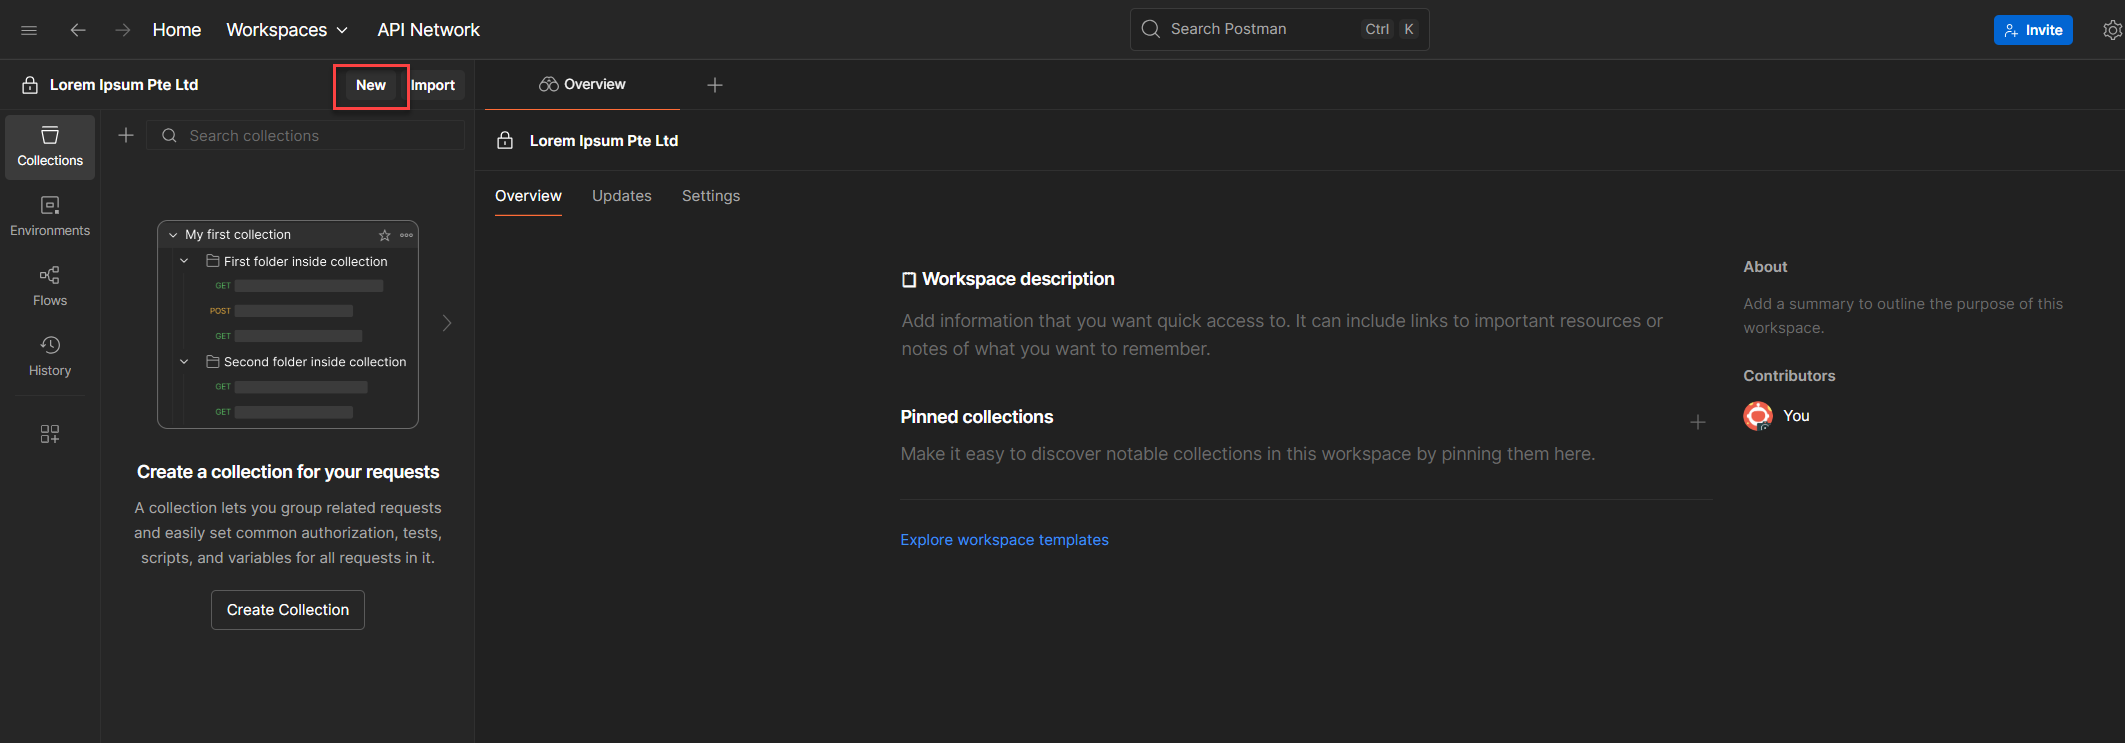
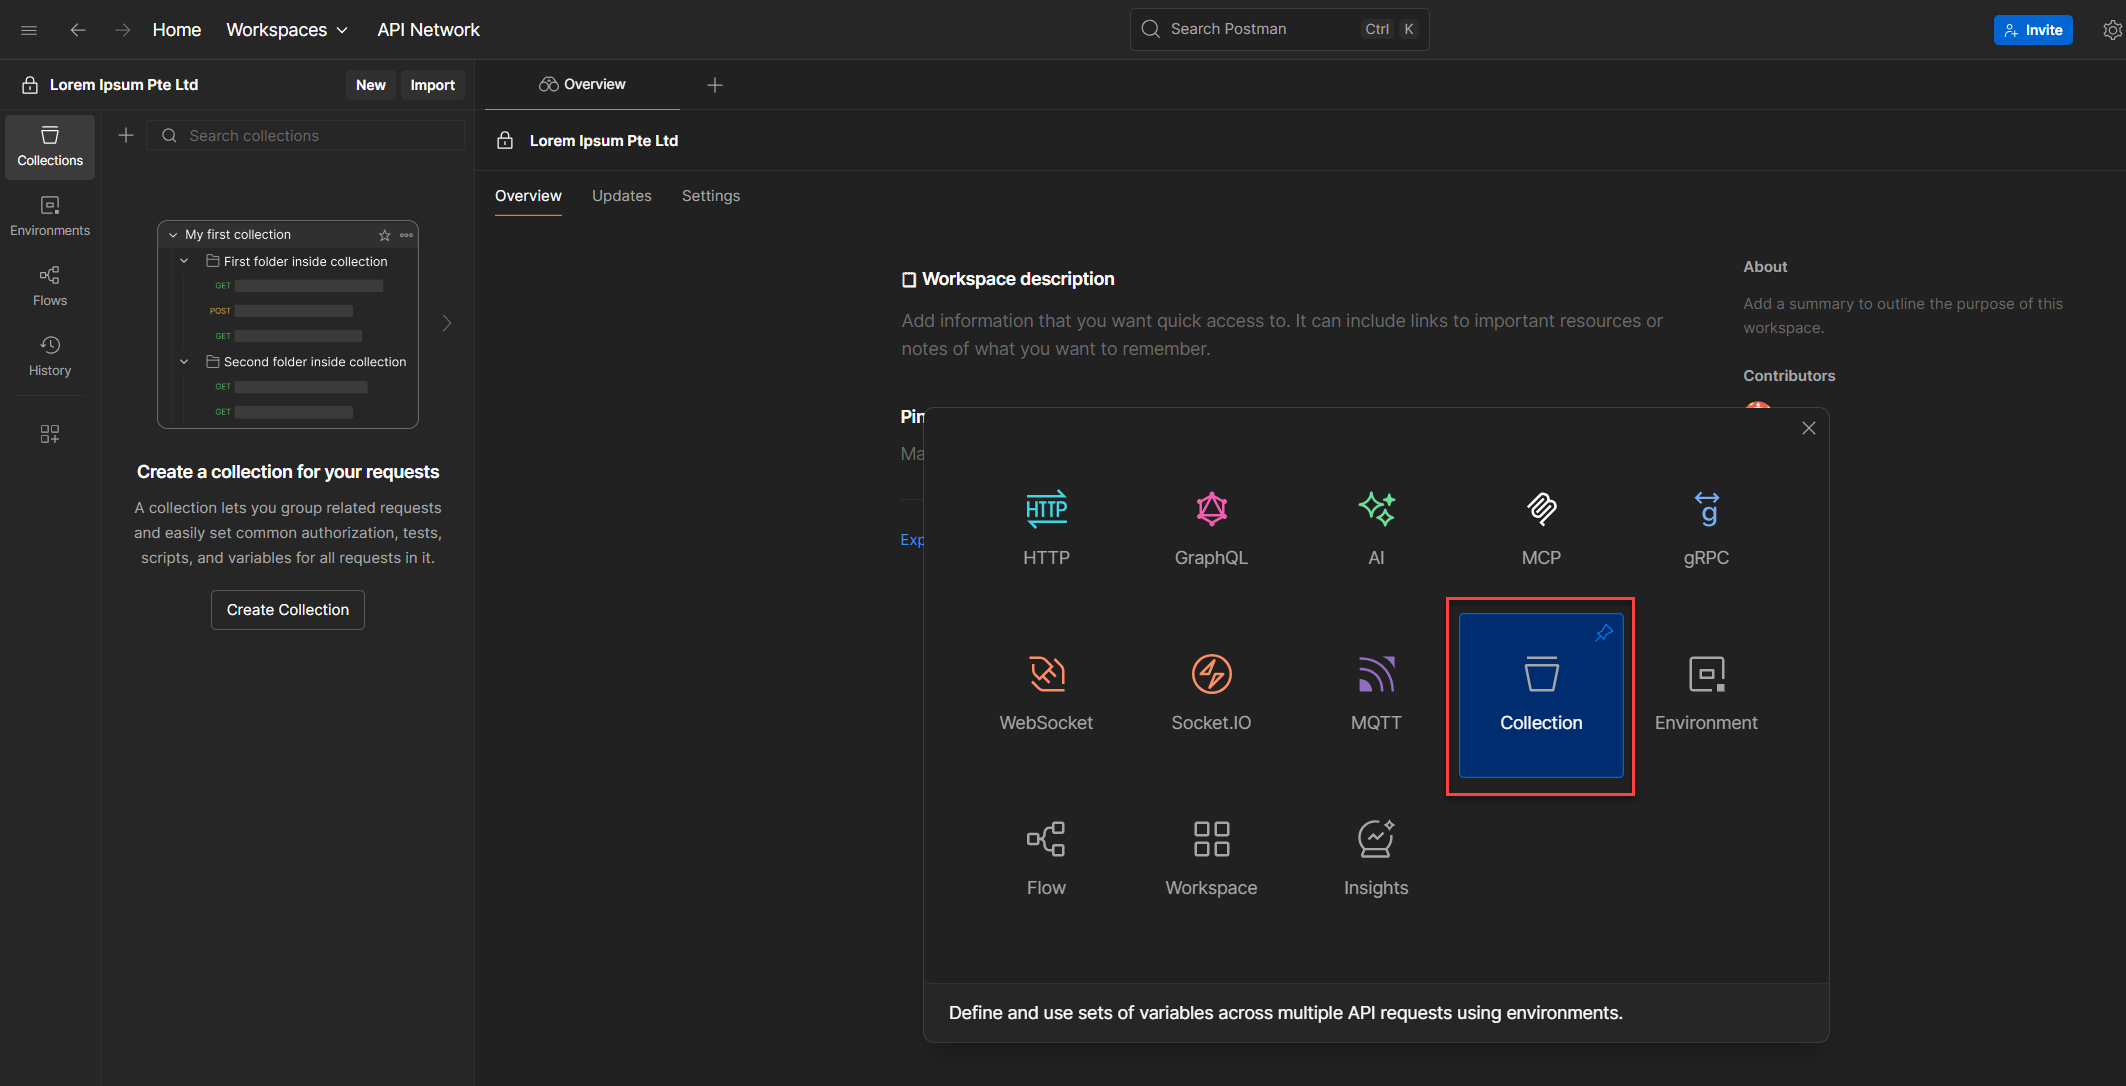
2. From the options, select Collection. This will create a folder that will hold all your HTTP requests for this flow.
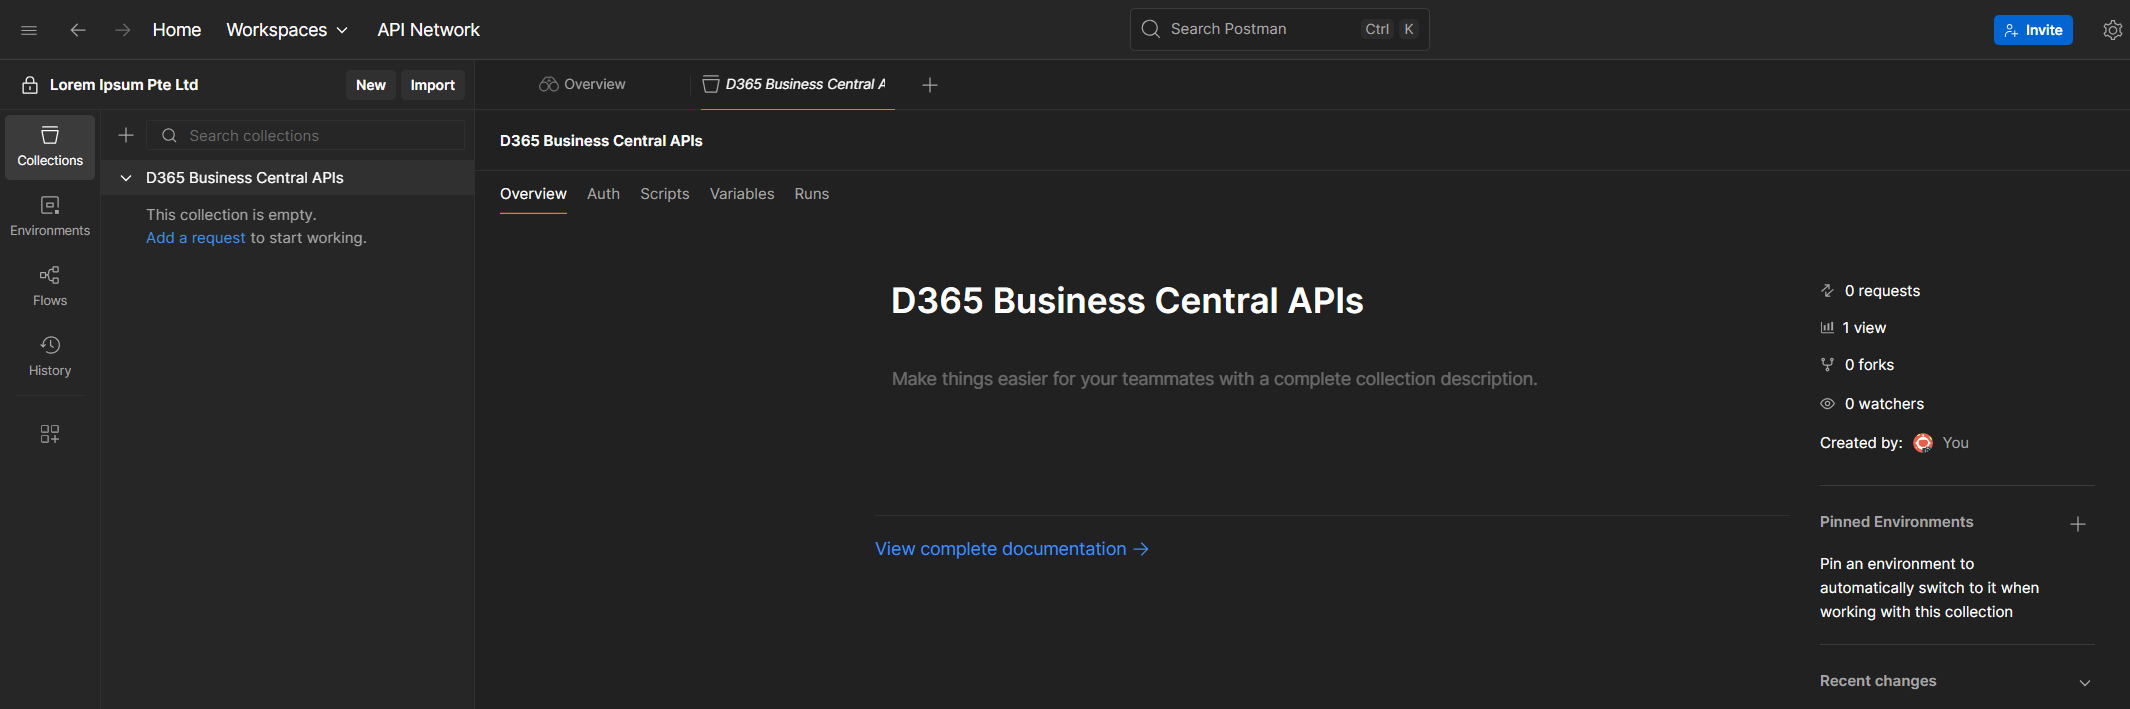
3. Once the collection appears in the sidebar, right-click it and choose Rename.
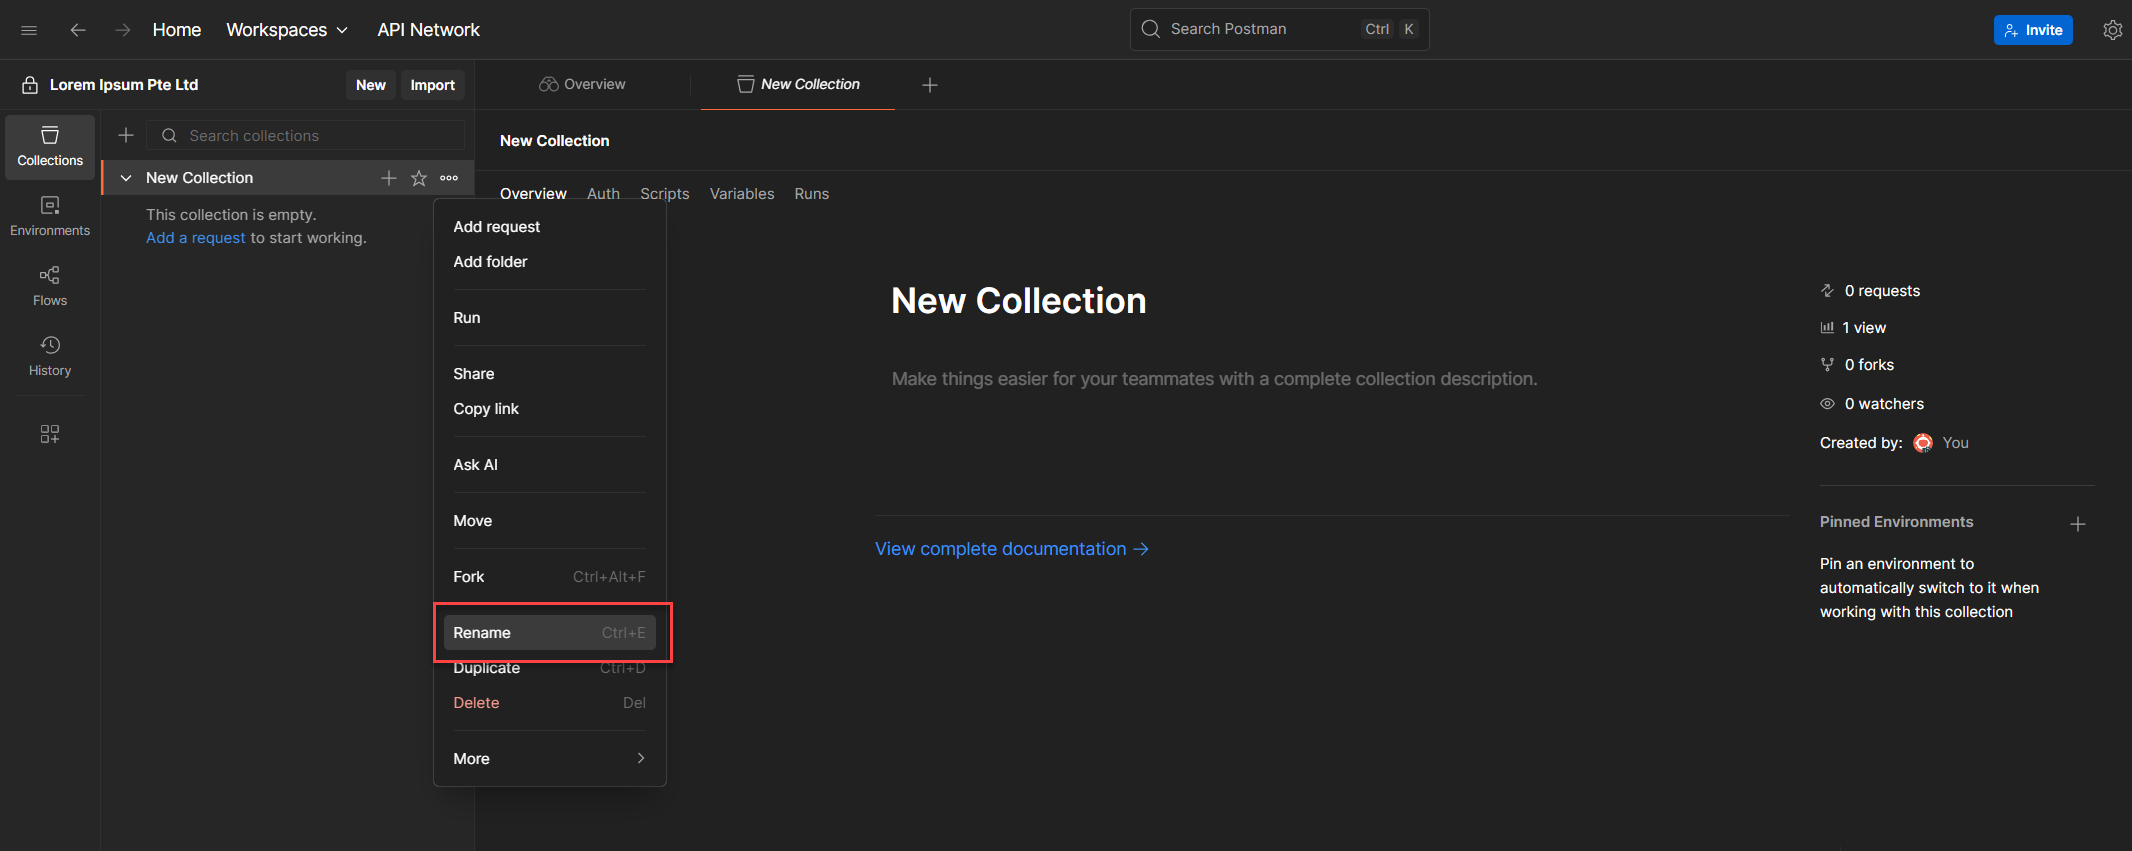
4. Give it a descriptive name, something that makes sense to you and anyone who might use it later. For this walkthrough, let’s call it: D365 Business Central APIs
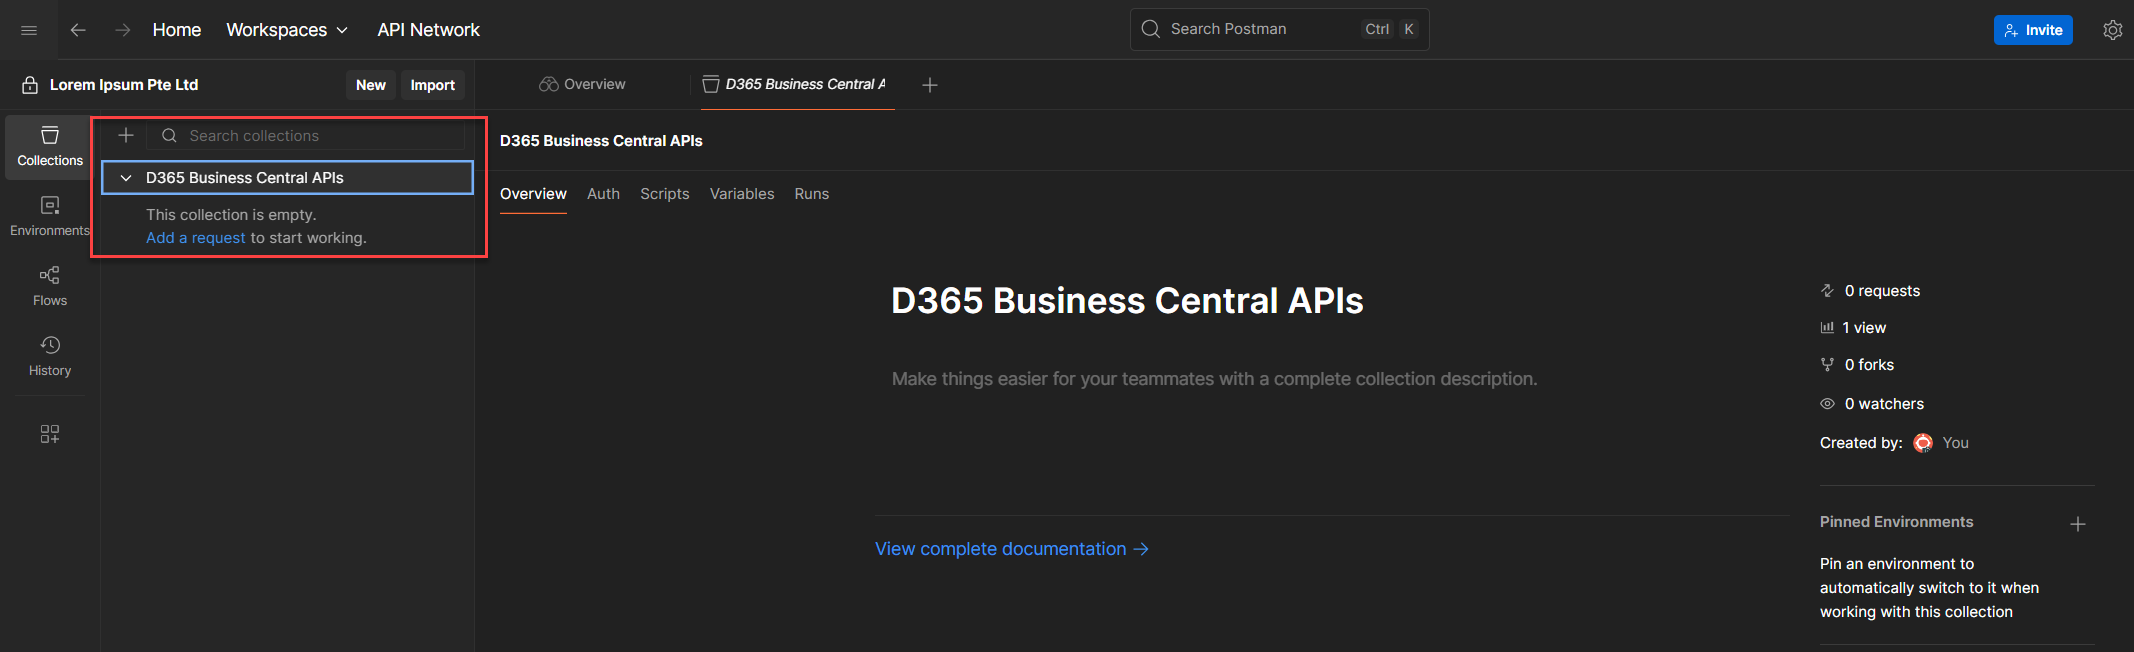
💡 Another not so boooooooooooring Tip: Naming matters. Period. A clear name helps you trace what this collection is for, especially when you revisit it weeks or months later.
And that’s a wrap, you’ve now created a Postman Collection inside your workspace. Next up: we’ll create your first request and wire it to your token flow.
Creating a Request
If you’re still here, that means I’ve caught your interest and I’m not letting go just yet.
So far, we’ve created a workspace. Then we built a collection, a space to group related requests. Think of it like this: if you’re working with Shopify APIs, you’d want a dedicated collection just for those calls. It’s clean, it’s organized, and it saves you from future headaches.
Now, let’s test our OAuth2 setup.
There are two ways I’ve tried, and can think of. Let’s start with the hard way. Because why not? Sometimes the hard way teaches you more.
Method 1: The Old School Way (Per HTTP Request Token)
If you’ve made it this far, you’re clearly curious, and I respect that. Let’s walk through the more manual method of testing OAuth2: assigning a token per request. It’s a bit old school, but it teaches you what’s happening under the hood.
Step-by-step
1. Go to the Postman Collection you created earlier.
2. Click New (it’s the button right before Import).
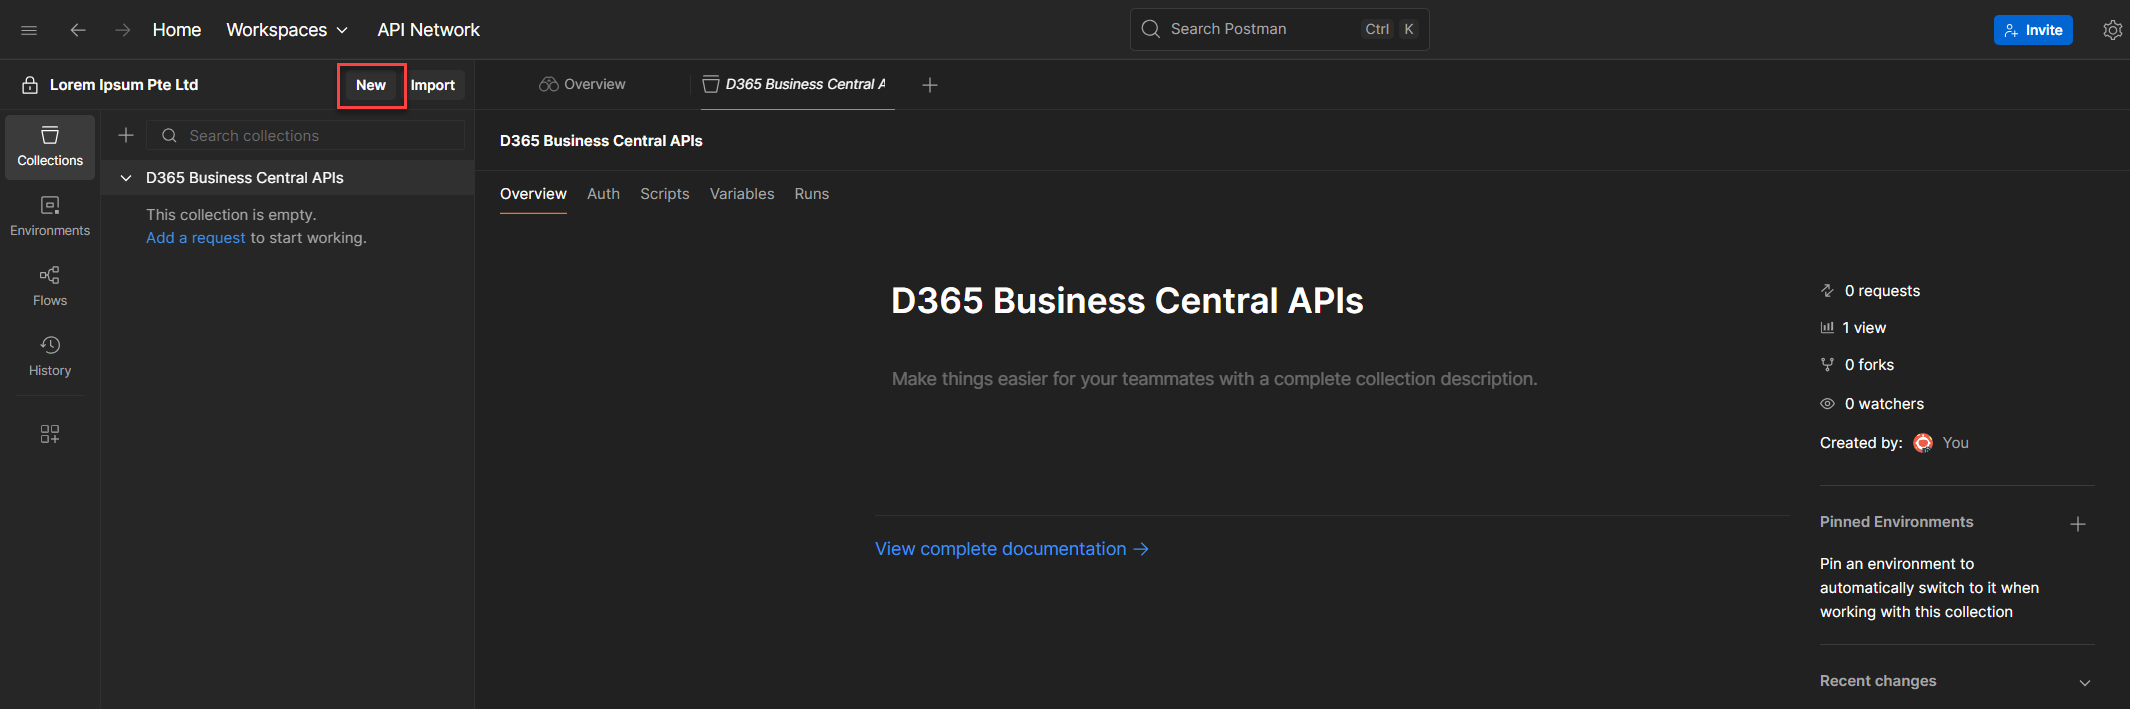
3. Select HTTP Request. This opens a new tab with a default method of GET. Ignore that for now, we’re heading straight to the Authorization tab.

4. You’ll see several tabs: Params, Authorization, Headers, Body, Scripts, and Settings. For now, we’re focusing on Authorization.
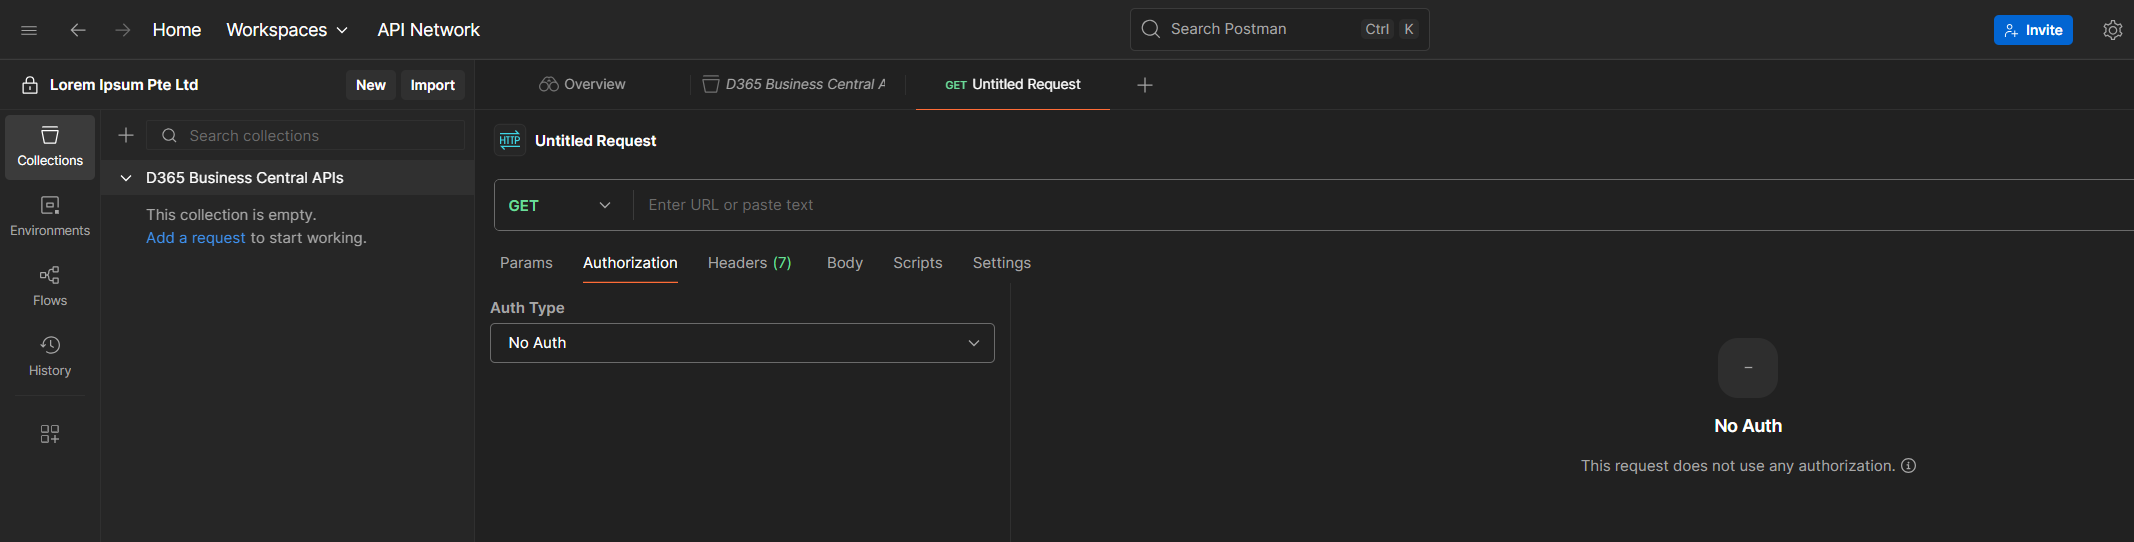
5. In the Authorization tab, click on Auth Type and select OAuth 2.0 from the dropdown.
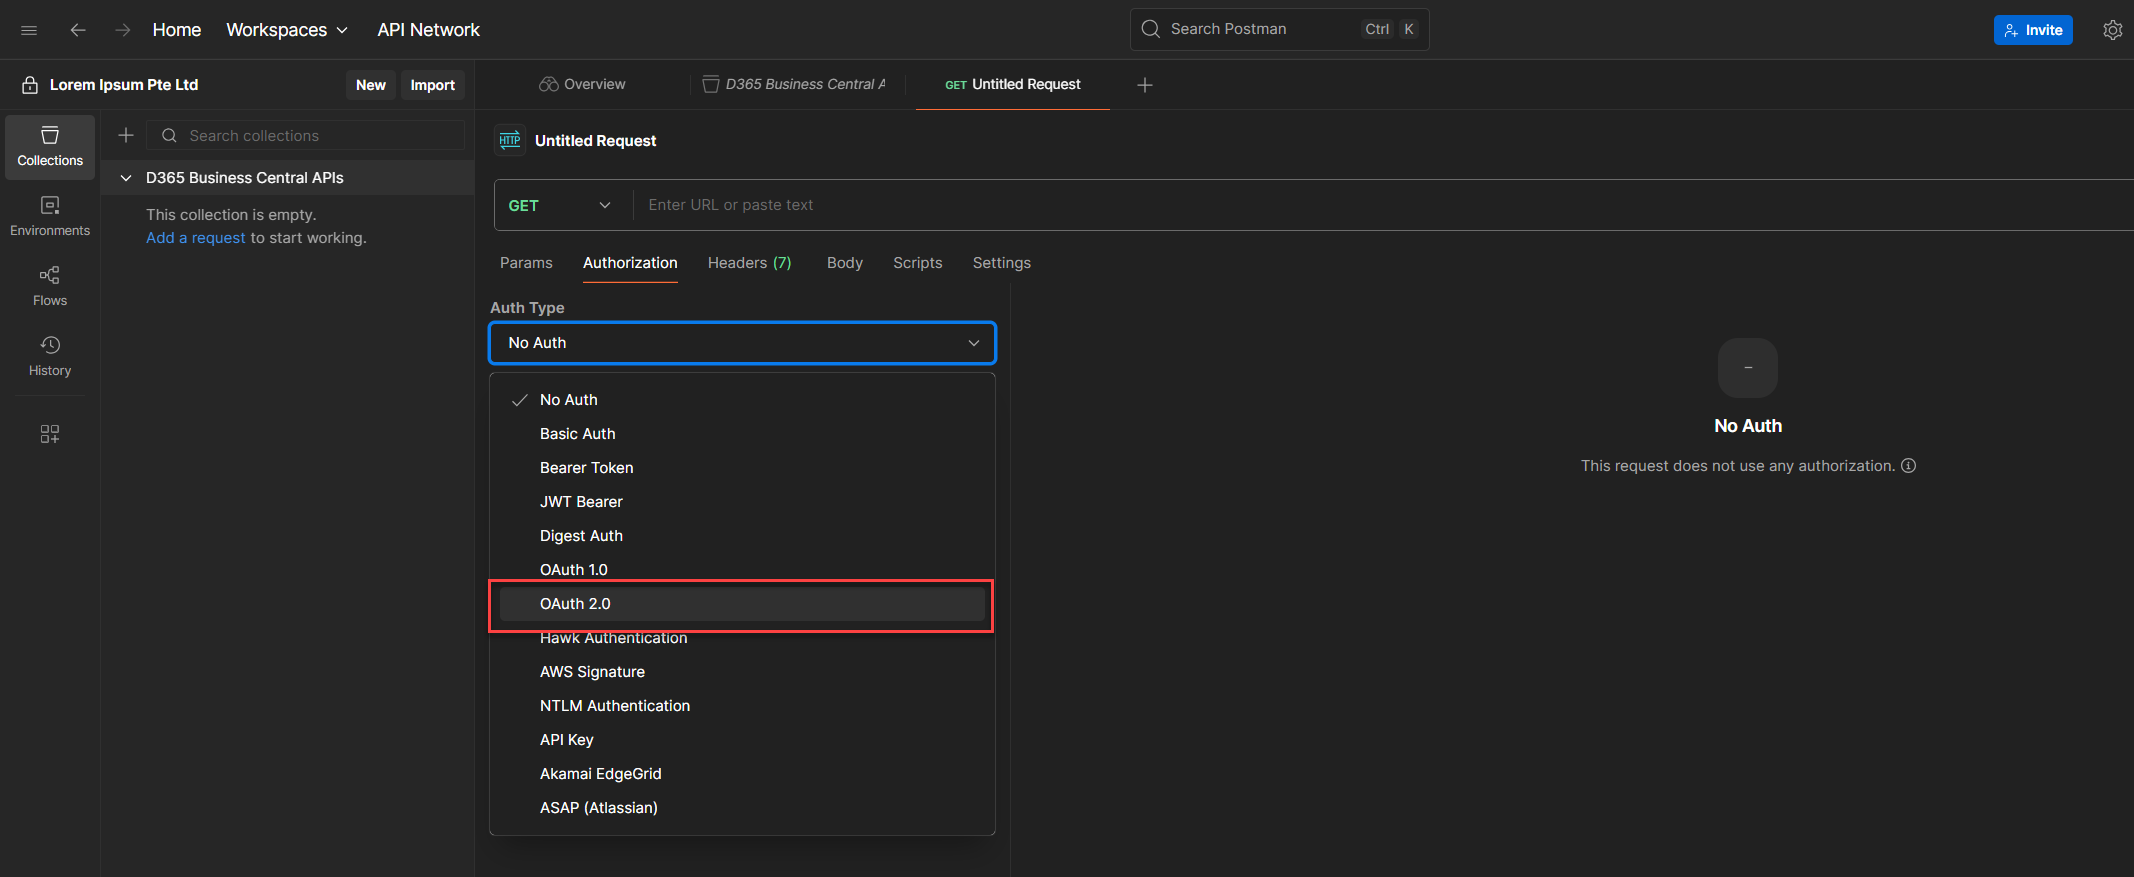
6. Once selected, the dashboard will shift, revealing the OAuth2 configuration panel.
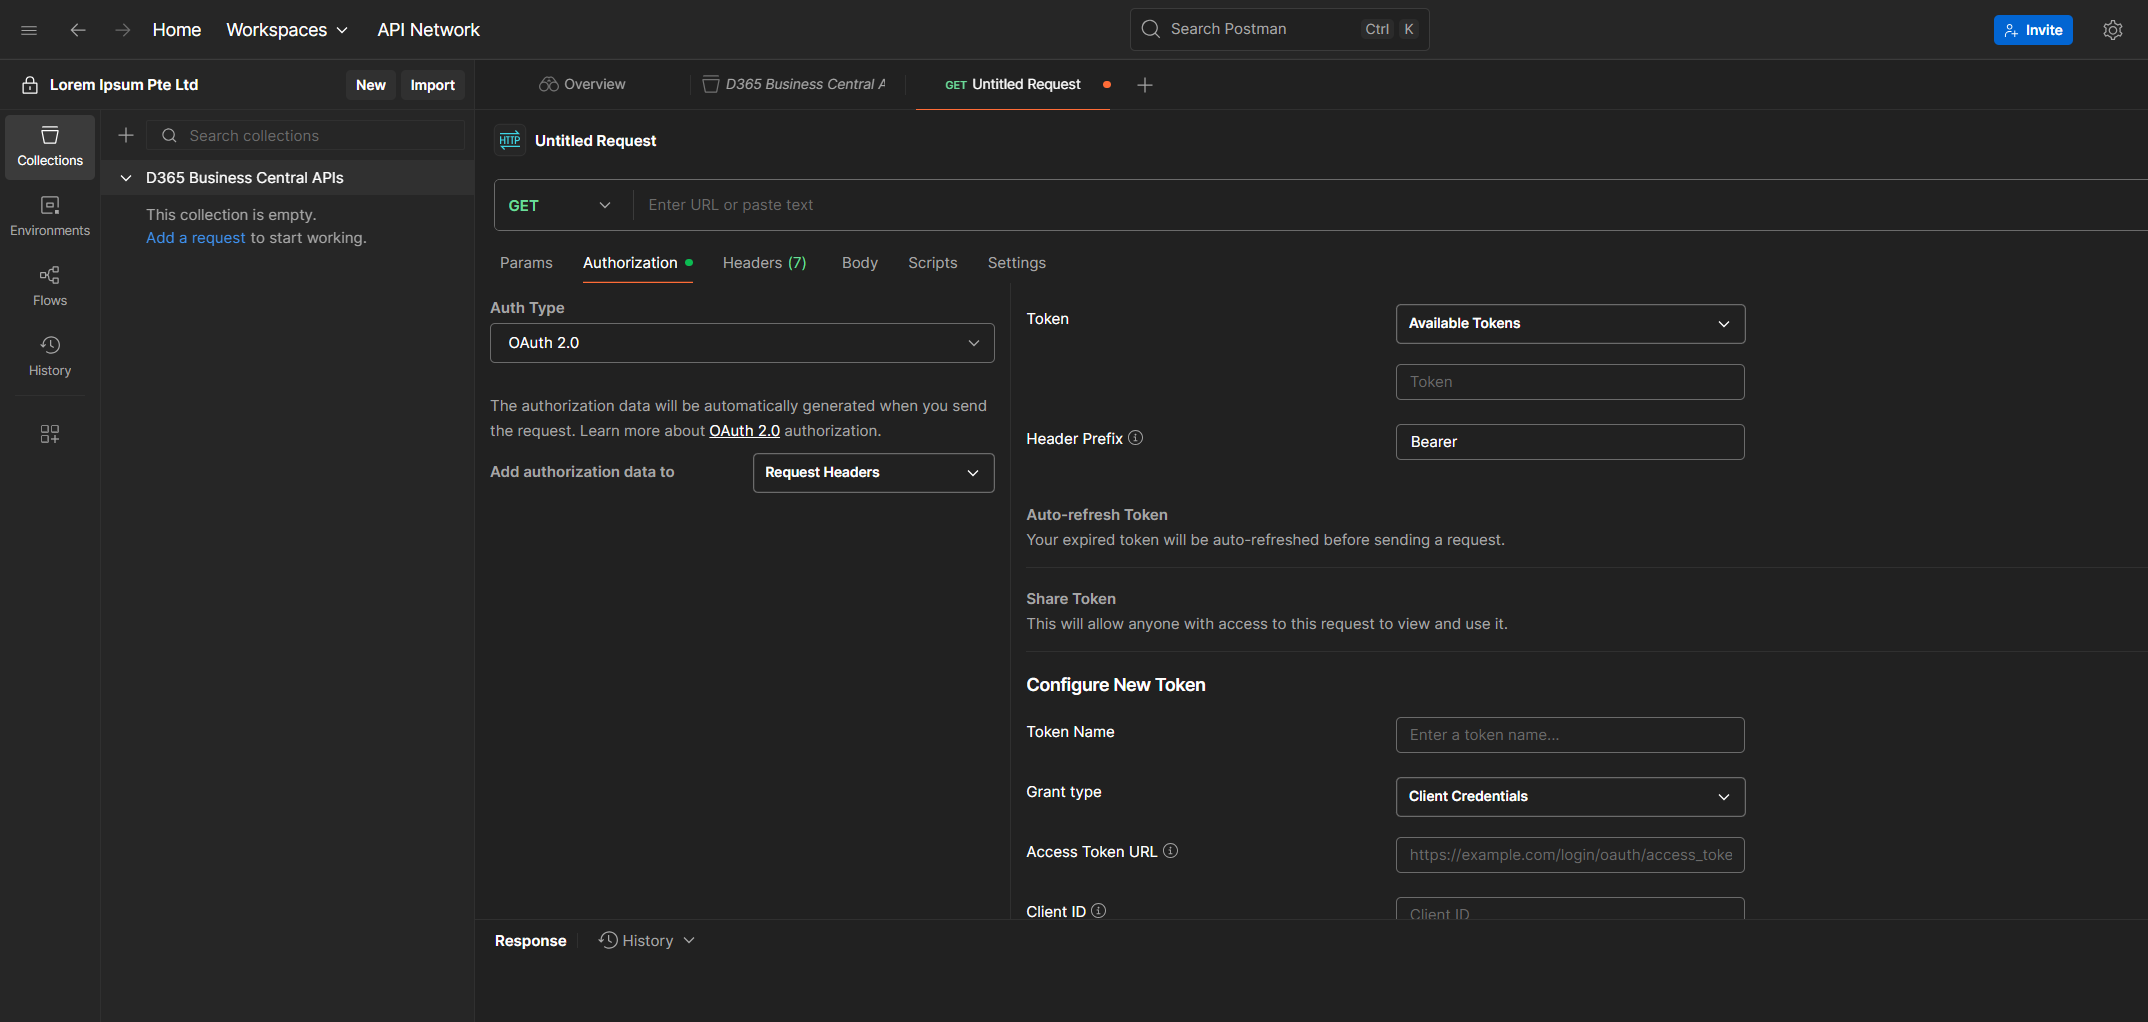
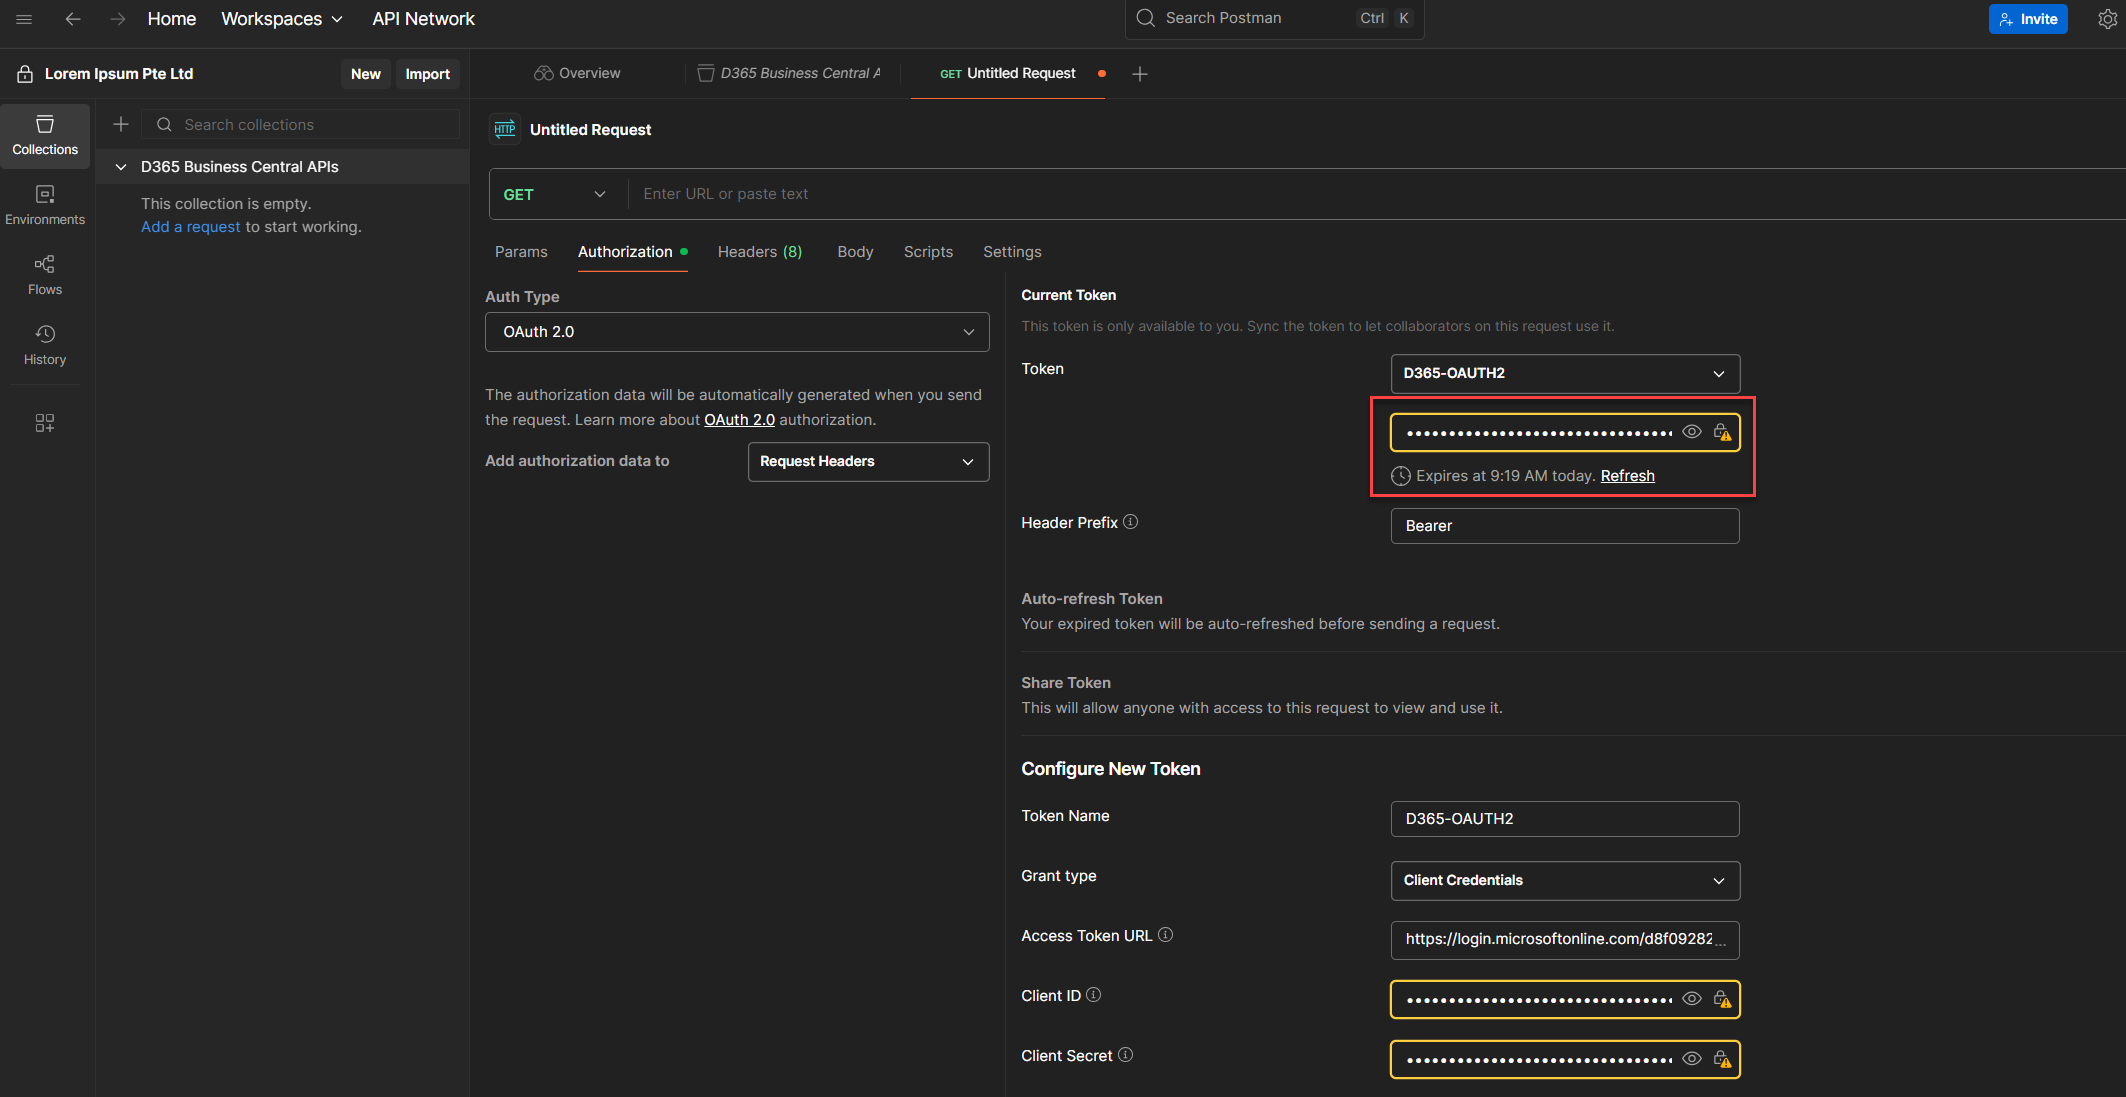
7. Scroll down until you see the section called Configure New Token. Ignore the Current Token section for now. That’s just a placeholder, it’ll store the token once we generate it. For now let's focus on filling up the details we need. (See below guidelines for the parameters we need to supply)
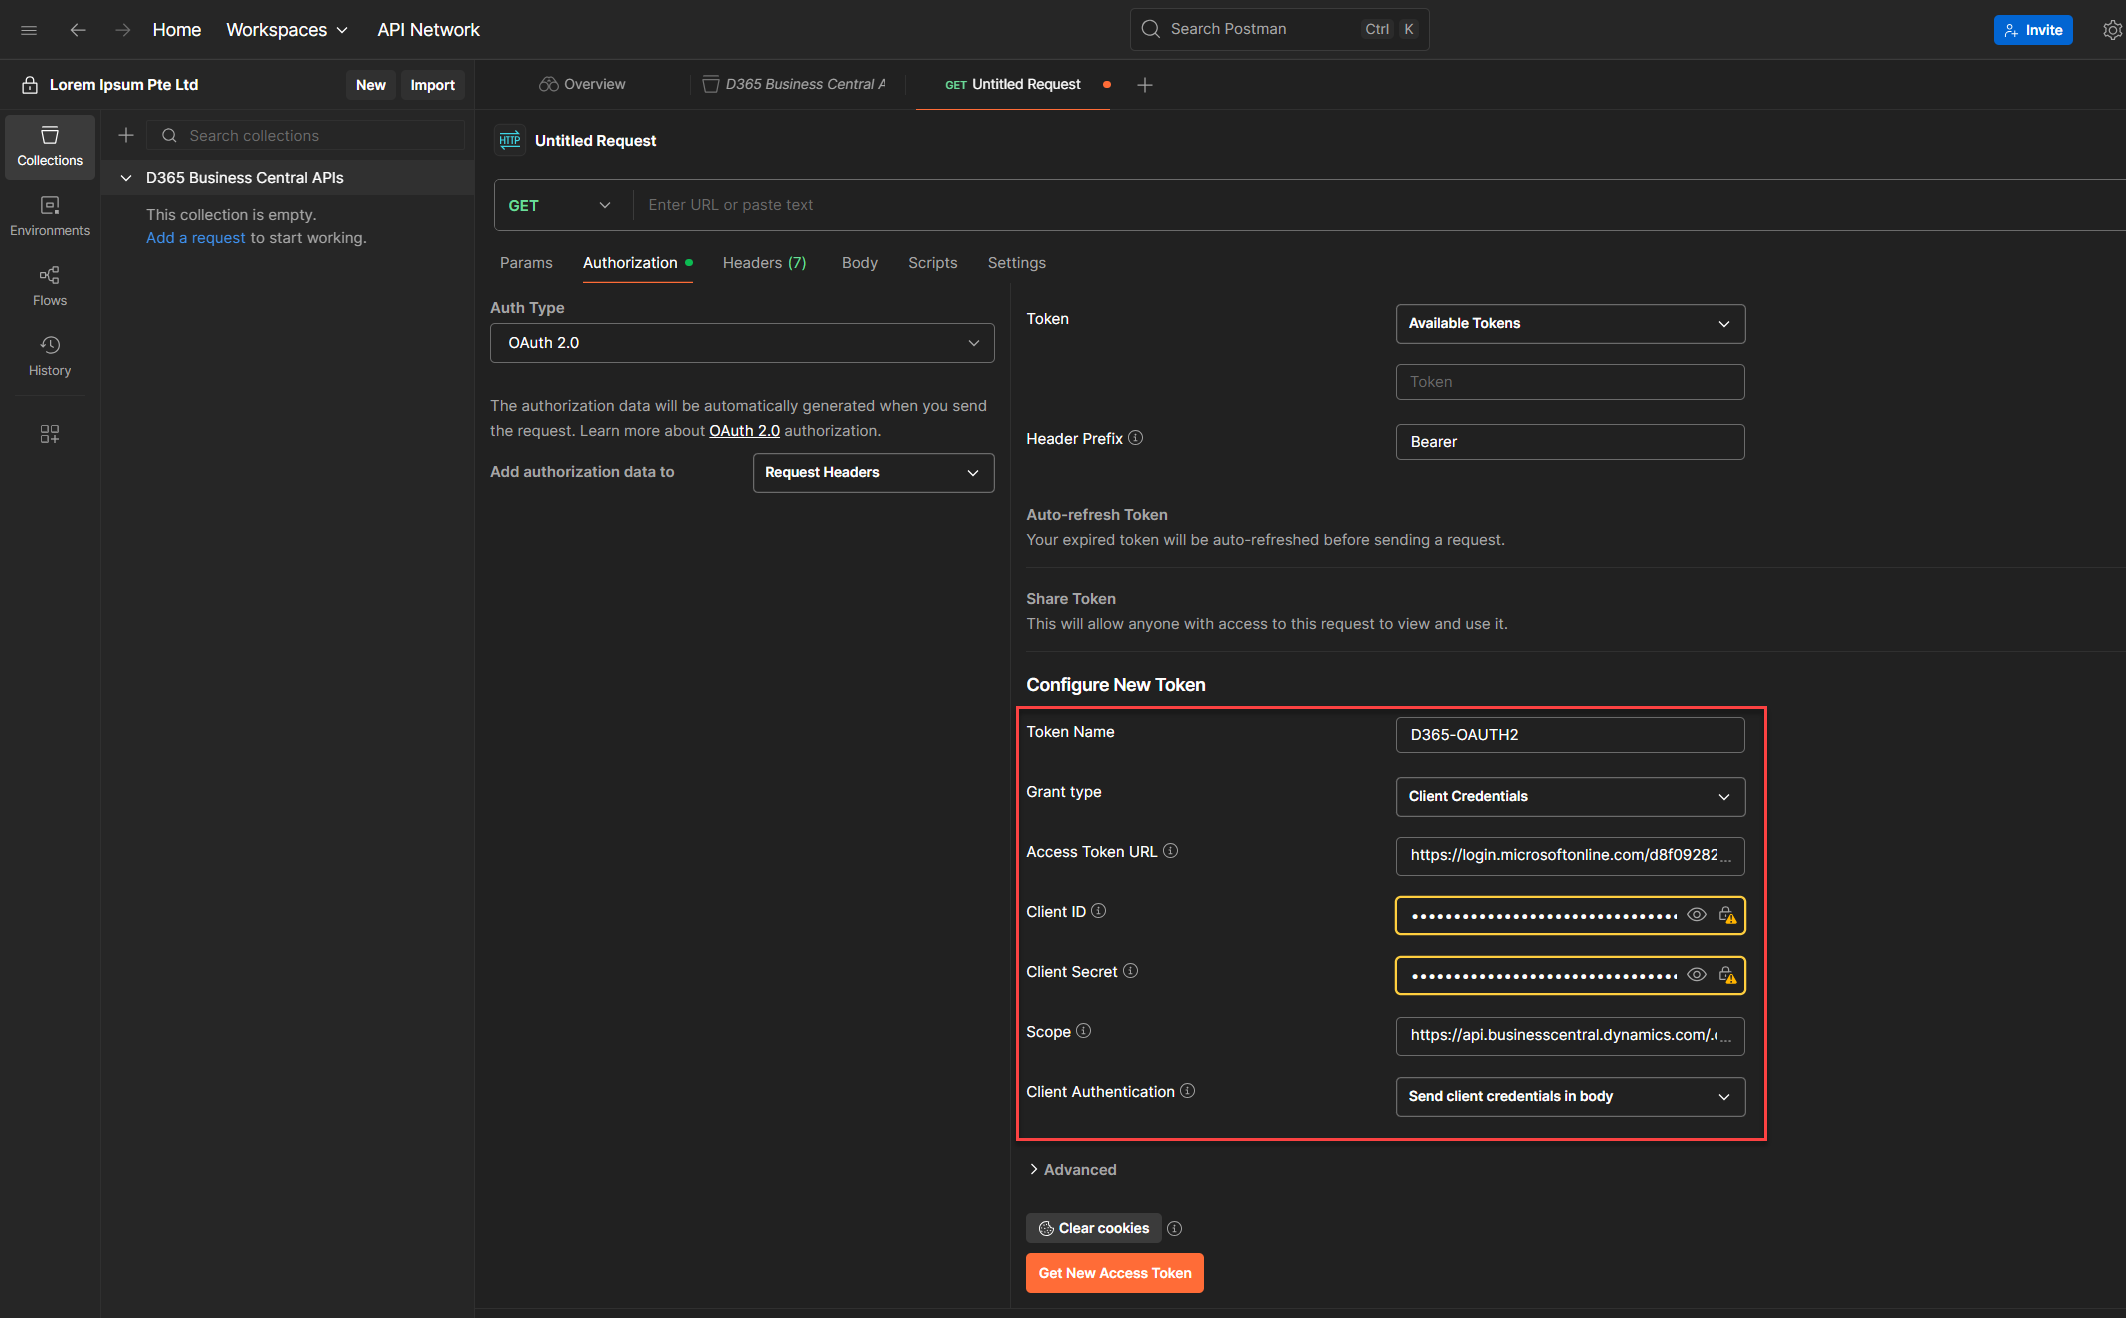
8. Once everything’s filled out, click Get New Access Token.
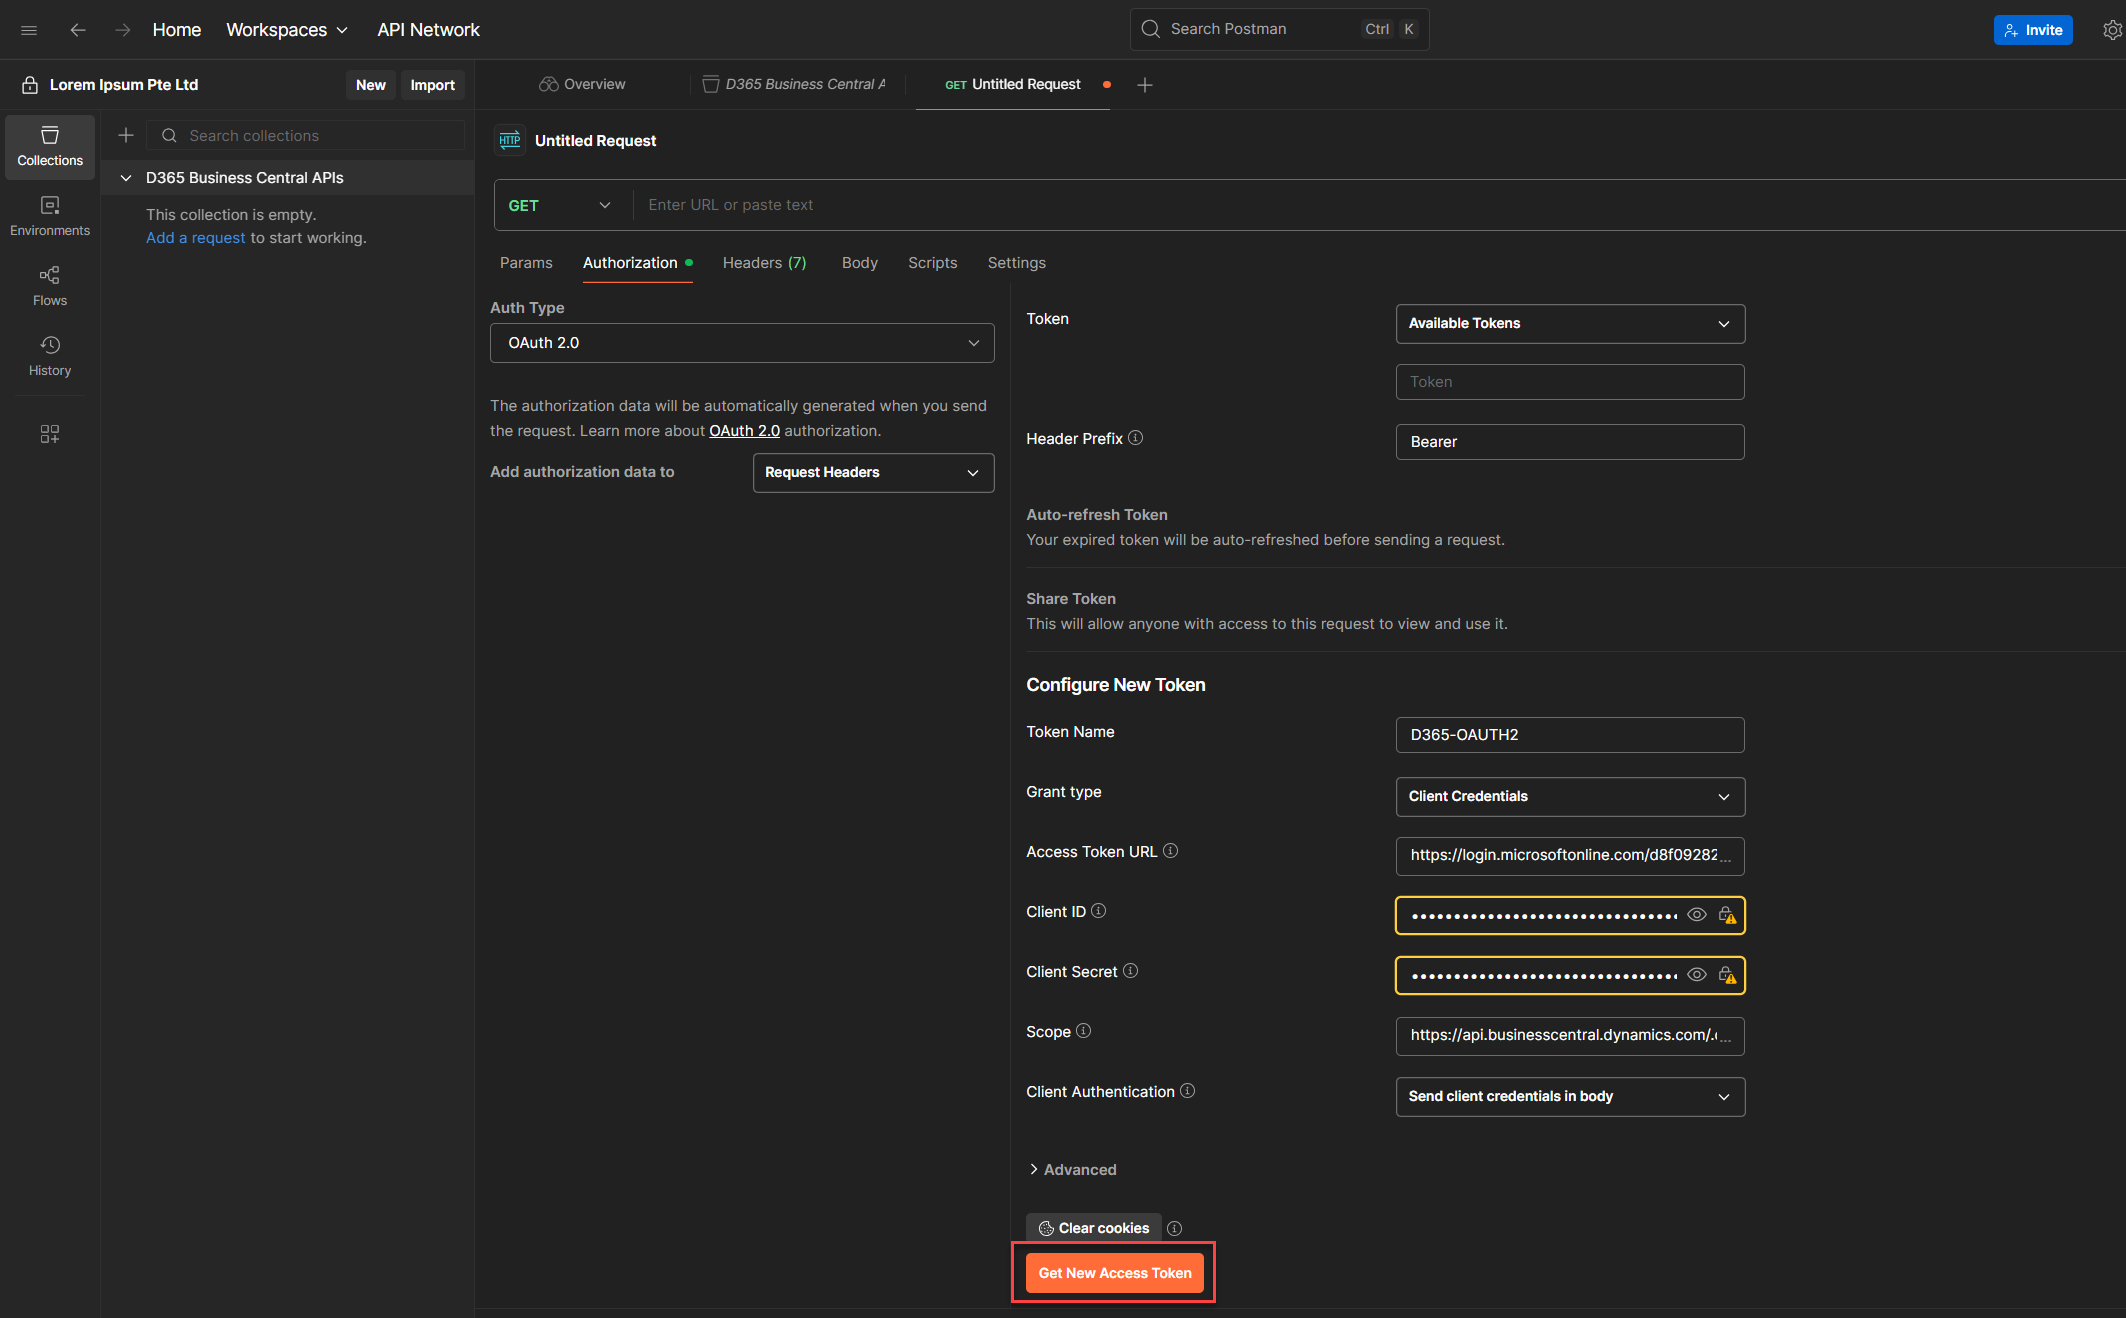
9. You’ll see a progress bar or message saying “Collecting access token…”
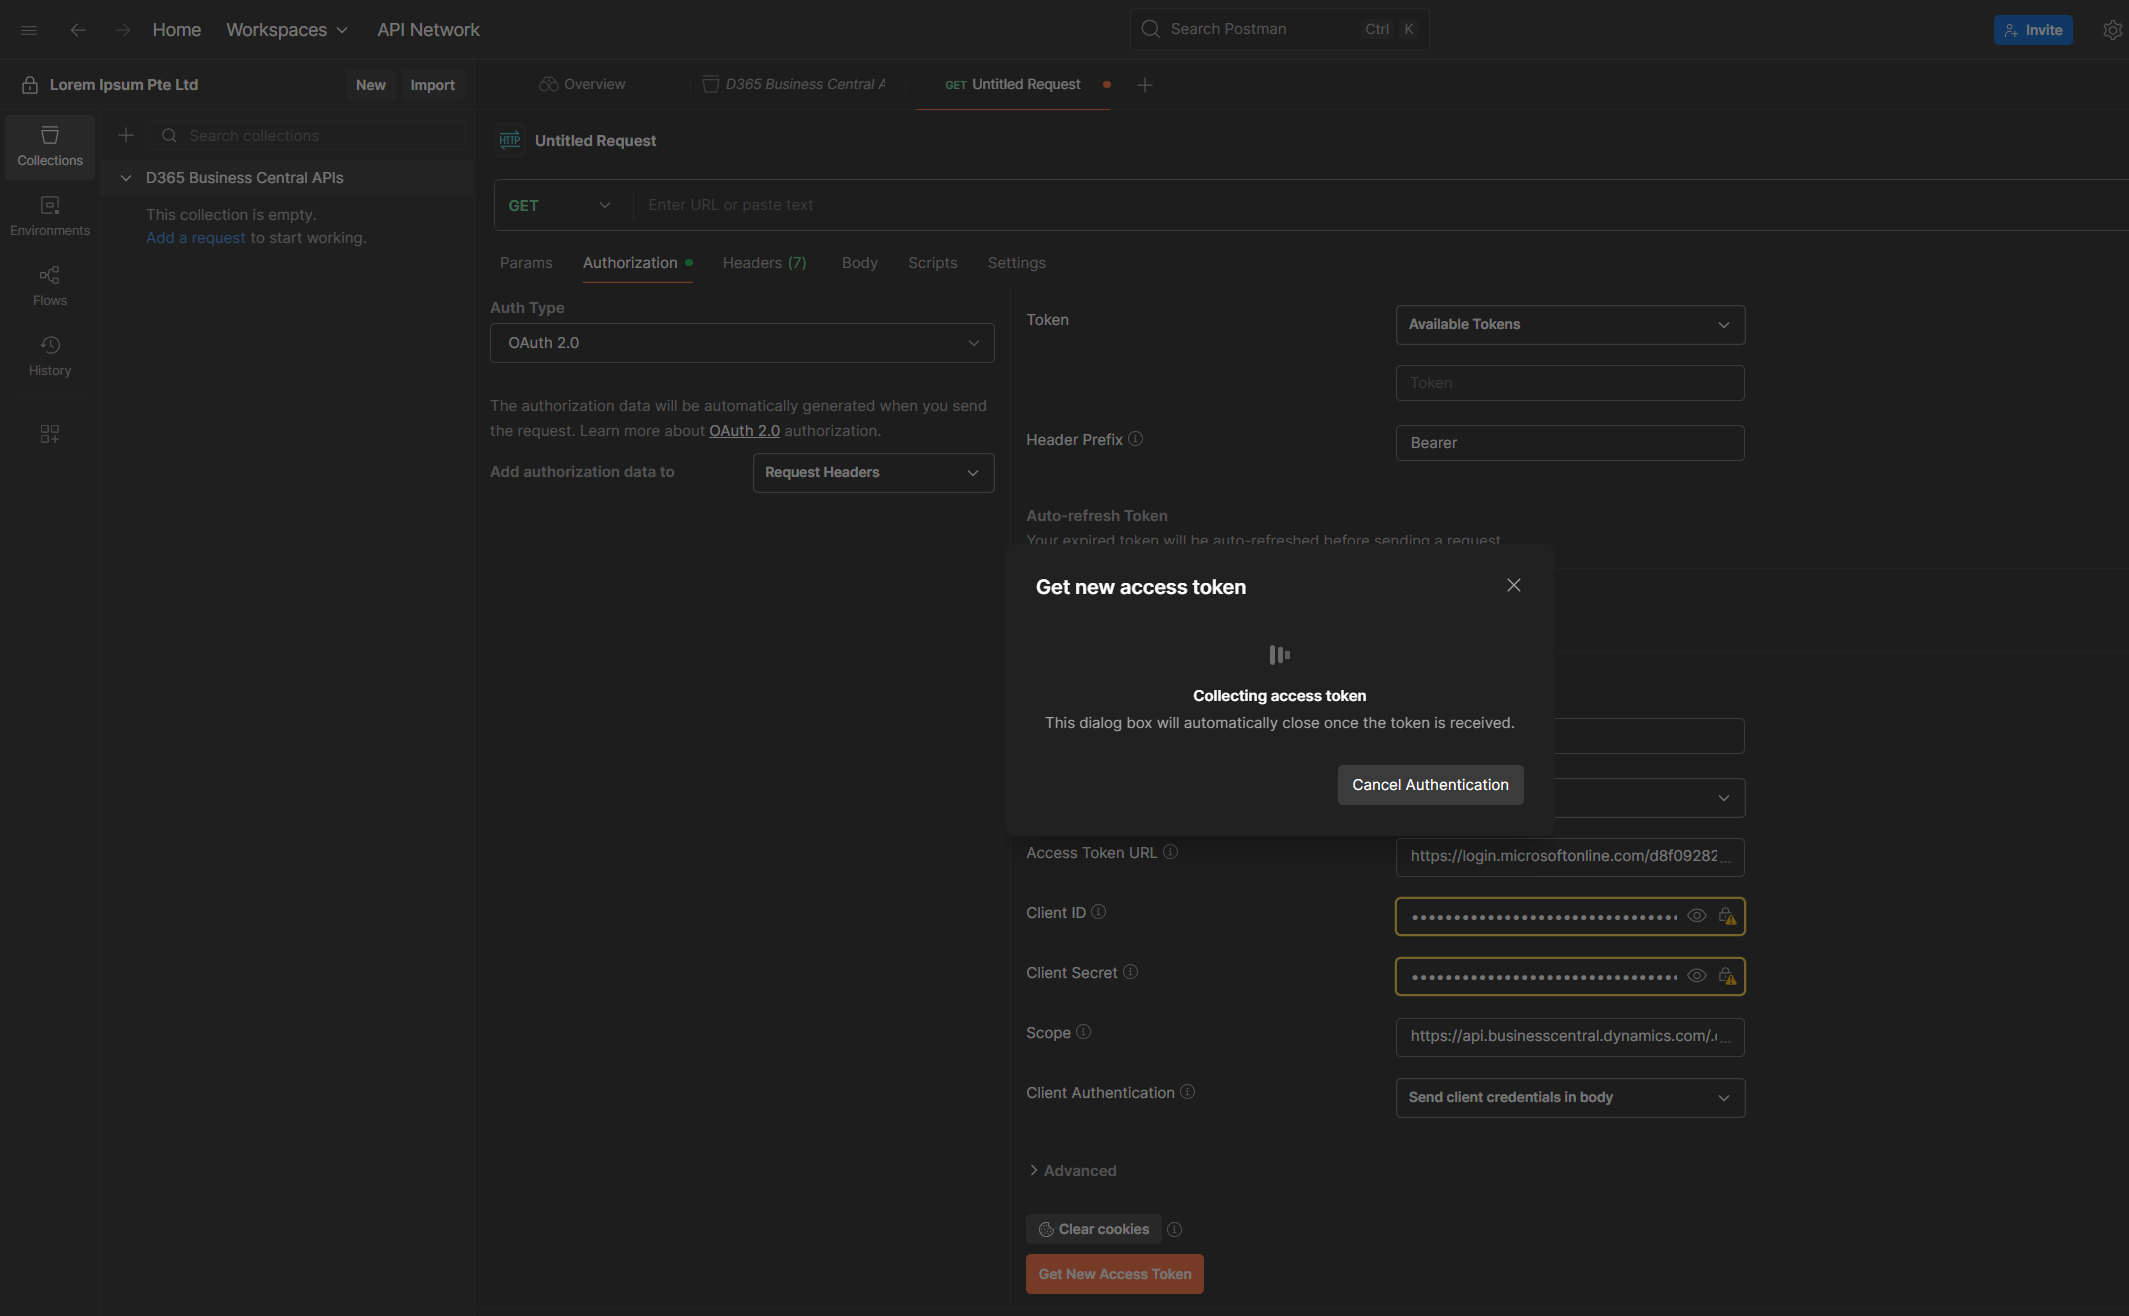
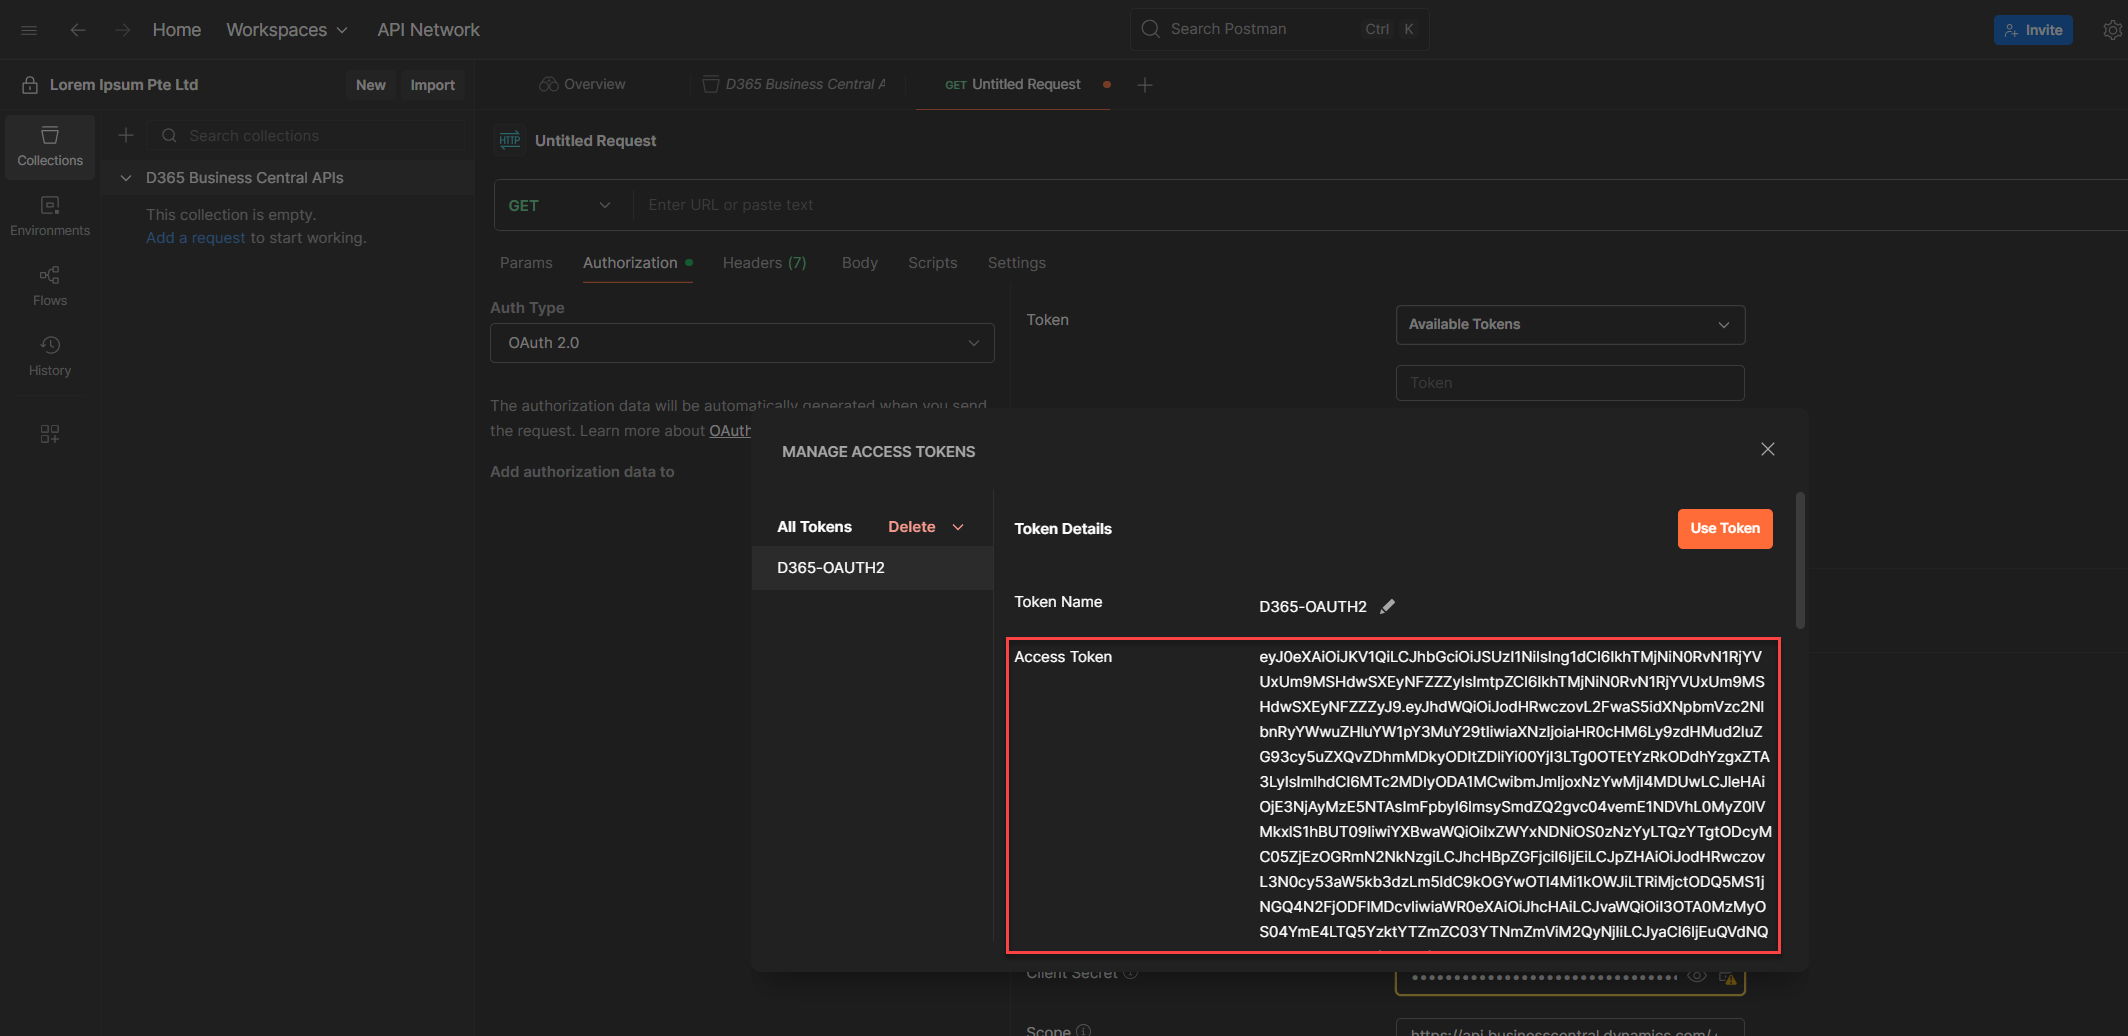
10. If all goes well, your token will be generated and stored in the Current Token section.
💡 Heads-up (a.k.a. Token Tunnel Vision):
This method stores the token per request. It’s solid for testing, but clunky when you’re working across multiple endpoints. You’ll end up copy-pasting tokens like it’s 2012. We’ll cover the cleaner, scalable way next, promise.
Method 2: The GOAT (A dedicated HTTP request just to fetch the access token)
If Method 1 felt a bit clunky, this one’s smoother. It’s the GOAT for a reason: you get the token once, store it, and reuse it across requests. No more clicking through dropdowns or manually injecting tokens per endpoint.
Step-by-step
1. Go to your Postman Collection.
2. Click New (the button before Import).
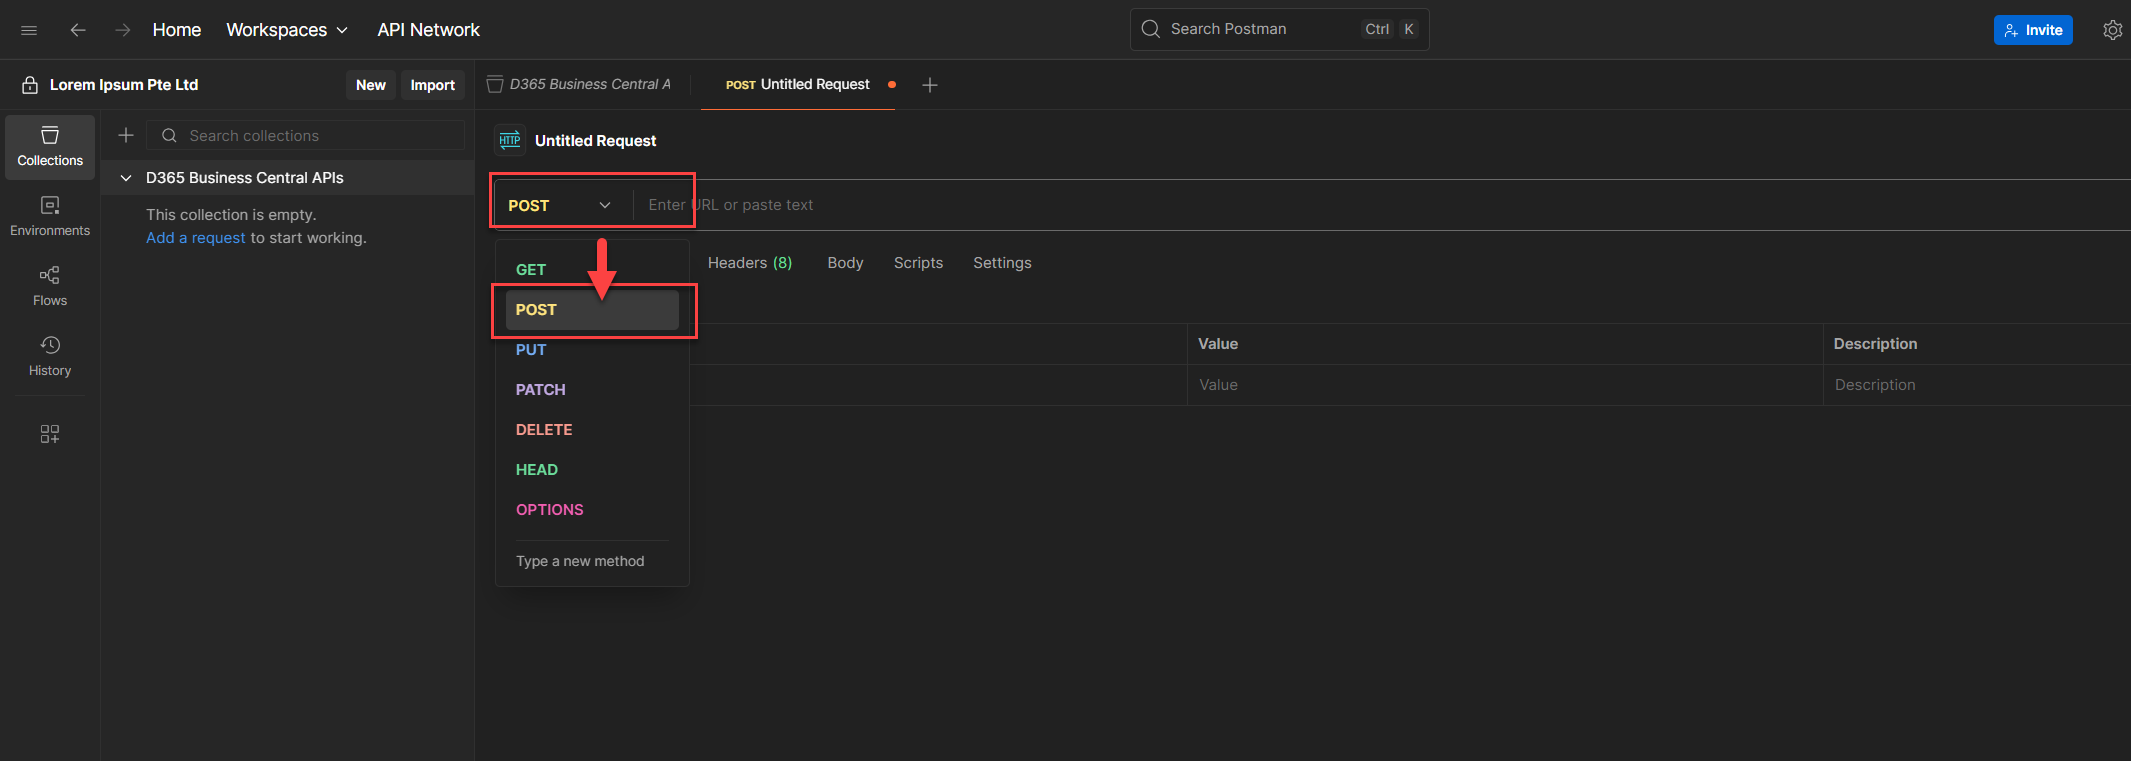
3. Select HTTP Request, and switch the method to POST.
4. In the URL field, paste the token endpoint from earlier. Or use this format:
https://login.microsoftonline.com/{tenantId}/oauth2/v2.0/token
Replace {tenantId} with your actual tenant ID from the environment you’re connecting to.
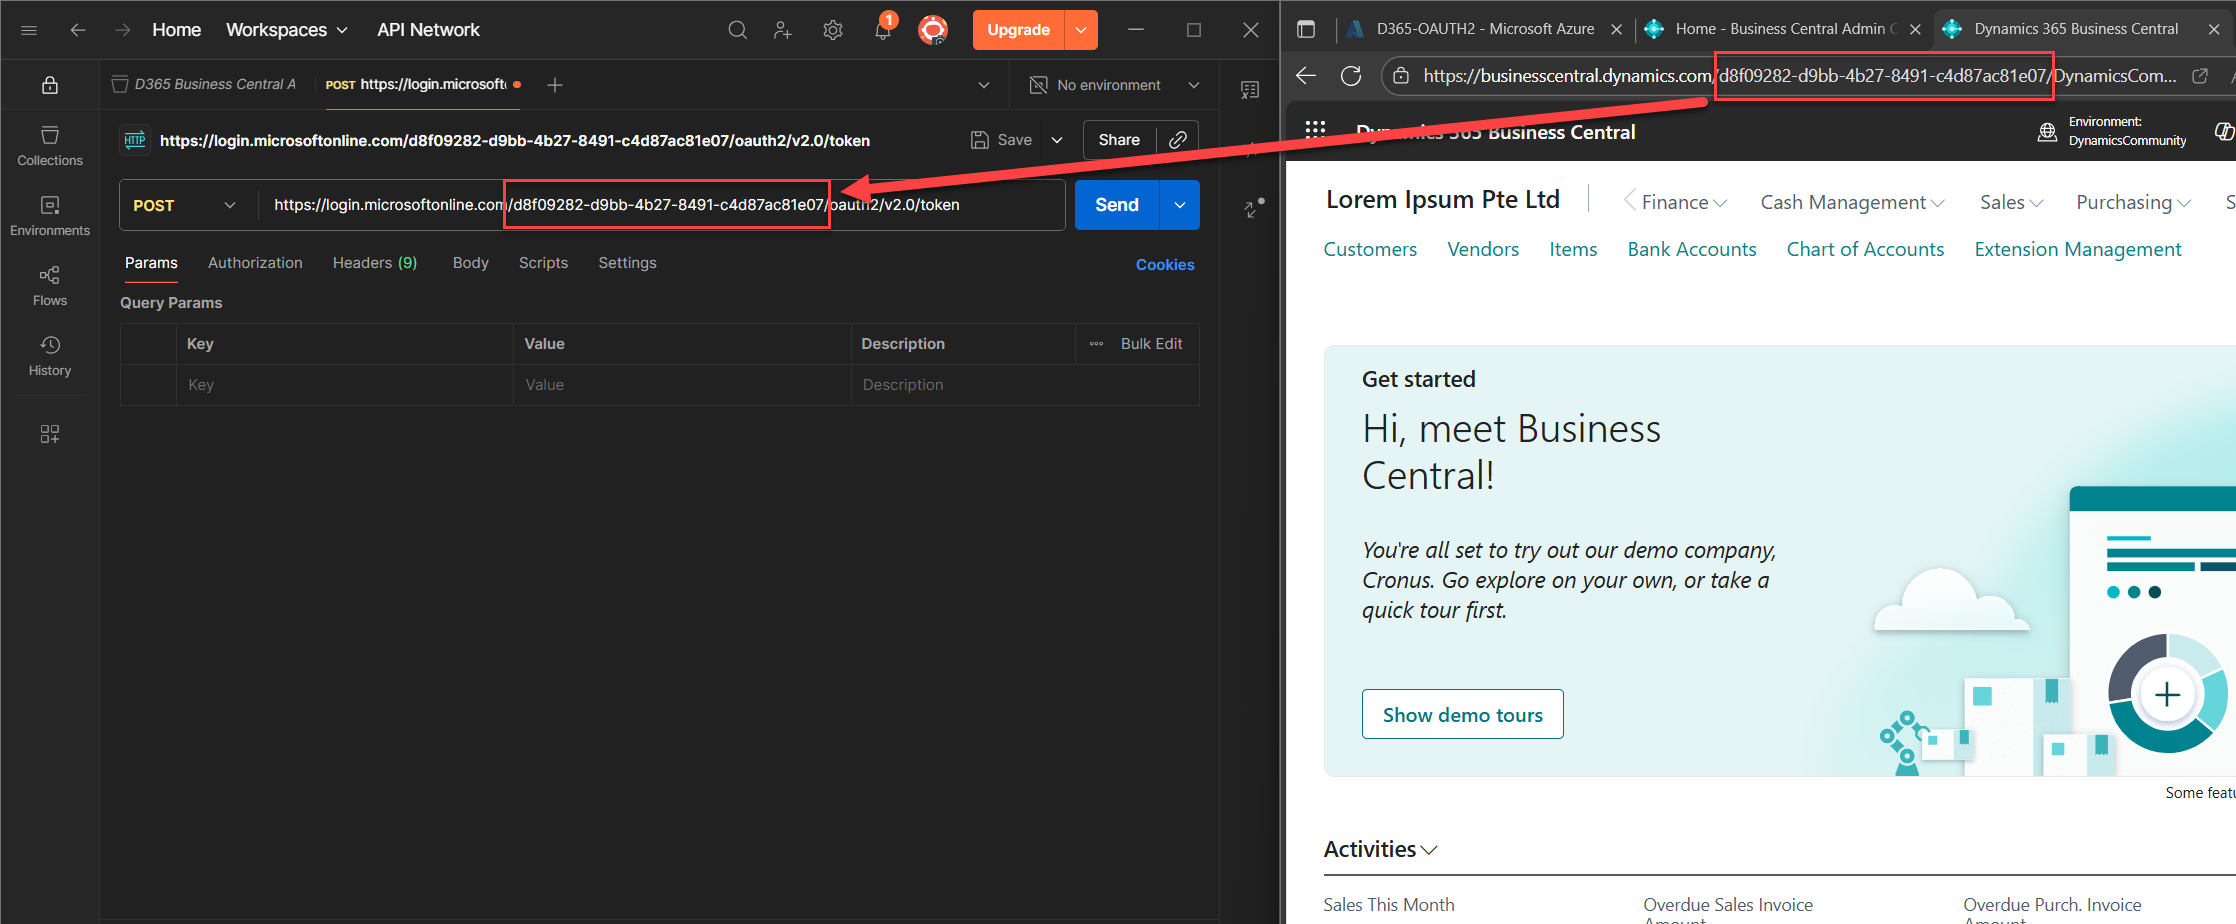
💡 If you forgot where to get your tenant ID, scroll back to Part 1: Register Your Entra App, Assign Business Central Permissions, and Prepare for OAuth2 Token Testing, or check Yun Zhu’s tutorial or the official Microsoft docs. No shame in double-checking.
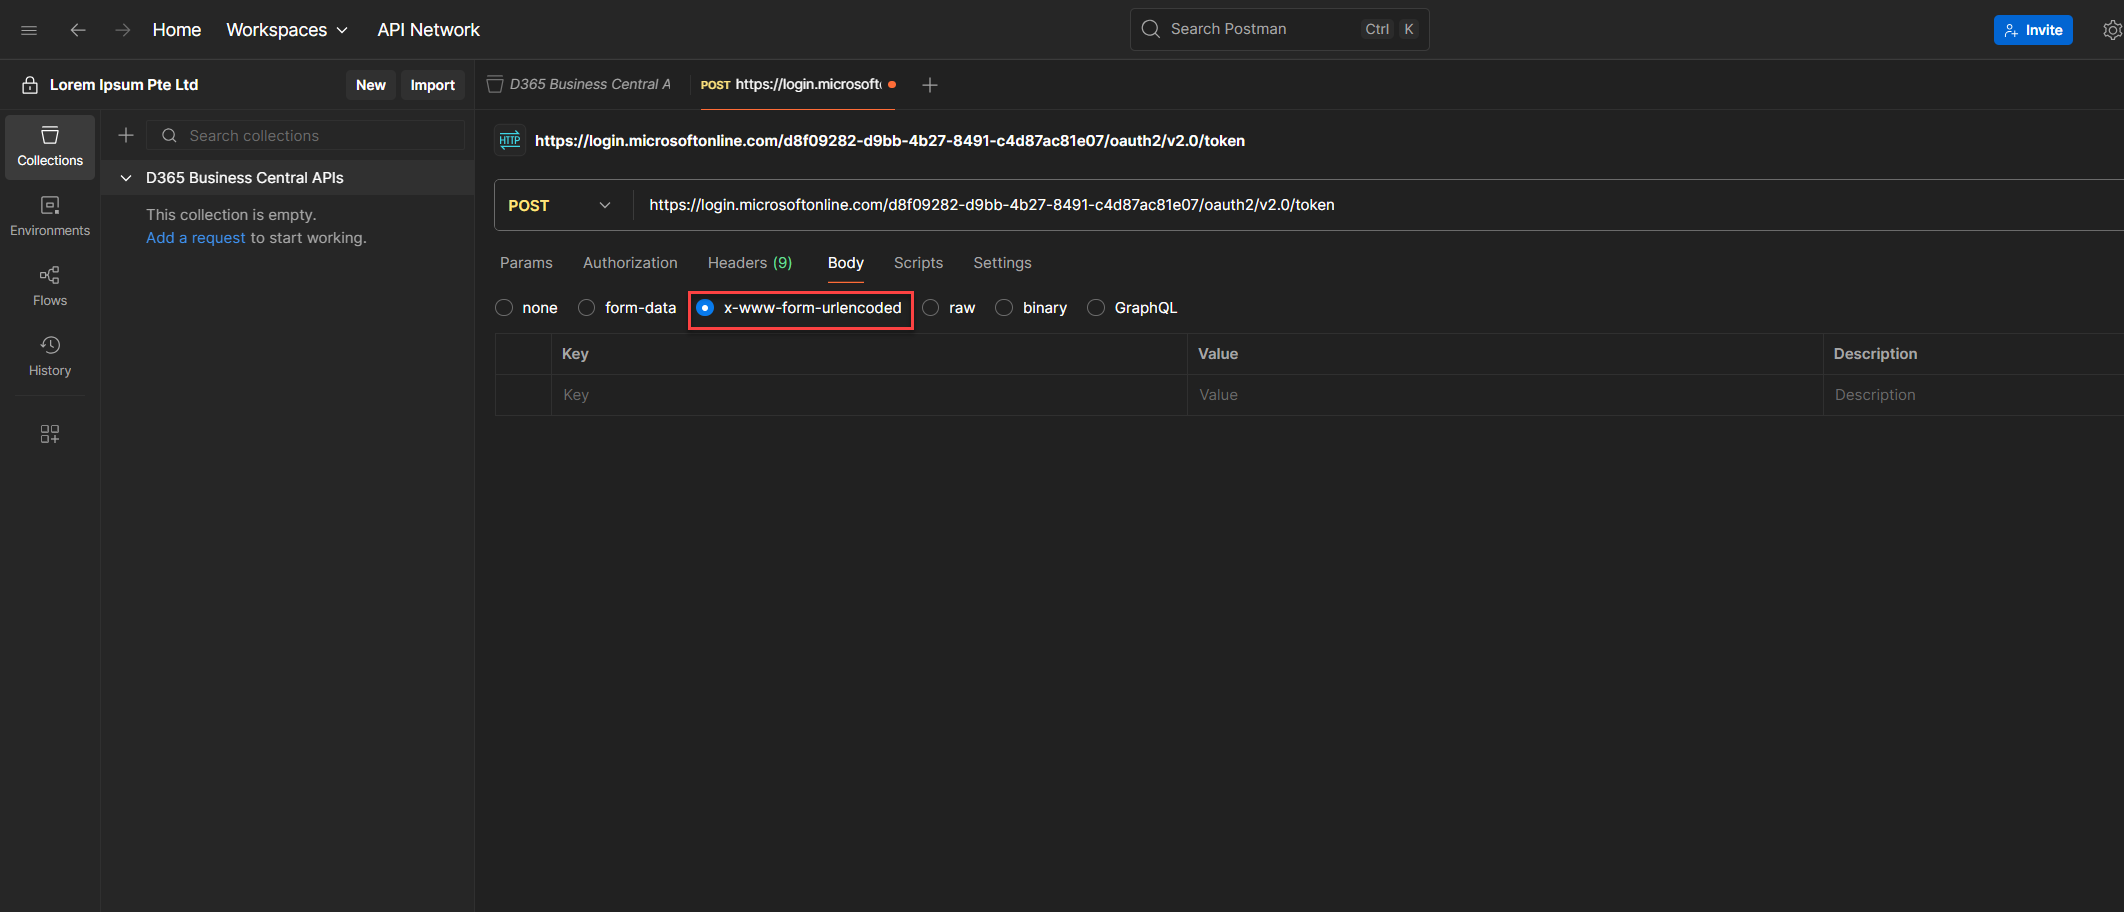
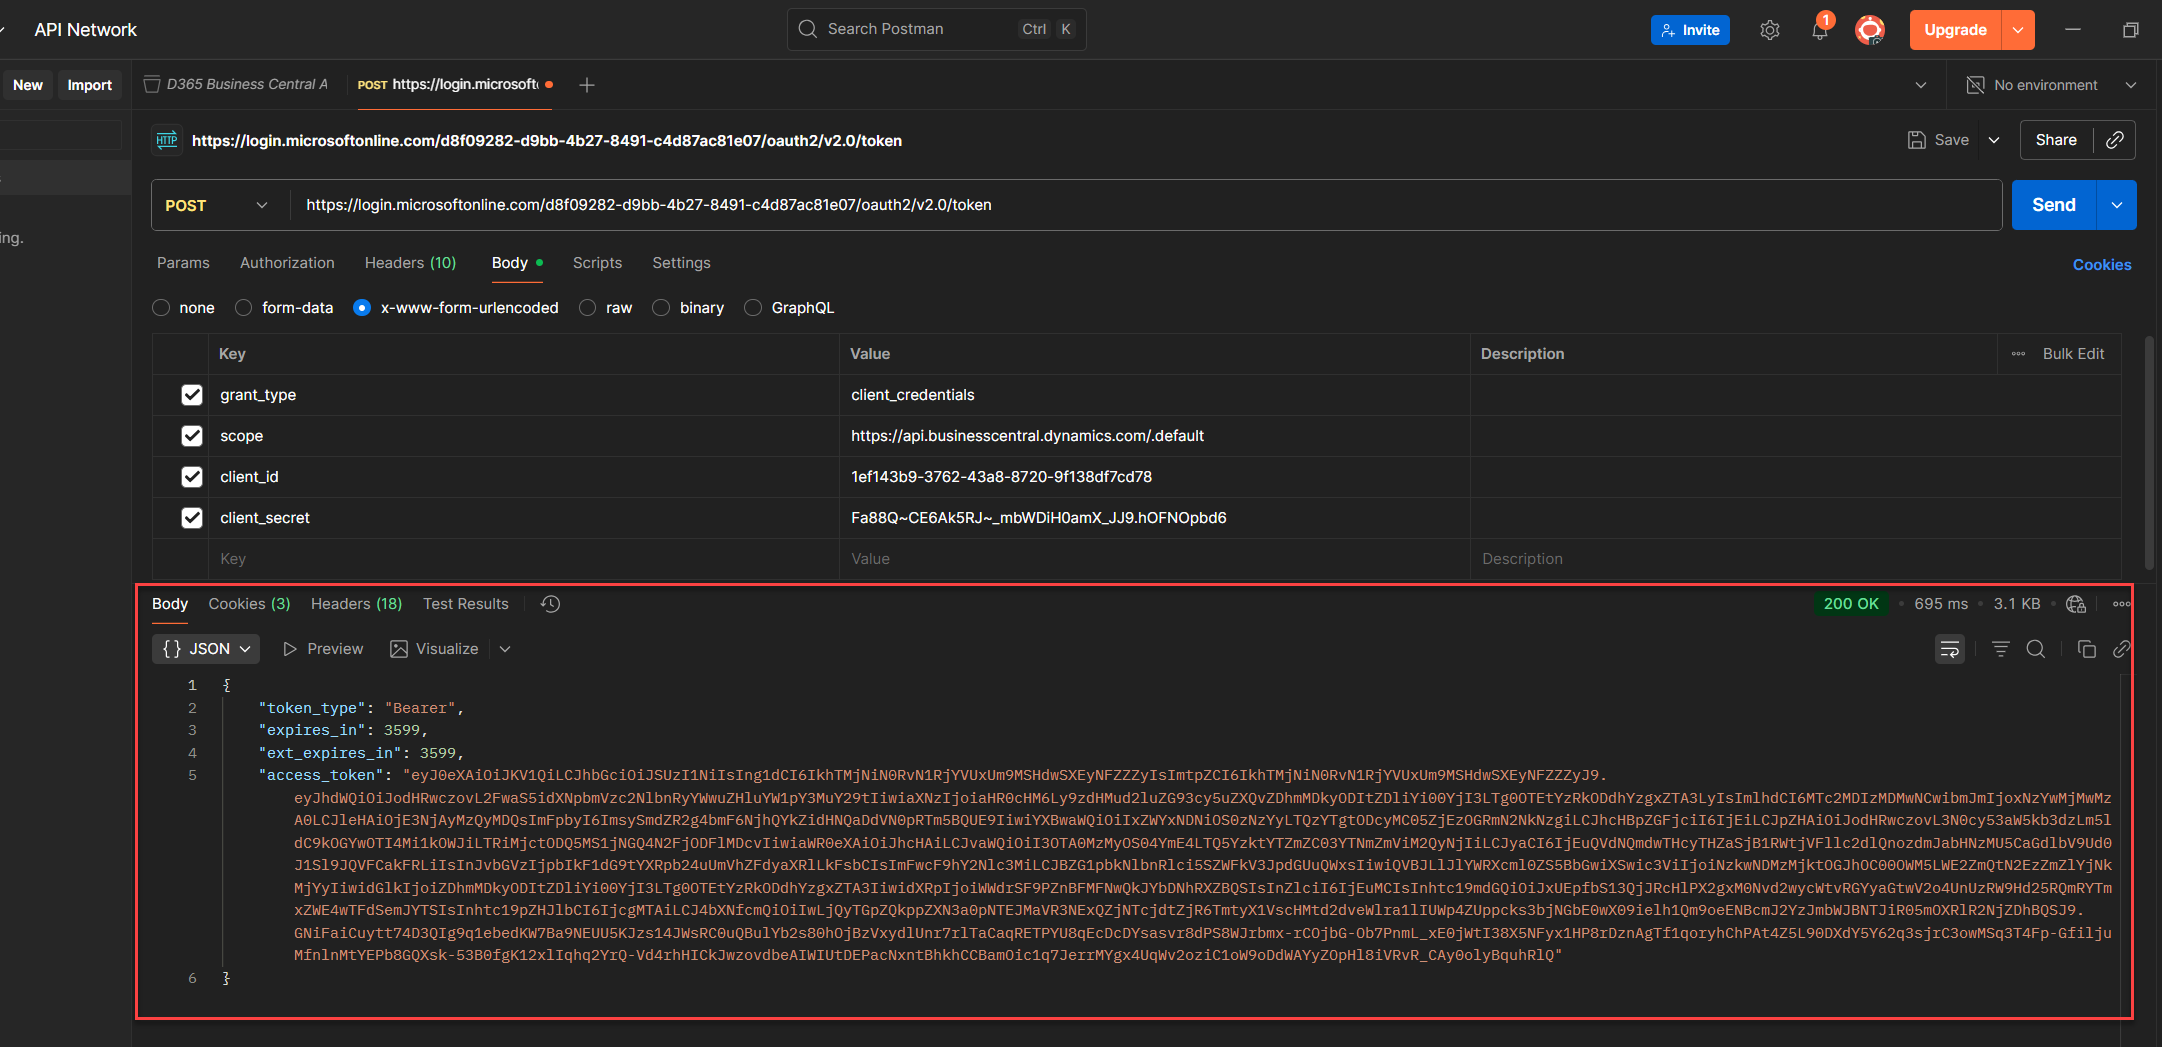
5. Go to the Body tab and select x-www-form-urlencoded.
This will give you three columns: Key, Value, and Description (optional). Fill in the following parameters:
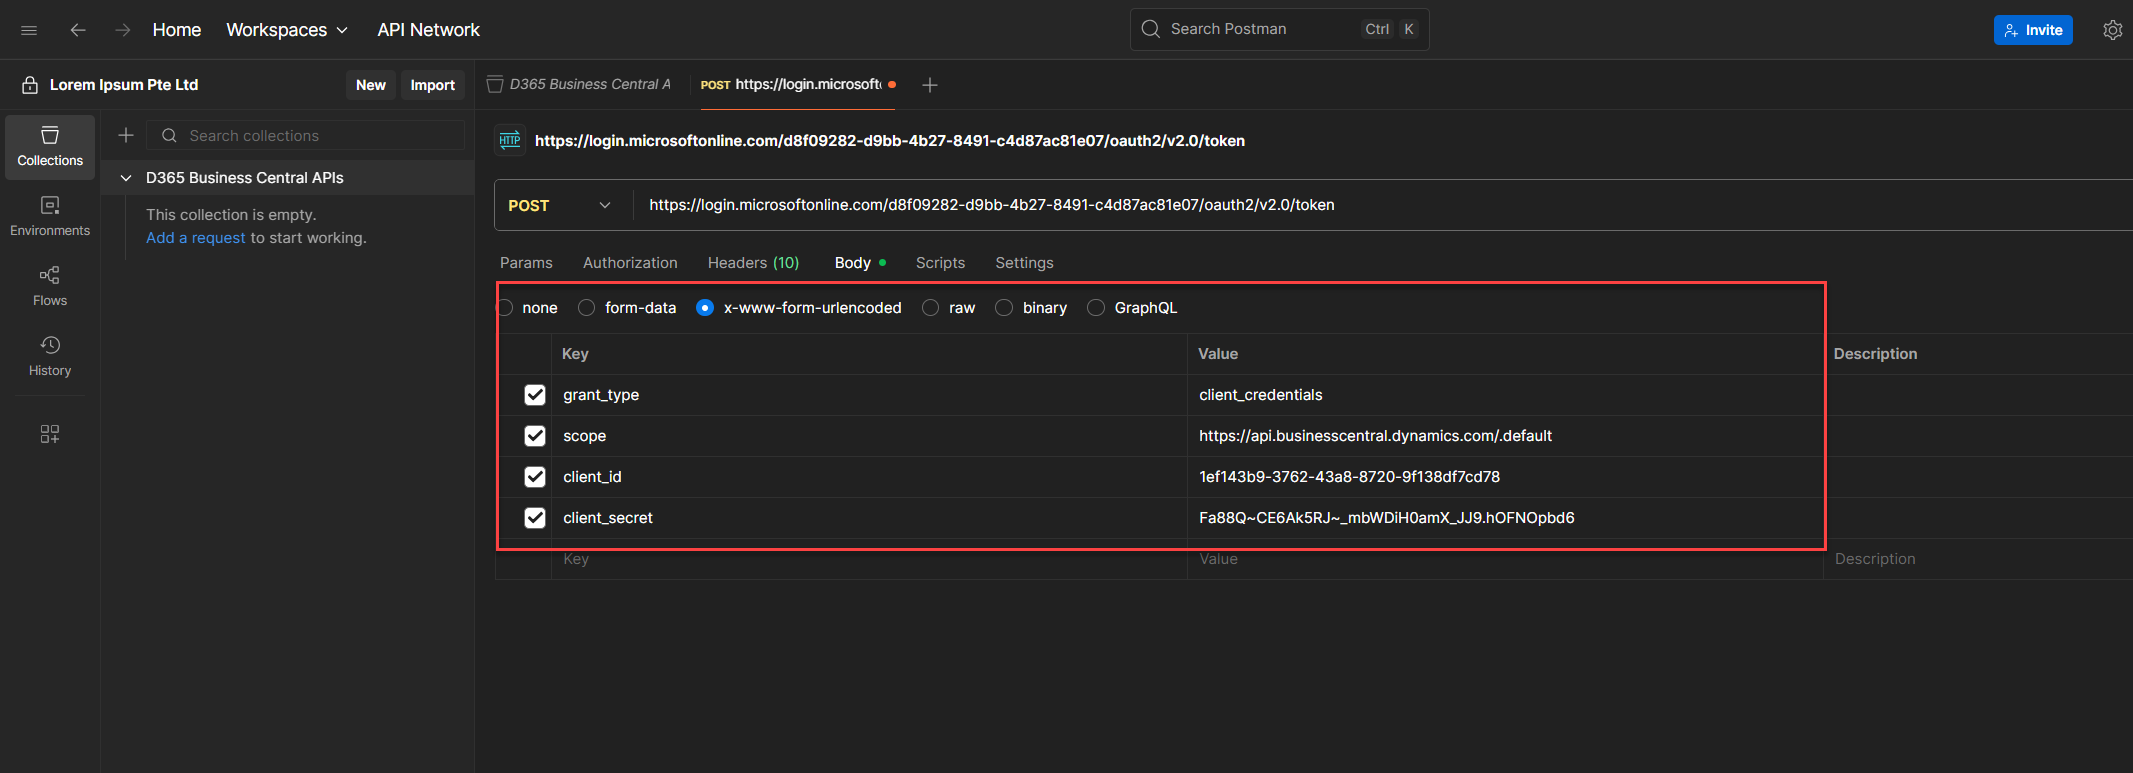
6. Once everything’s filled out, hit Send.
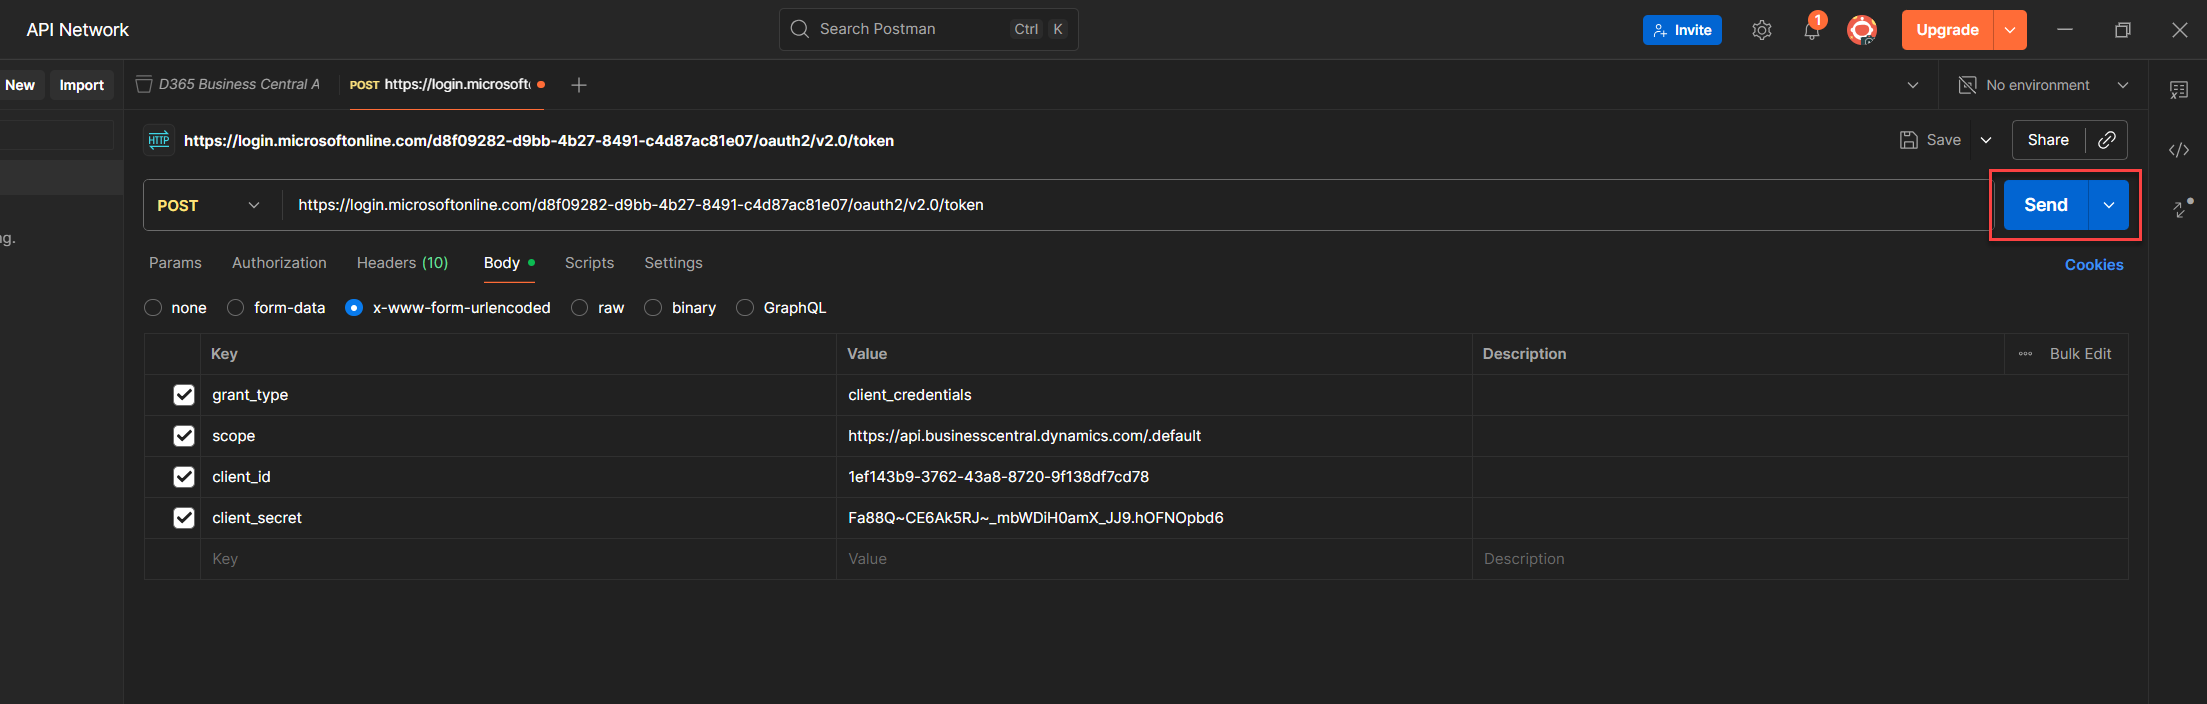
7. If all goes well, you’ll get a response with your access token. Copy it, and either use it directly in your requests or store it as a Postman environment variable for reuse.
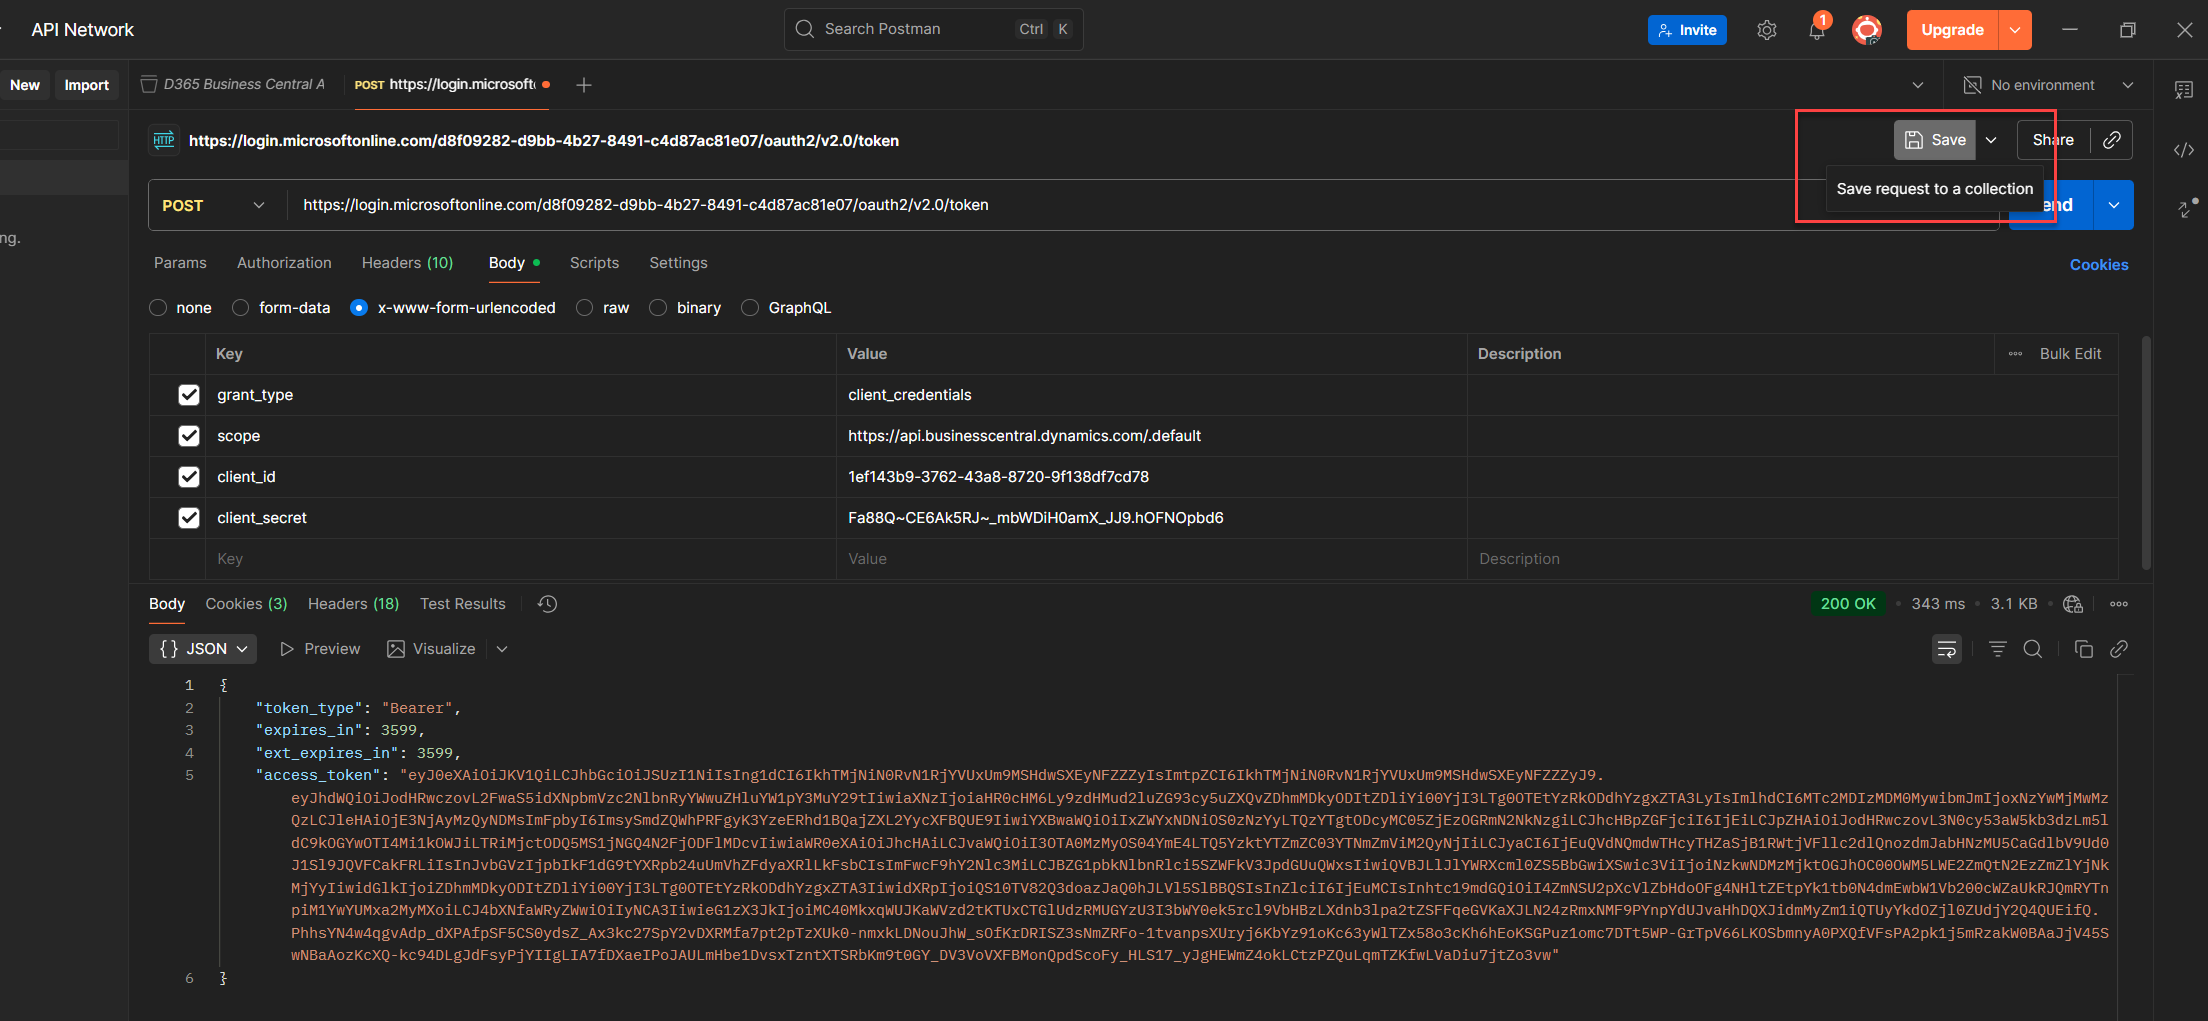
8. Once it’s working, click Save on the top right to keep this request.
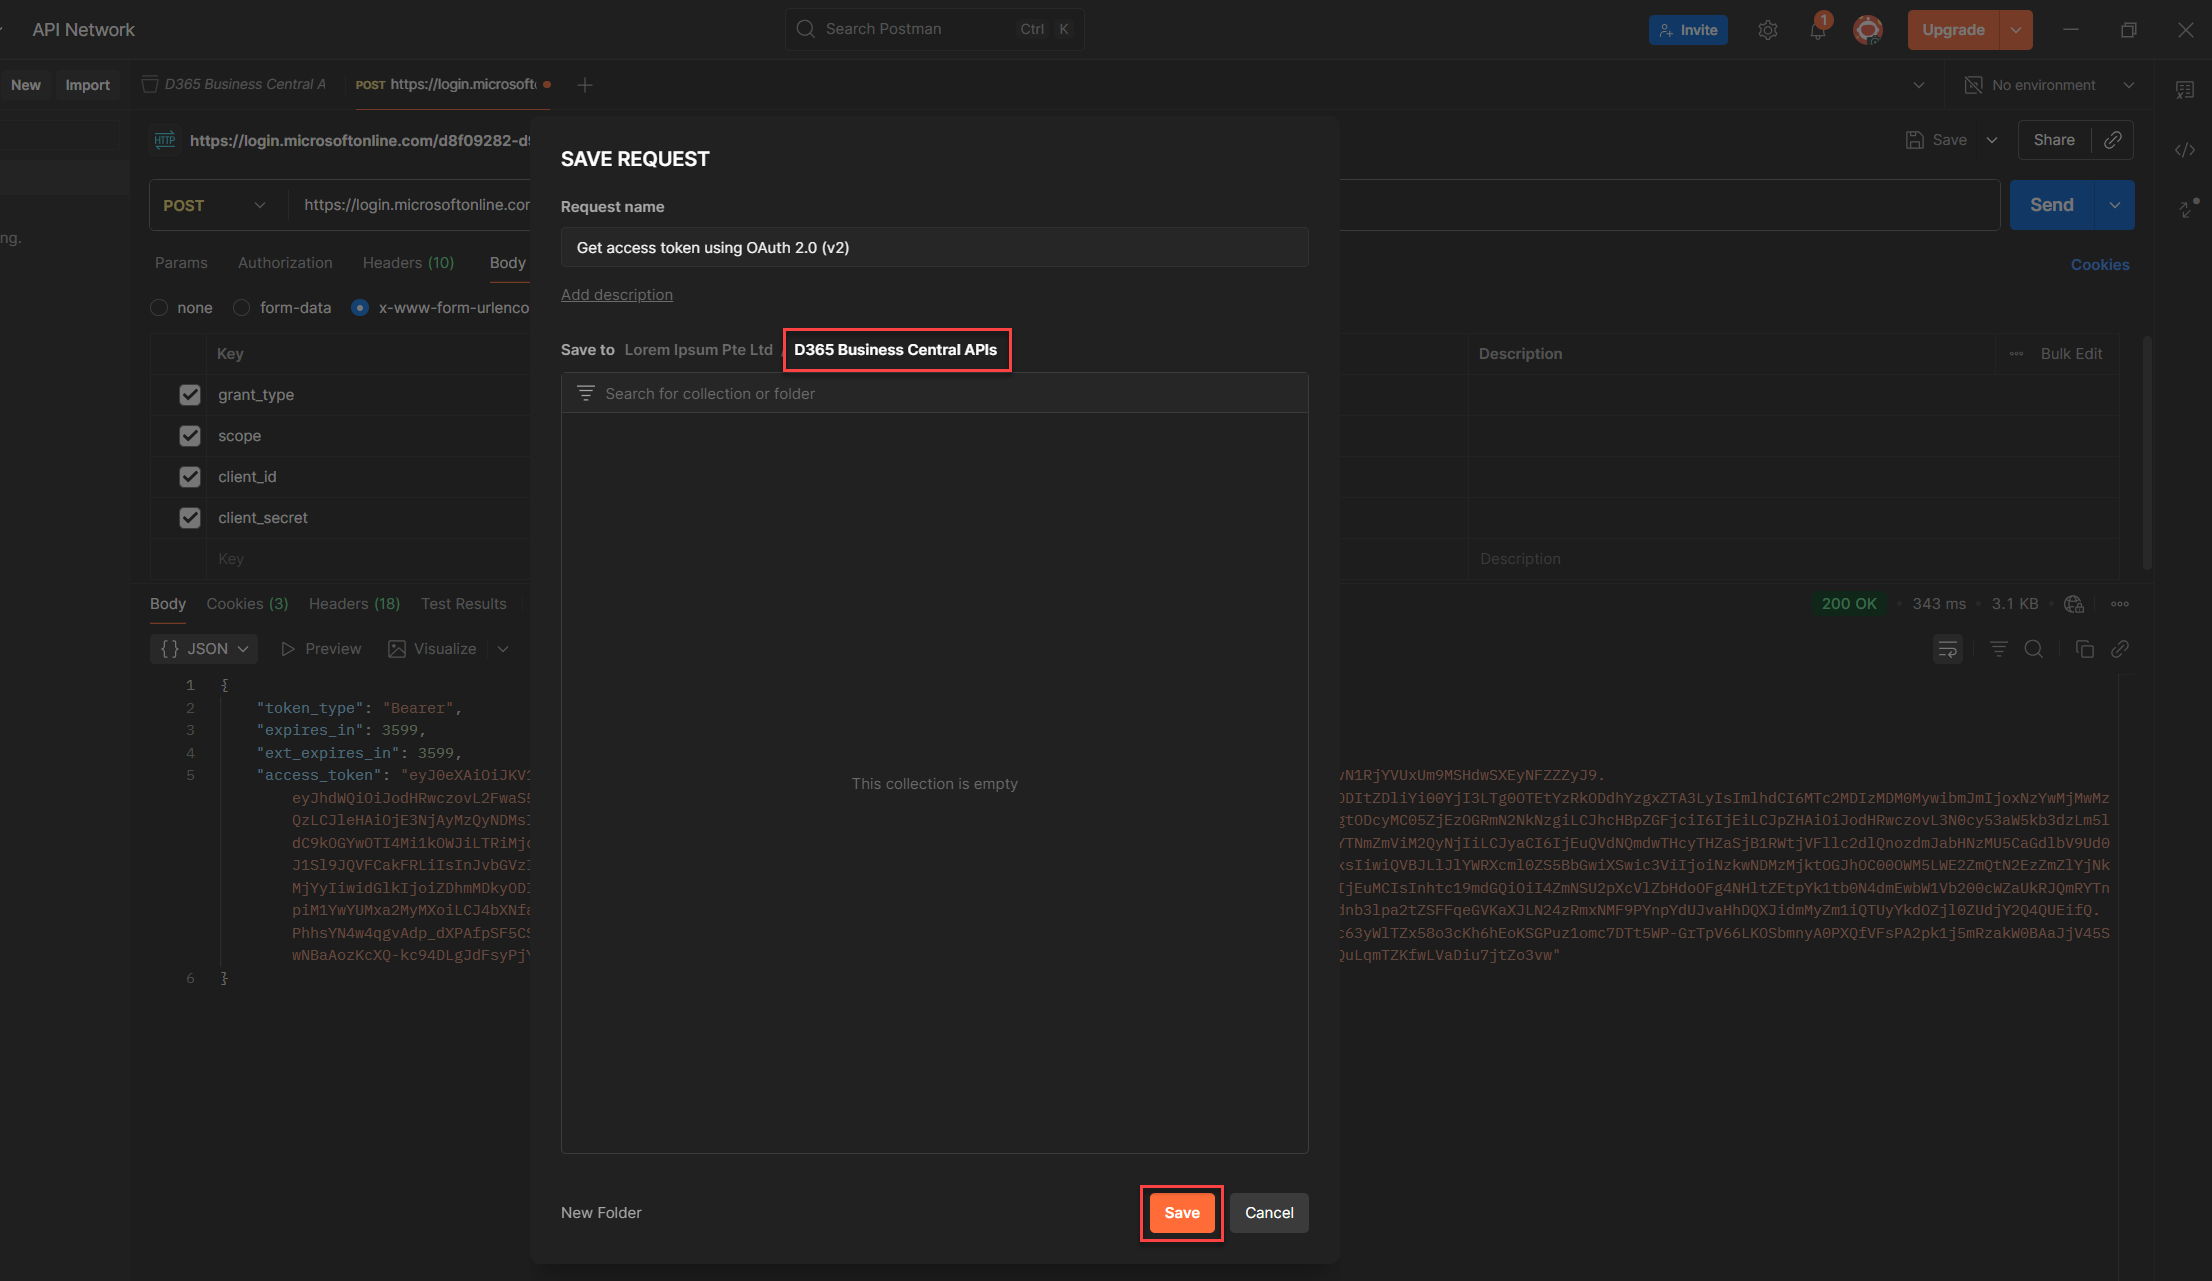
9. Before saving, rename the request to something descriptive e.g. Get access token using OAuth 2.0 (v2)
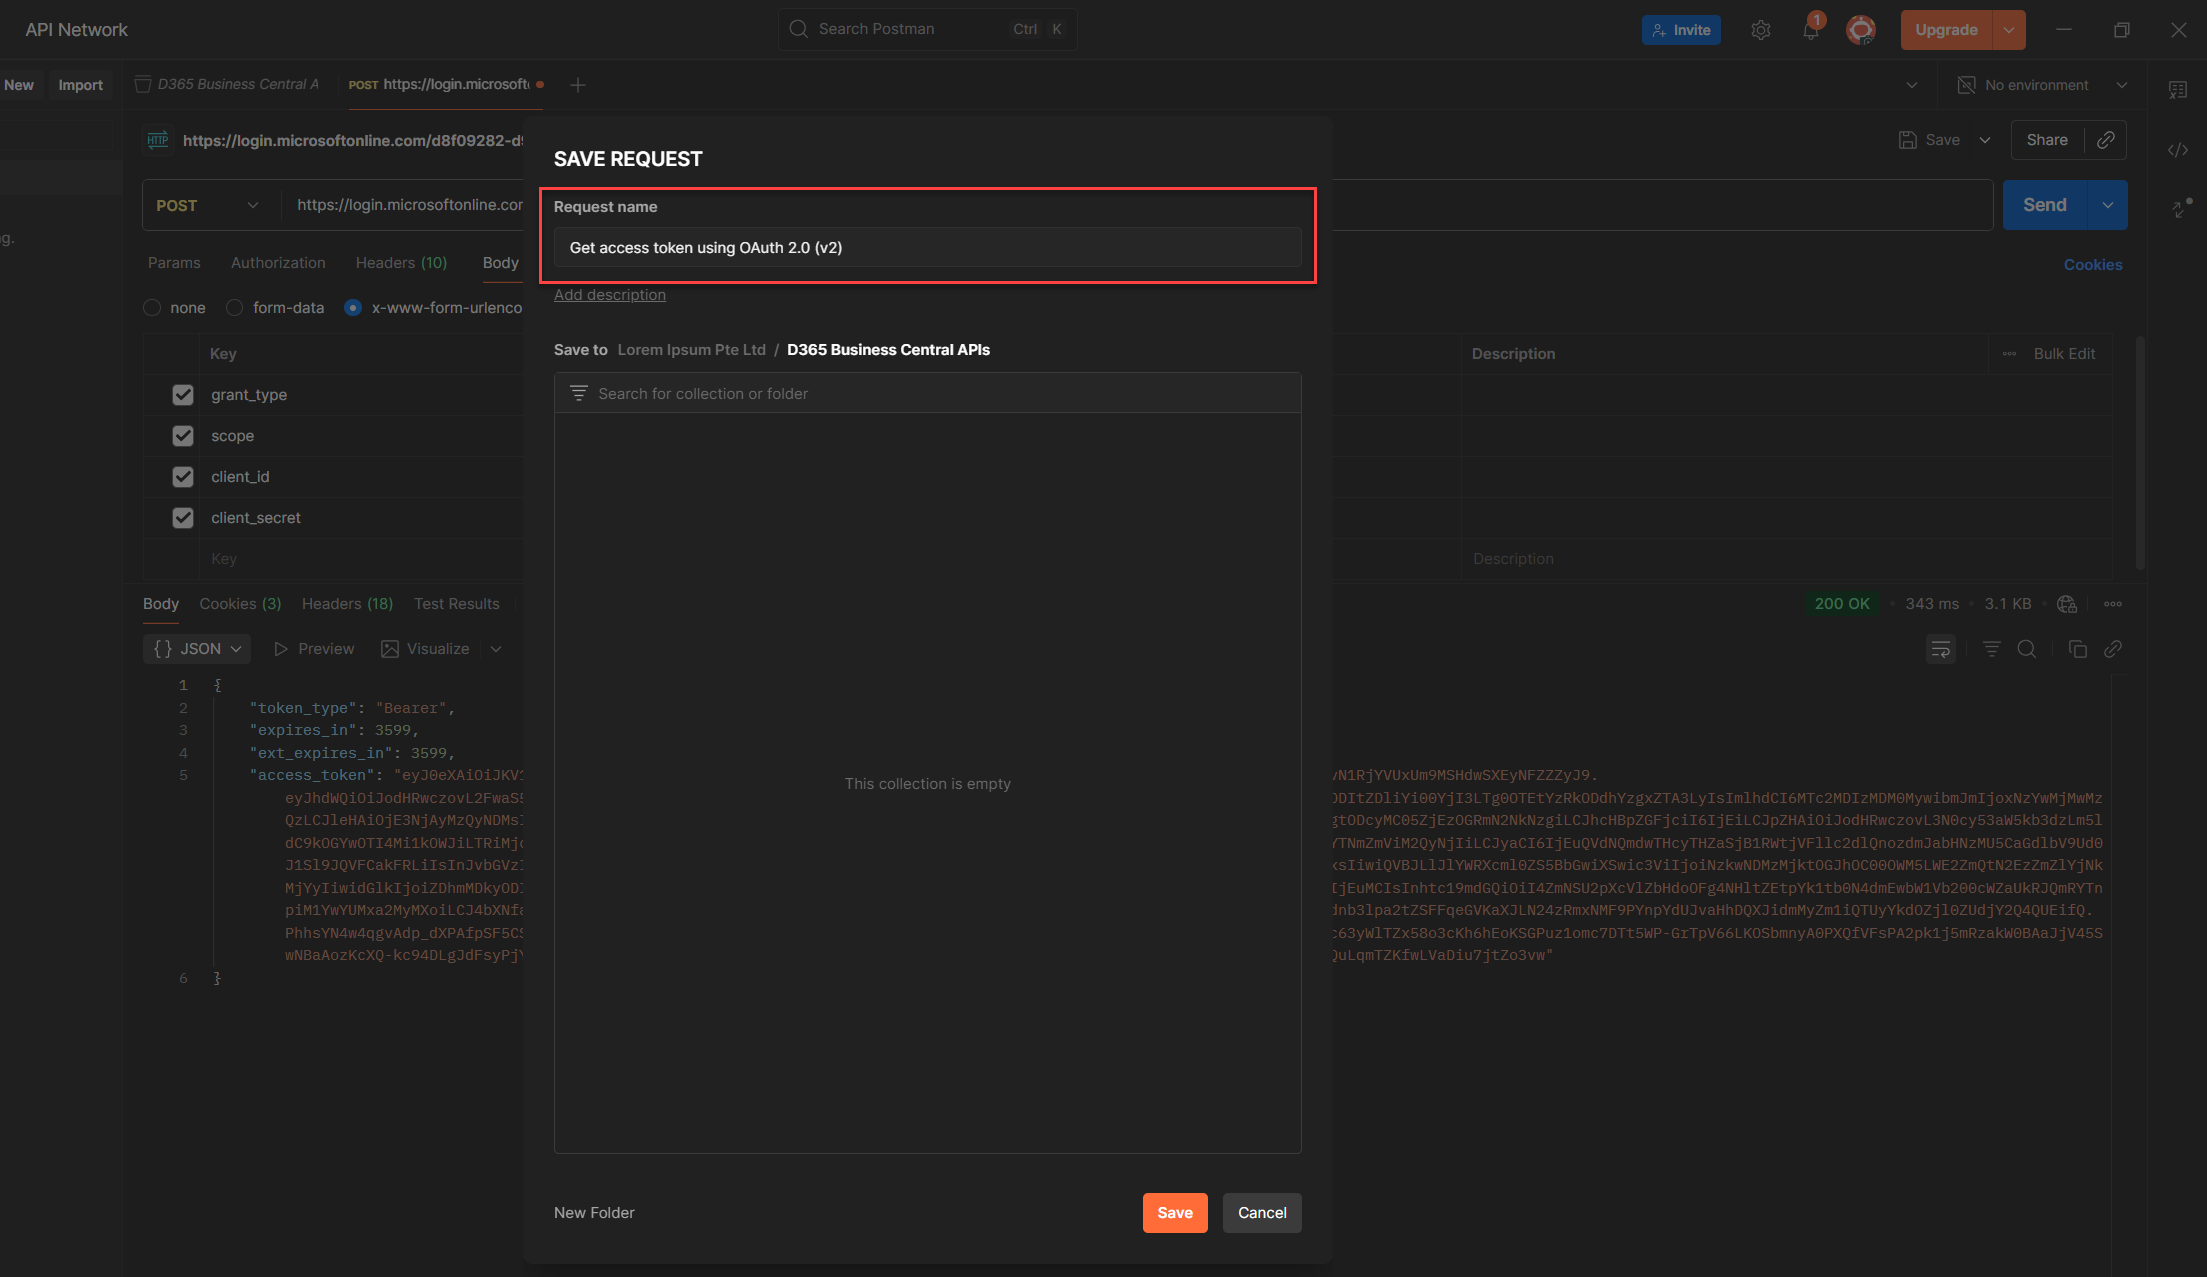
10. When the Save modal pops up, select the Postman Collection you created earlier and we are done, done, done! (HAHAHAHAHA guess what? I heard you singing.)
Why Use x-www-form-urlencoded for OAuth2 Token Requests
When you send a POST request to:
https://login.microsoftonline.com/{tenantId}/oauth2/v2.0/token
you’re talking to Microsoft’s OAuth2 token endpoint. And this endpoint? It’s picky. It expects your request body in a very specific format:
Content-Type: application/x-www-form-urlencoded
This format sends your parameters as key-value pairs, like this:
grant_type=client_credentials&client_id=...&client_secret=...&scope=...
No JSON. No fancy payloads. Just clean, URL-encoded data.
Why Not the Others?
💡 Heads-up (a.k.a. Silent Rejection):
If you accidentally send JSON here, Microsoft won’t throw a tantrum. It won’t even flinch. It’ll just quietly ignore your request like it never happened. No error, no warning, just silence. And that’s worse.
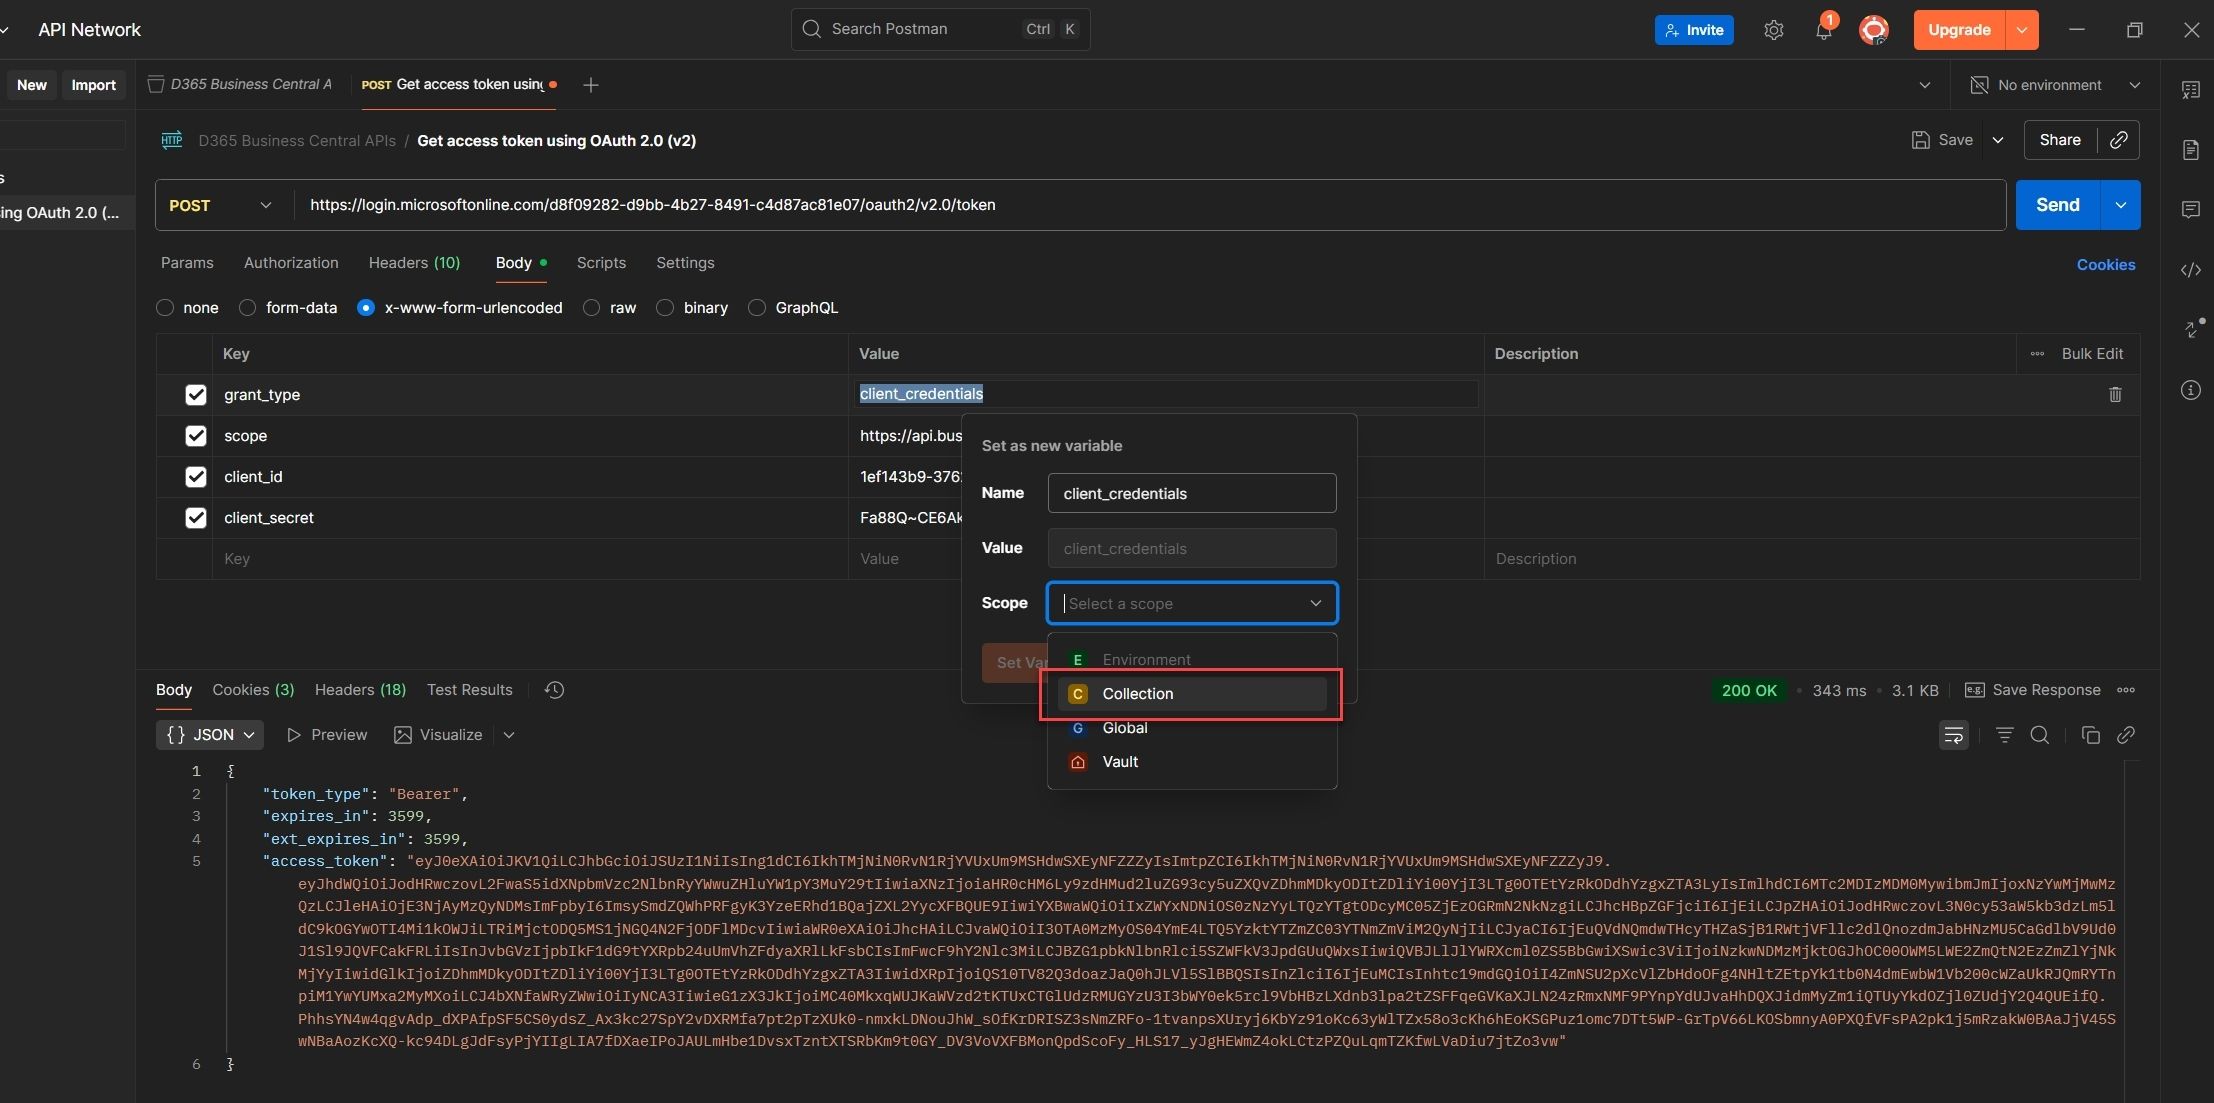
Setting Data Parameters as Variables
Let’s make life easier. Instead of hardcoding values like client_id, tenantId, or scope into every request, we’ll store them as variables. That way, you can reuse them, update them once, and keep your workspace clean.
If you’ve worked with AL before, you’ll recognize the vibe, global vs. local variables. Postman has its own flavor, with four scopes to choose from:
Steps to Assign a Variable from a Key Value (So You Don’t Have to Copy-Paste Forever)
Once you’ve filled in your token request parameters, here’s how to turn any value into a reusable variable:
1. Select the key value you want to reuse like client_credentials, client_id, or anything you’ll need again.

2. Right click the value to open Postman’s context menu.
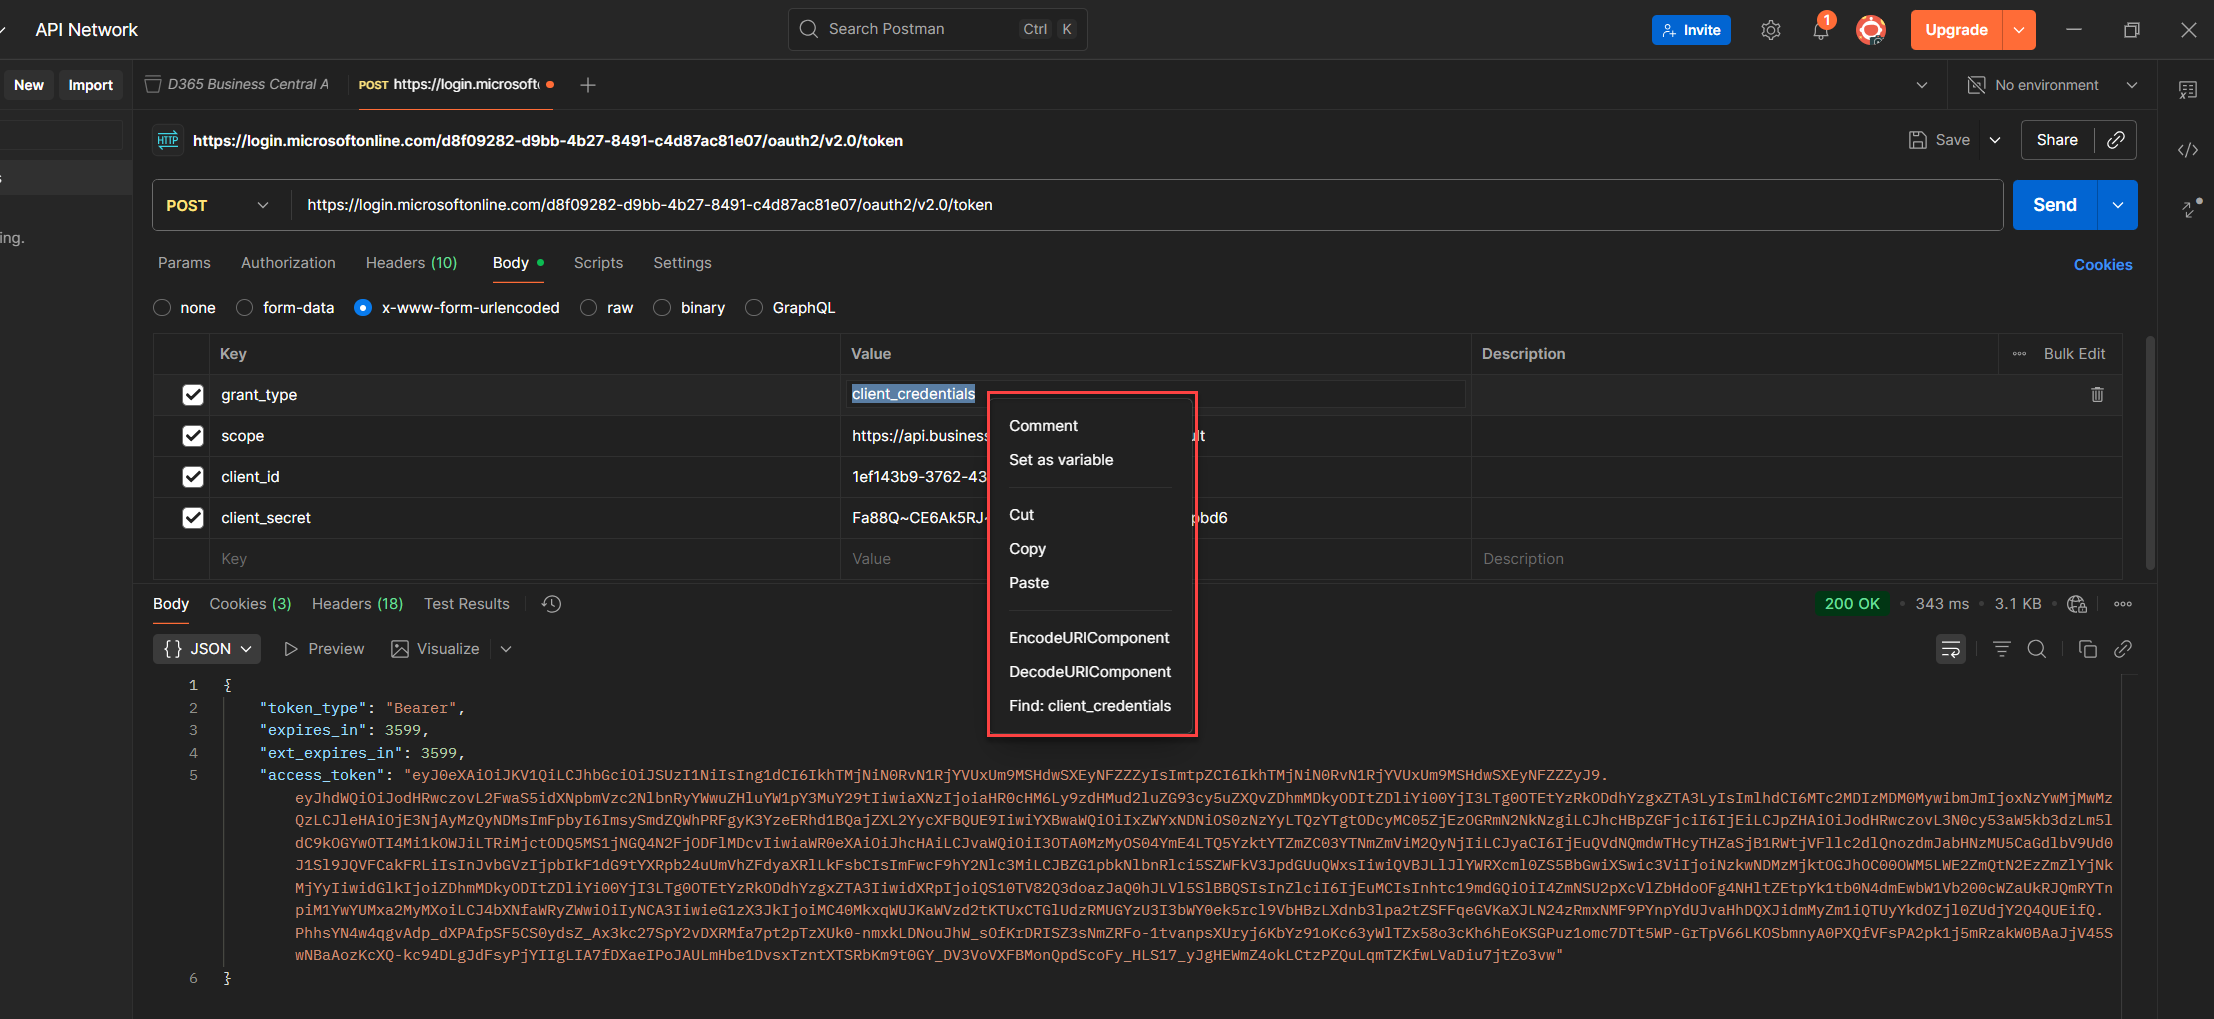
3. Choose Set as variable to start the assignment.
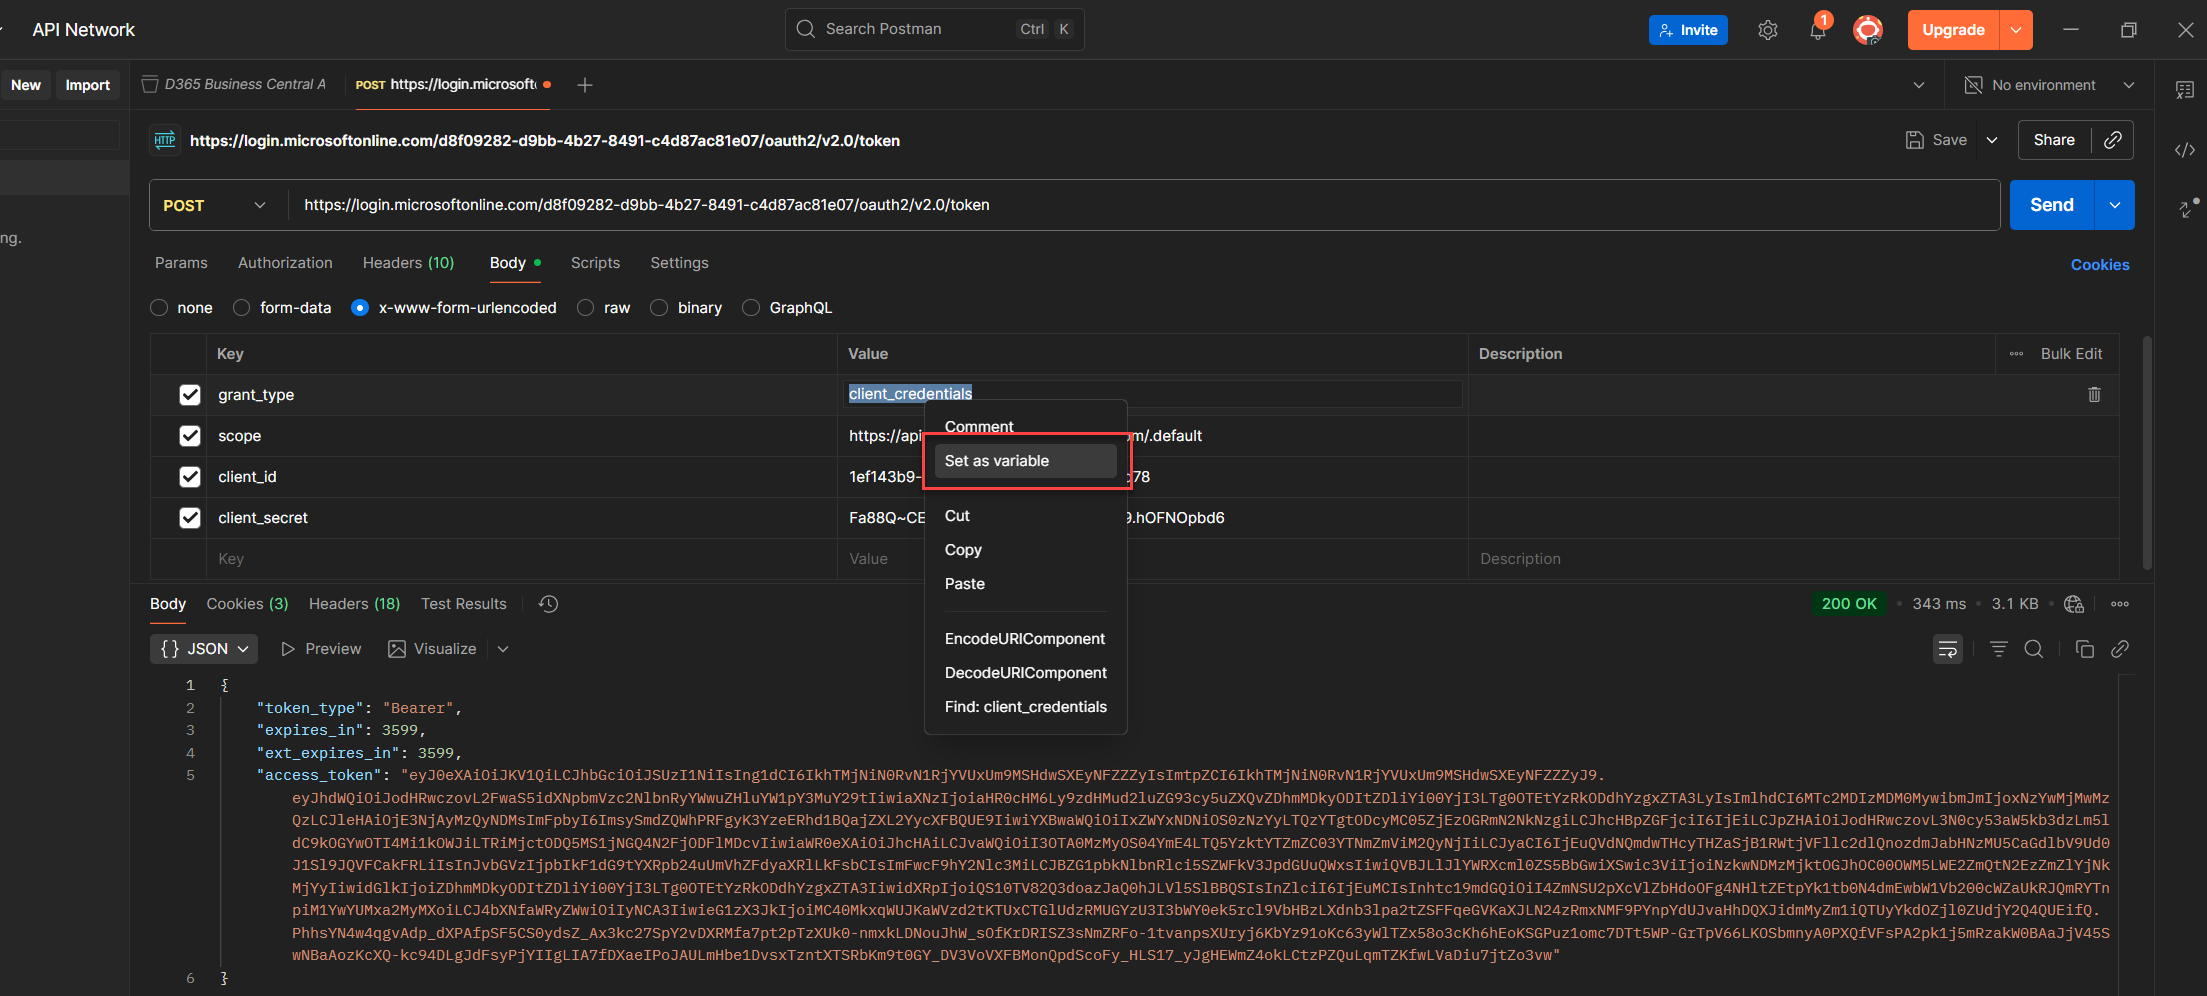
4. Click Set as a new variable so you don’t overwrite anything by accident.
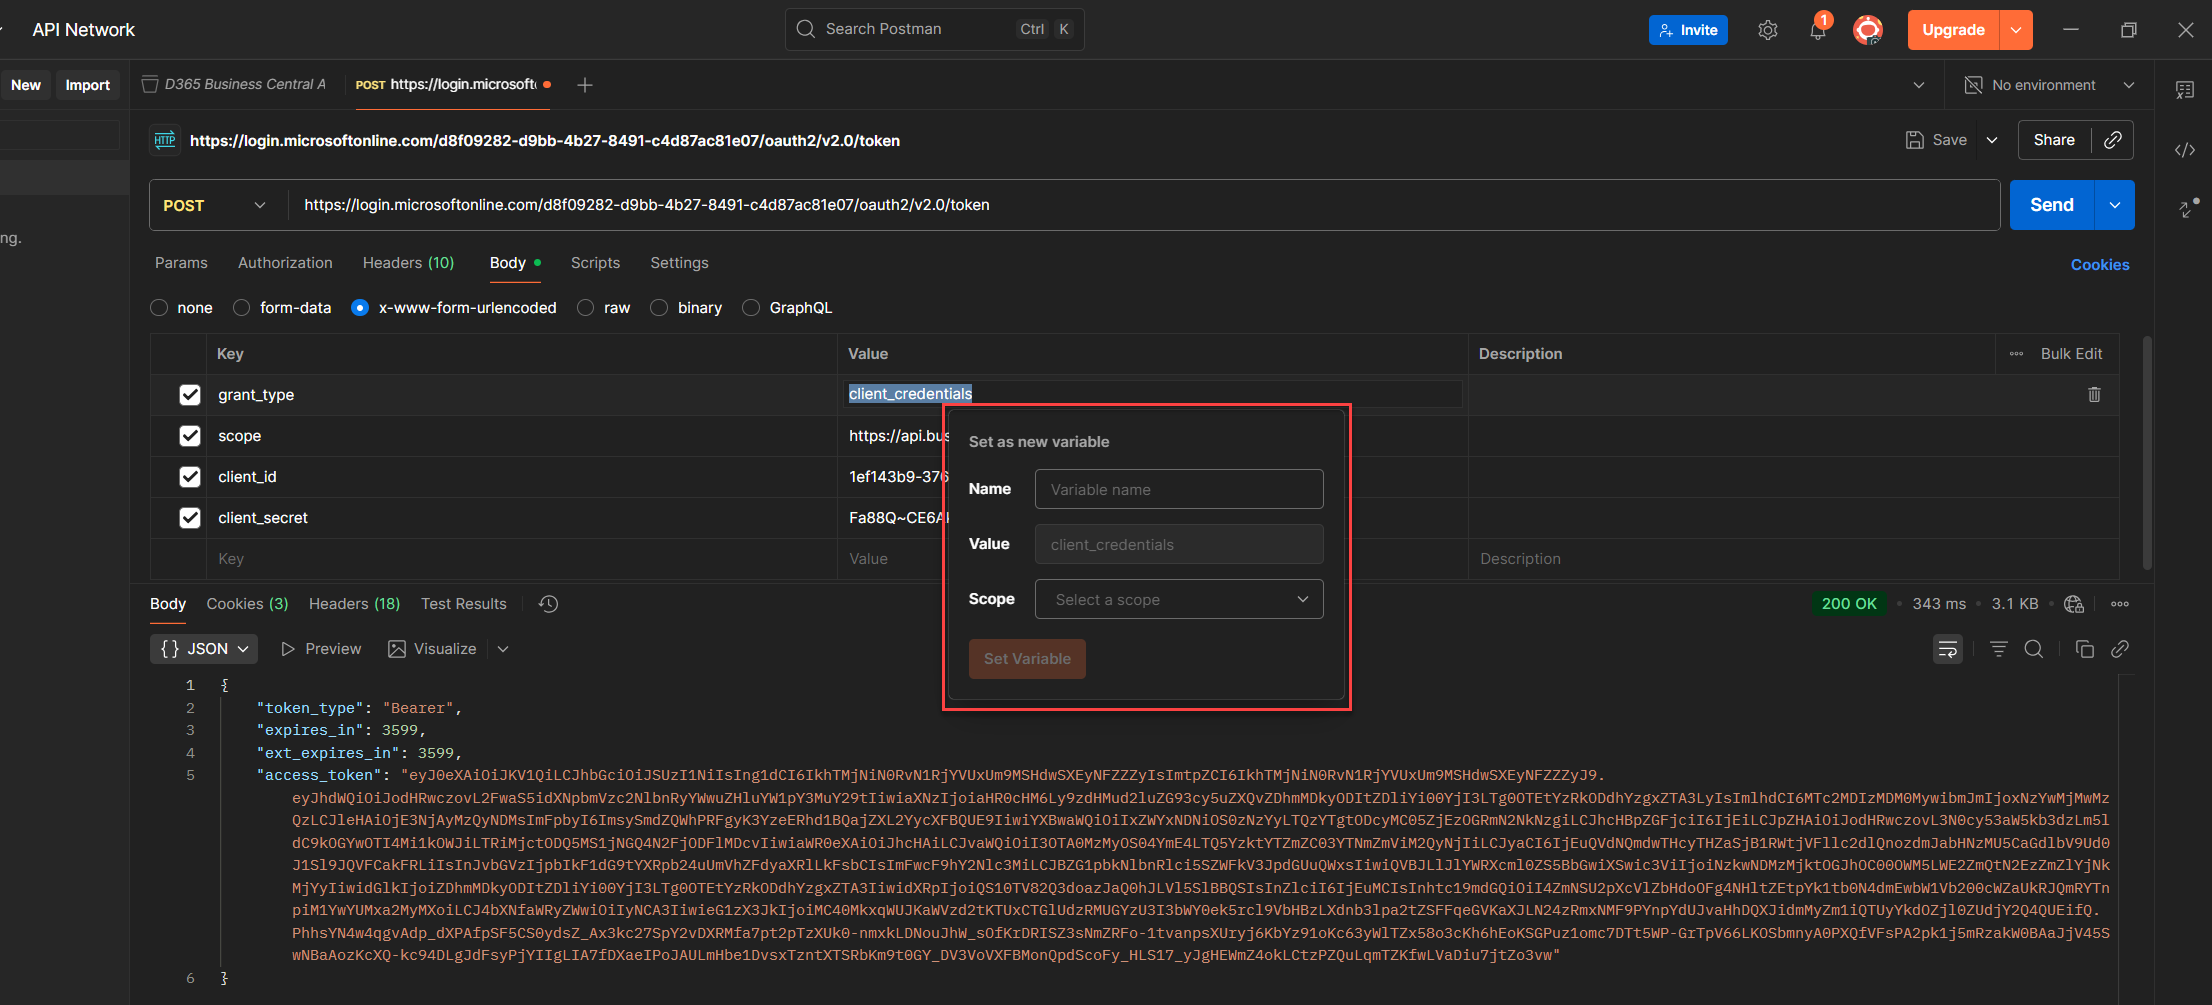
5. Fill in the Name, Value, and Scope, Postman will auto fill the value for you.
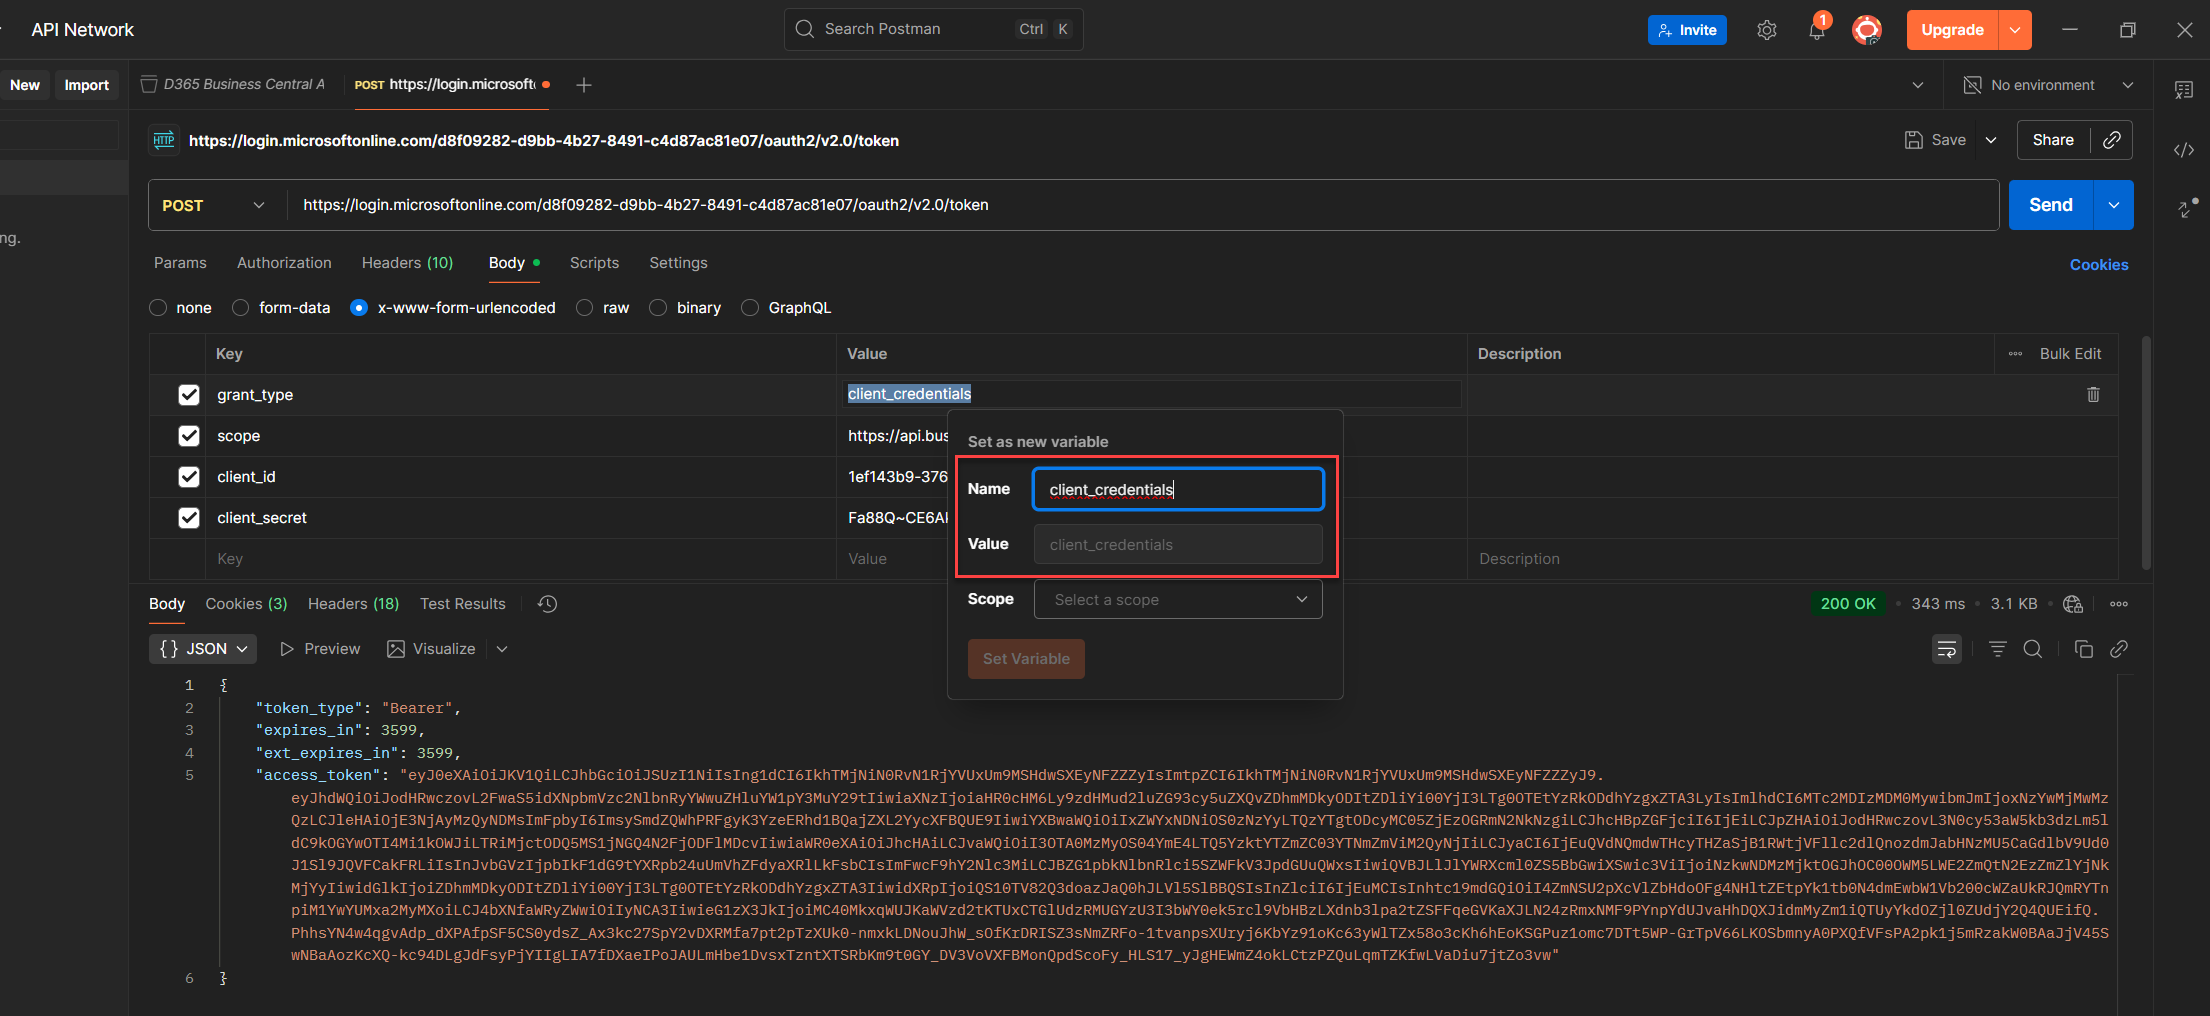
6. Choose the right scope (Local, Environment, Collection, or Global) depending on how far you want the variable to reach. (See the guide below for what each variable actually does.)

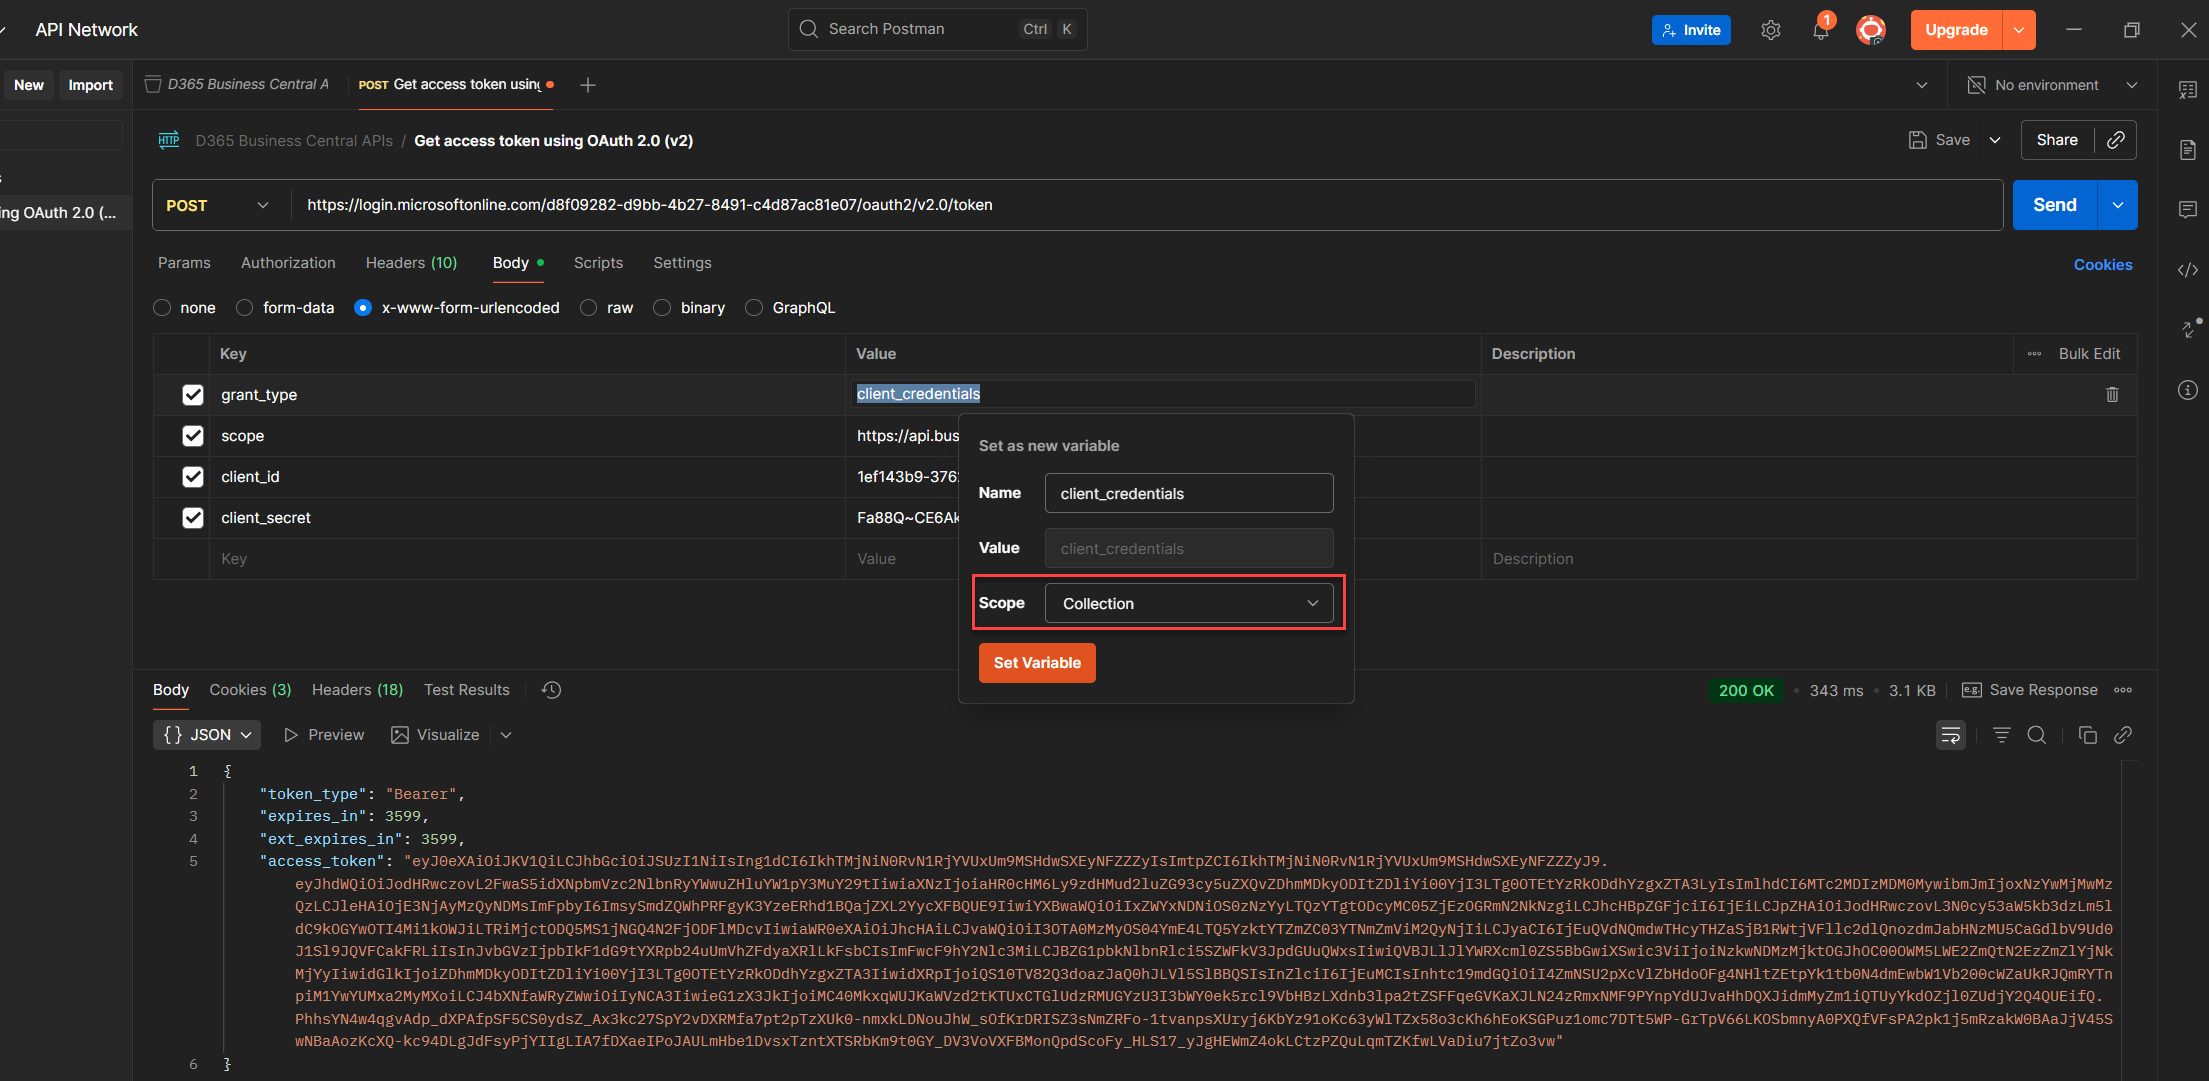
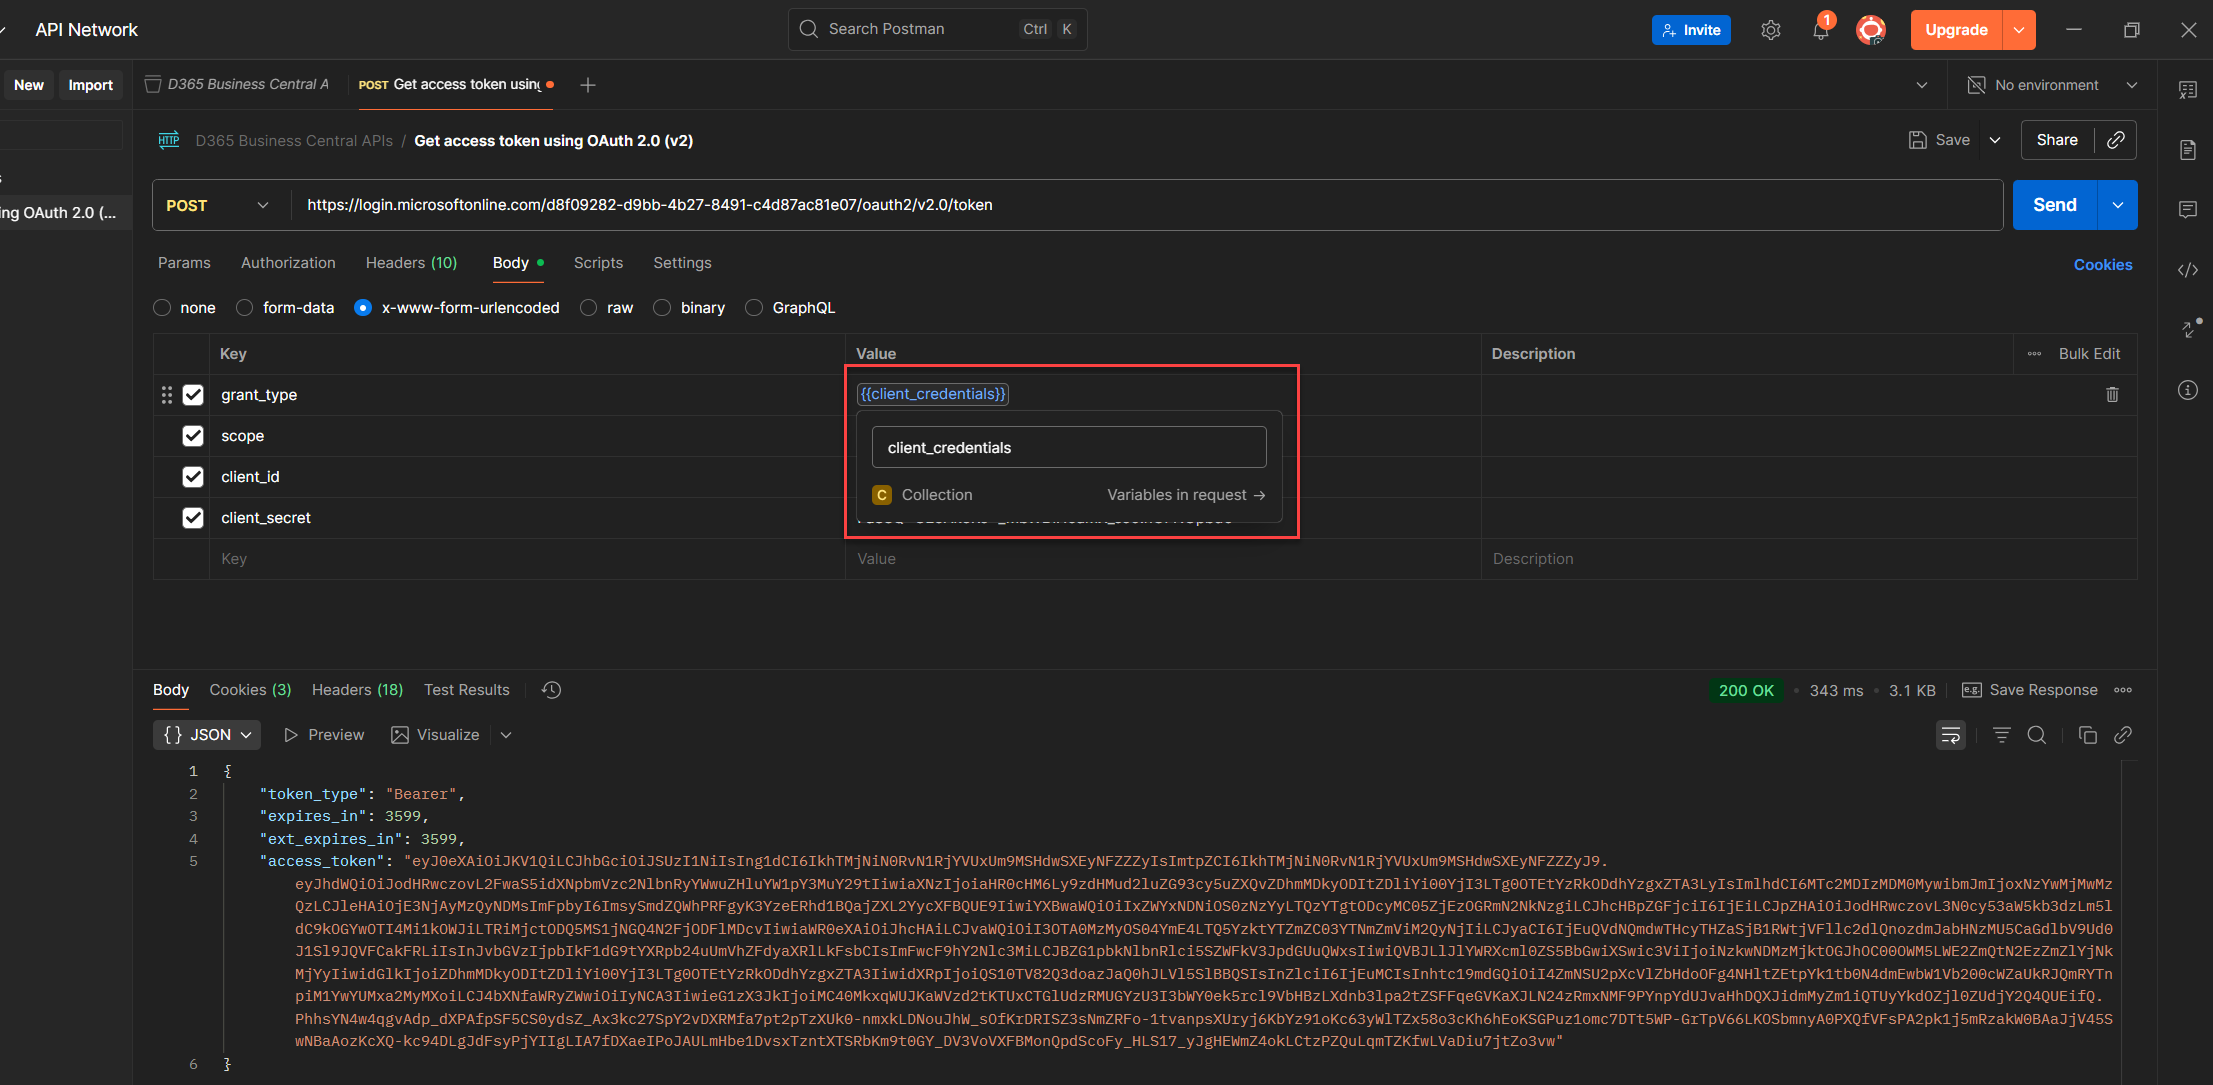
7. Set it, and Postman will swap the value with {yourVariableName} clean, reusable, and easy to trace. (Note: Double curly braces, always.)
💡 Heads-up (a.k.a. Variable Showdown):
If Postman sees the same variable name in multiple scopes, it doesn’t get confused, it just picks the one with the highest priority. So if you define client_id as both a global and a local variable? Local wins. Every time. No drama, no debate.
Lessons Learned the Hard Way
(a.k.a. How to Not Break Things)
These aren’t just best practices, they’re the habits I now swear by after breaking a few things myself. If you want your token flow to stay clean, secure, and easy to trace, here’s what I’d pass on:
1. Use environment variables in Postman
Don’t hardcode sensitive values like client_id, client_secret, or tenant_id. Postman environments let you reuse values across requests, switch contexts easily, and keep secrets out of plain sight.
2. Rotate secrets regularly Client secrets expire.
Set calendar reminders or automate renewal because nothing’s worse than waking up by your boss yelling at you or doing a support on a vacation leave and no one knows why it stops working. (HAHAHAHAHA lol)
3. Assign only the permissions you need
Avoid giving D365 FULL ACCESS unless absolutely necessary. Use BUS FULL ACCESS or define custom sets that match your app’s actual scope. Minimal access = minimal risk.
4. Document your token procedures
Everyone working with your API should know where the token comes from, how it’s stored, and how it’s refreshed. Treat it like a reusable artifact, not a one-time setup.
5. Use x-www-form-urlencoded for token requests
Microsoft’s token endpoint expects this format. Send JSON, form-data, or raw and it’ll quietly ignore you. No tantrum, no error, just silence. And that’s worse.
Common Pitfalls and How to Fix Them (Because We’ve All Been There)
- Forgot to grant admin consent
Token request succeeds, but API calls fail. Go to Entra → API Permissions → Grant admin consent. (You can go back to Part 1: Register Your Entra App, Assign Business Central Permissions, and Prepare for OAuth2 Token Testing as I discussed it there) - Assigned SUPER to app user
Business Central throws an error. Use D365 BUS FULL ACCESS or define custom permission sets. - Used wrong token format
You’ll get 400 Bad Request or unsupported_grant_type. Use x-www-form-urlencoded it’s the only format Microsoft accepts. - Hardcoded secrets in Postman
Risk of exposure, especially in shared workspaces. Use environment variables or secure vaults. - Confused sandbox vs production
API returns 404 or 401, and nothing makes sense. Double check your endpoint URL, sandbox and prod are not interchangeable.
Here’s how it feels in action ✨
A small thing that helps a lot
Once your token retrieval is working, don’t treat it like a one off setup. It’s a reusable piece of your system, something you can share across environments, teams, and services without reinventing the wheel.
If you’re using Postman, wrap the logic in a pre-request script and attach it to your collection. That way, every request knows how to fetch a fresh token, no manual steps, no copy-paste, no surprises.
💡 Bonus: This also makes hand over easier. Anyone jumping into your workspace can just hit Send and get a working token, no setup tour required.
TL;DR – (Where You’re At And What’s Next)
So far, You’ve already done the real work: connected Entra to Business Central, gave your app the right access and permission, and made sure your token flow works in Postman. It’s not just setup, it’s working.
But we’re not stopping here.
Coming in Part 3:
Next, we’ll make it easier to repeat. You’ll learn how to skip the portal clicks and automate everything, from app registration to token fetching to permission setup. We’ll use CLI and PowerShell to make it fast, clean, and handoff-ready.
And because you don’t want people asking “Where do I even begin?”, we’ll prep ready to use templates. So when someone joins your workspace, they get a working flow not a dead ends and missing pieces.
Support the Community
♻️ Repost to support the Microsoft Dynamics 365 Community and follow Jeffrey Bulanadi for technical insights above and beyond Business Central, AL development, and scalable integration architecture.
Demo Repository
Want to see how it all fits together? I’ve shared a GitHub sample that shows the full setup, from getting your token to making your first API call. It includes working examples, reusable scripts, and notes you can build on or tweak for your own project. 👉 OAuth2 Setup and Automation Part 2 on GitHub
✨ Part 3 is live: Learn How to Automate Token Retrieval and Variable Assignment Using Postman Scripts View blog
Helpful References
OAuth2 and OpenID Connect Protocols – Microsoft Identity Platform
Azure App Registration – Microsoft Learn
Business Central API Access – Microsoft Docs
Join the Conversation
Share your thoughts, ask questions, or discuss this article with the community. All comments are moderated to ensure quality discussions.
No comments yet
Be the first to start the conversation!
0 Comments
Leave a Comment