

✨ Part 2 is live: Learn How to Configure Entra, Set Up Postman, and Validate OAuth2 Token Flow View blog
D365 Business Central: OAuth2 Setup and Automation – Part 1
Yo! This post started as a Saturday draft (shoutout to #BCSaturdayCodeHacks), but I held off finishing it. Not because I got stuck, because I didn’t want to drop just another intro. I wanted to build something that actually helps you see how the pieces fit together, especially in the world of Business Central.
Before we dive in, quick thanks. Whether you’ve been following this space or just landed here, your curiosity is what keeps it alive. You’re the reason lines of code turn into something meaningful.
Alright, let’s get into it.
So Why I Started Documenting OAuth2 for Business Central
So I started documenting. First, the basics: how to register the app, set permissions, test the workflow. Then the deeper stuff: token refresh scripts, CLI commands, Graph API calls.
As I wanted anyone working with Business Central and its APIs to understand what’s happening behind the scenes, not just follow steps blindly like follow this and that, do this and that.
This walkthrough is not just a guide but it’s a way to turn OAuth2 from a boring setup into something fun, something you actually want to configure.
It’s not perfect, of course. But I’m writing from real world implementation, actual experience, and the kind of work that happens out in the field.
Introduction: So What OAuth2 Really Is
OAuth 2.0 is an authorization framework that lets apps access user data without needing the user's password. Think of it as a secure permission slip.
Instead of saying Here’s my password, go wild, the user says: Here’s a token. You can use it to access this specific data for this amount of time, but nothing else.
OAuth2 Core Components (Explained like a 5 year old on a playground)
OAuth2 is like a playground with rules. You (the kid) want your robot helper (Postman) to fetch toys (data) from the toy box, but only if the guard (Authorization Server) says it’s okay.
- Resource Owner (You): The user who owns the data.
Imagine you’re the person who owns the “toy box”, your data. Only you can decide who plays with it. - Client (Postman): The app requesting access (e.g., Postman, Third-Party App).
Let's say a Postman (The API Testing Tool) is like a robot helper you control.
You tell it: “Go knock on the toy box and ask for this toy.”
Postman doesn’t own the toys, it just delivers your request exactly how you tell it. - Authorization Server (The Security Guard): Validates the user and issues tokens (e.g., Microsoft Identity Platform).
This is the guard at the playground gate. They check: “Is this really you? Do you want your robot helper to get this toy for you?” If yes, they give Postman a special pass (access token). - Resource Server (The Toy Box): Hosts the protected data (e.g., Business Central APIs).
This is where the toys (your protected data) are kept.
The toy box only opens if Postman shows the special pass from the guard.
✨ Quick Notes from the Playground
Access Token: The playground pass that lets Postman open the toy box.
Refresh Token: A secret code Postman can use to ask the guard for a new pass when the old one expires.
OAuth2 Use Cases You’ll Actually Need
-
Social Login Integration
e.g Sign in with Google or Login via Facebook
Why it matters: Reduces friction for users and avoids password fatigue
OAuth2’s role: Grants limited access to profile data without sharing credentials -
Third-Party API Access
e.g A calendar app accessing your Google Calendar
Why it matters: Enables rich integrations while maintaining user control
OAuth2’s role: Issues access tokens scoped to specific permissions -
Payment Gateways
e.g Pay with PayPal or Stripe integrations
Why it matters: Facilitates secure transactions without exposing financial data
OAuth2’s role: Authorizes payment actions via token exchange -
Enterprise SSO (Single Sign-On)
e.g Employees using their Microsoft or Google accounts to access internal tools
Why it matters: Centralized identity management and reduced IT overhead
OAuth2’s role: Delegates access across multiple services with one login -
IoT Device Authorization
e.g Smart thermostats or cameras connecting to cloud services
Why it matters: Devices need secure, credential-free access
OAuth2’s role: Issues tokens for device-to-cloud communication -
Healthcare Data Sharing
e.g Fitness apps accessing electronic health records
Why it matters: Enables personalized insights while protecting sensitive data
OAuth2’s role: Enforces strict, scoped access to medical information
Let’s start with the basics: Manual OAuth2 Setup in Azure. A clear path.
Step 1: Register the Web API (Resource App)
This app represents the protected resource that hosts the API and defines the scopes others may request. Think of it as the guardian of the sacred data.
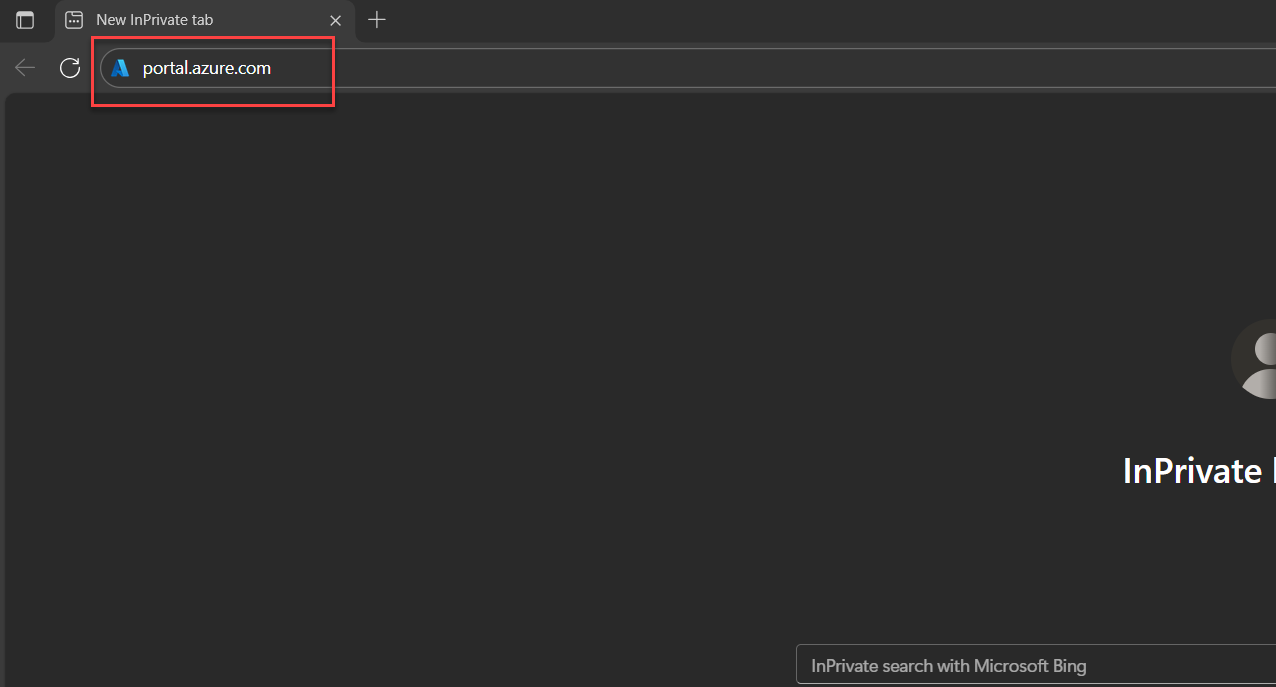
1. Open the Azure Portal
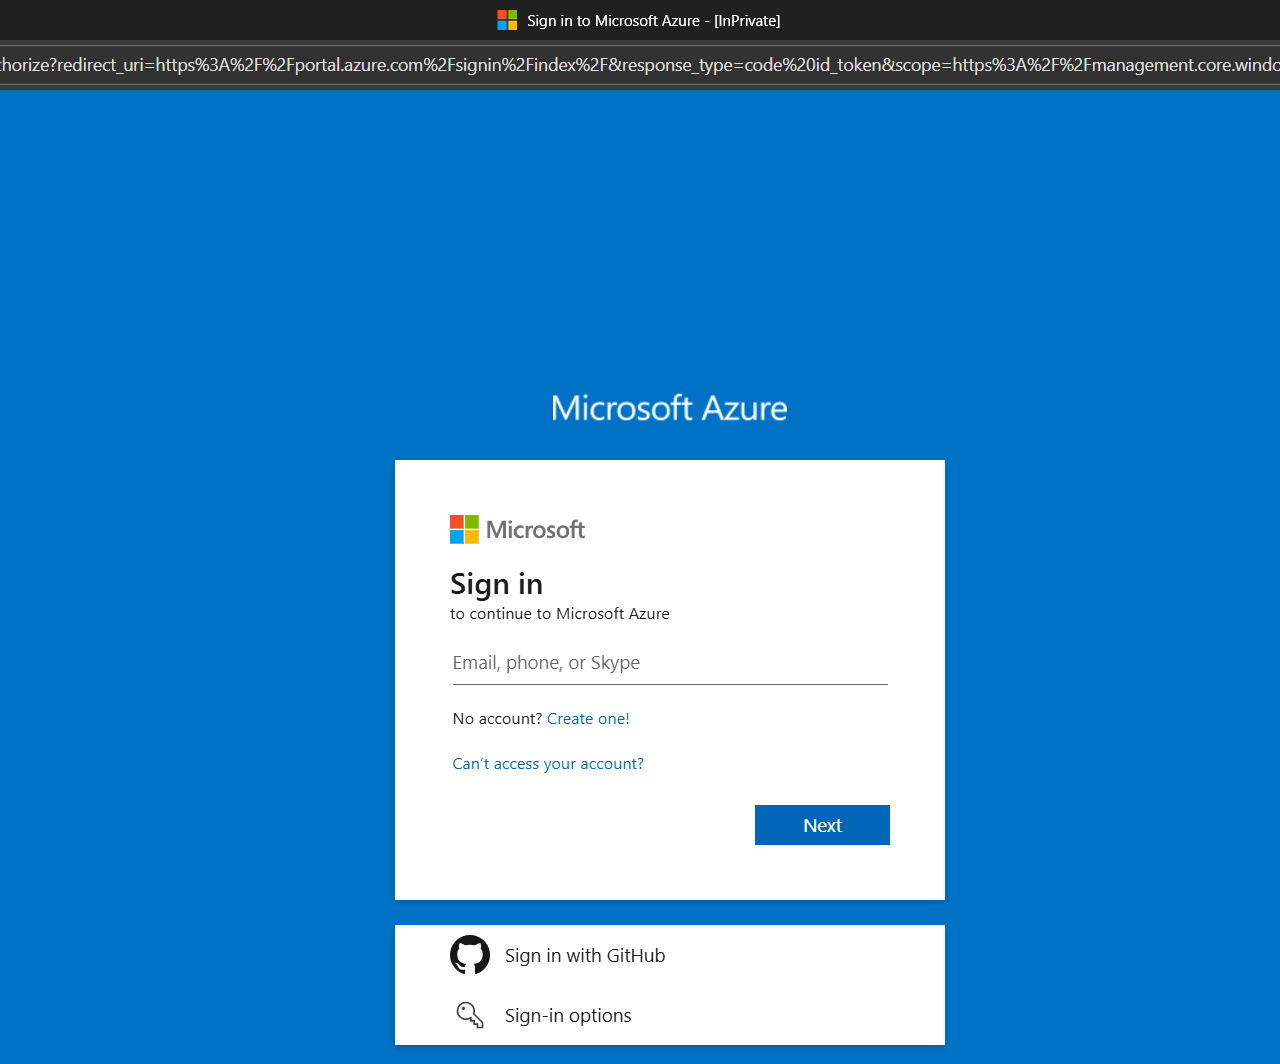
Go to Azure Portal (Open up a browser, type portal.azure.com and hit enter of course, this will then ask you to sign in using Microsoft account)
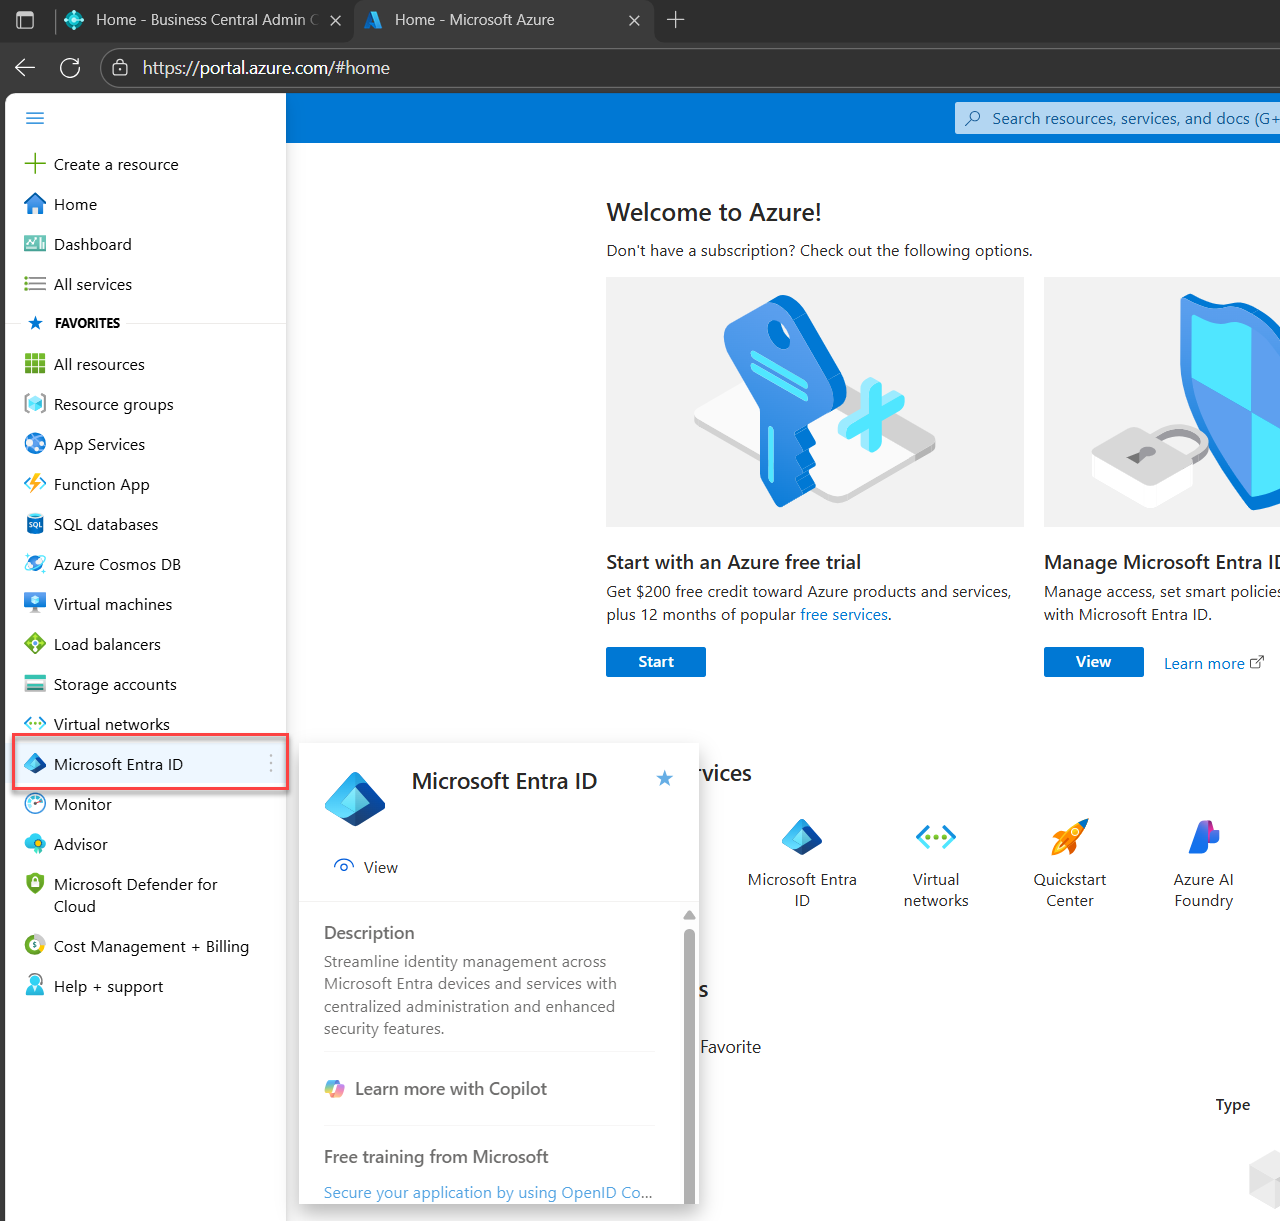
2. Find Azure Active Directory
On the very top-left screen there is a hamburger (☰) icon and click that
You will see a new pane called Microsoft Entra ID (Formerly known as Azure Active Directory)
Note: You can also use the search bar, type the same thing Microsoft Entra ID, and click it.
![]()
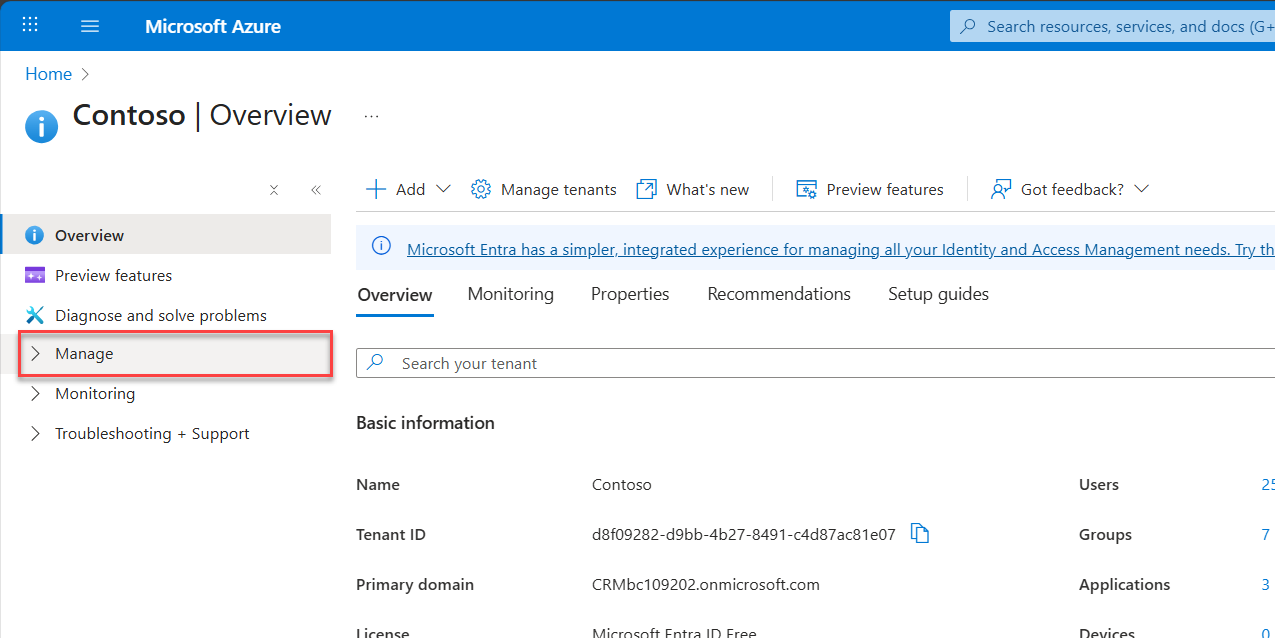
3. Tap into the Manage tab
On the left panel, click Manage. You’ll see more options unfold, this is your staging ground.
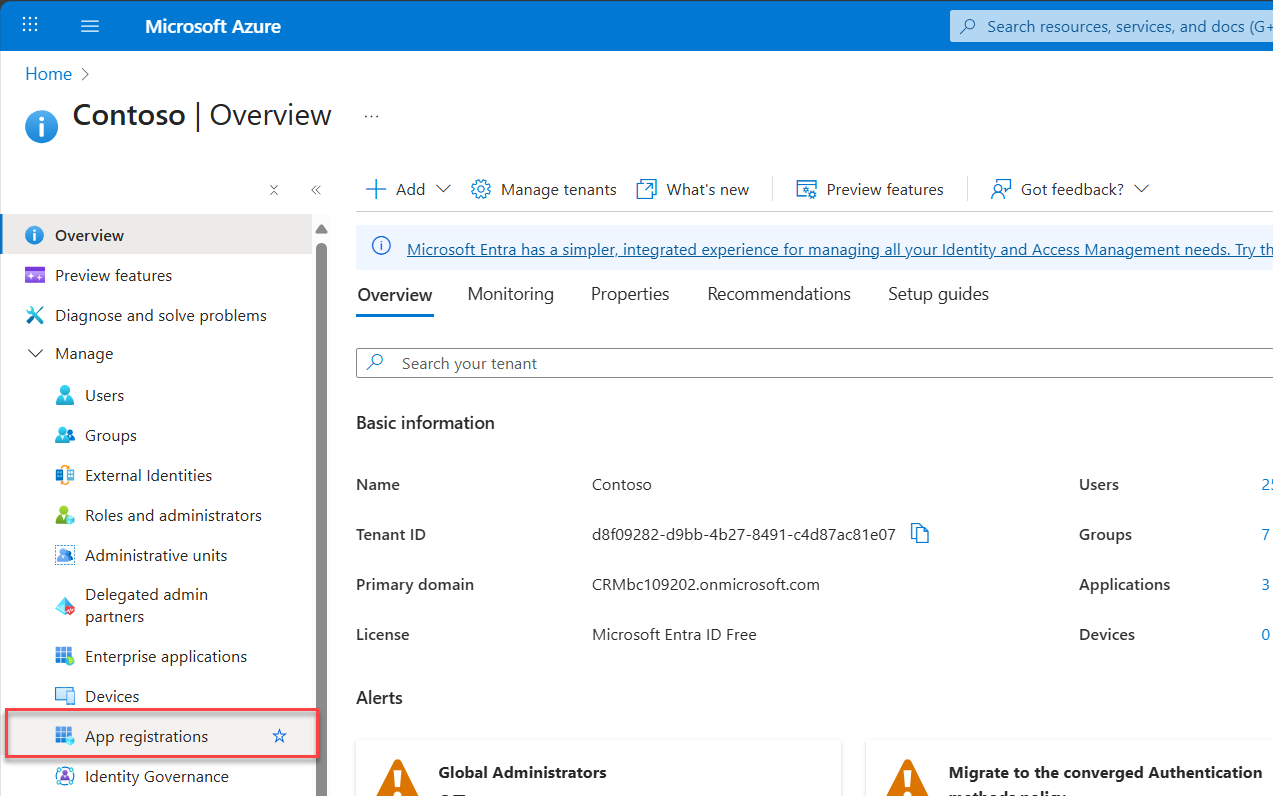
4. Navigate to App registrations
From the Manage Pane, select App registrations. This opens the dedicated App Registrations page.
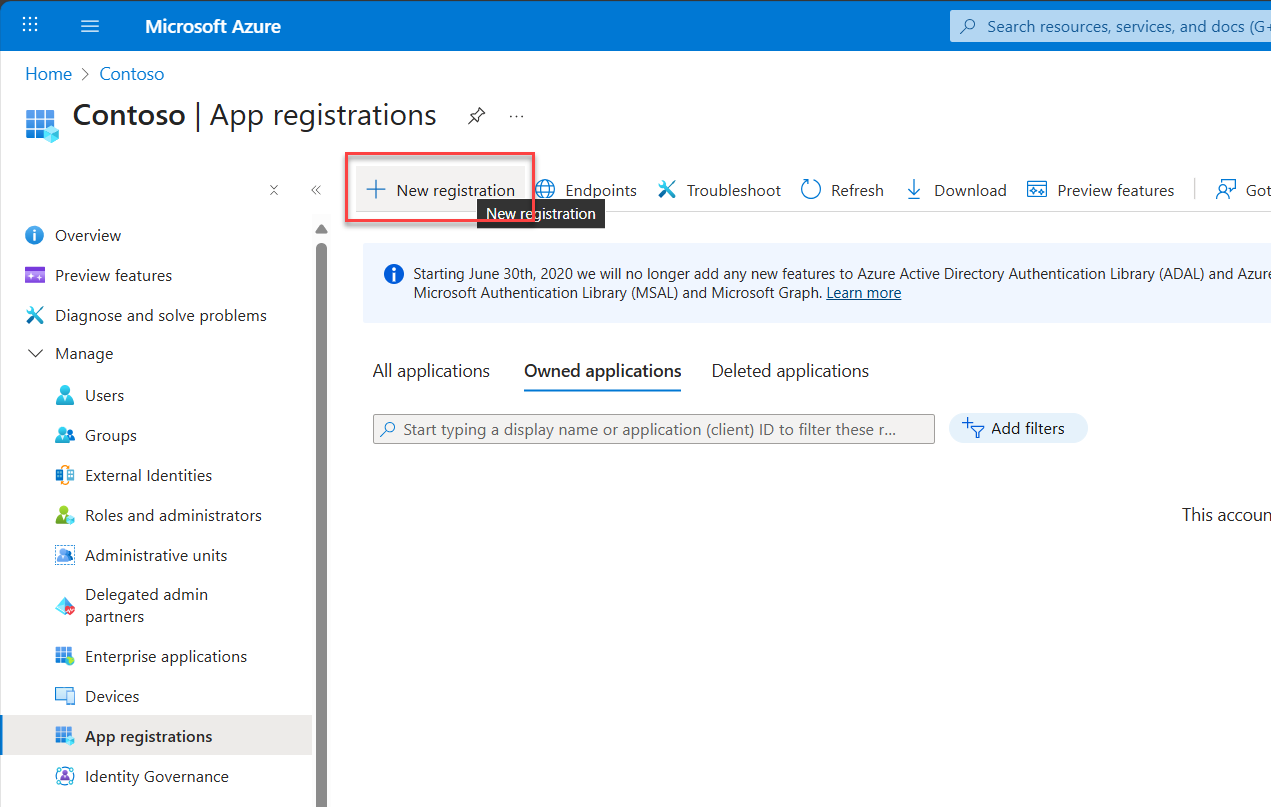
5. Initiate a New Registration
On the App Registrations page, you’ll see other options like Endpoints, Troubleshoot, Refresh, and Download, but for now, focus on New registration.
Click the New registration. Giving your app a soulmark and anchoring its identity.
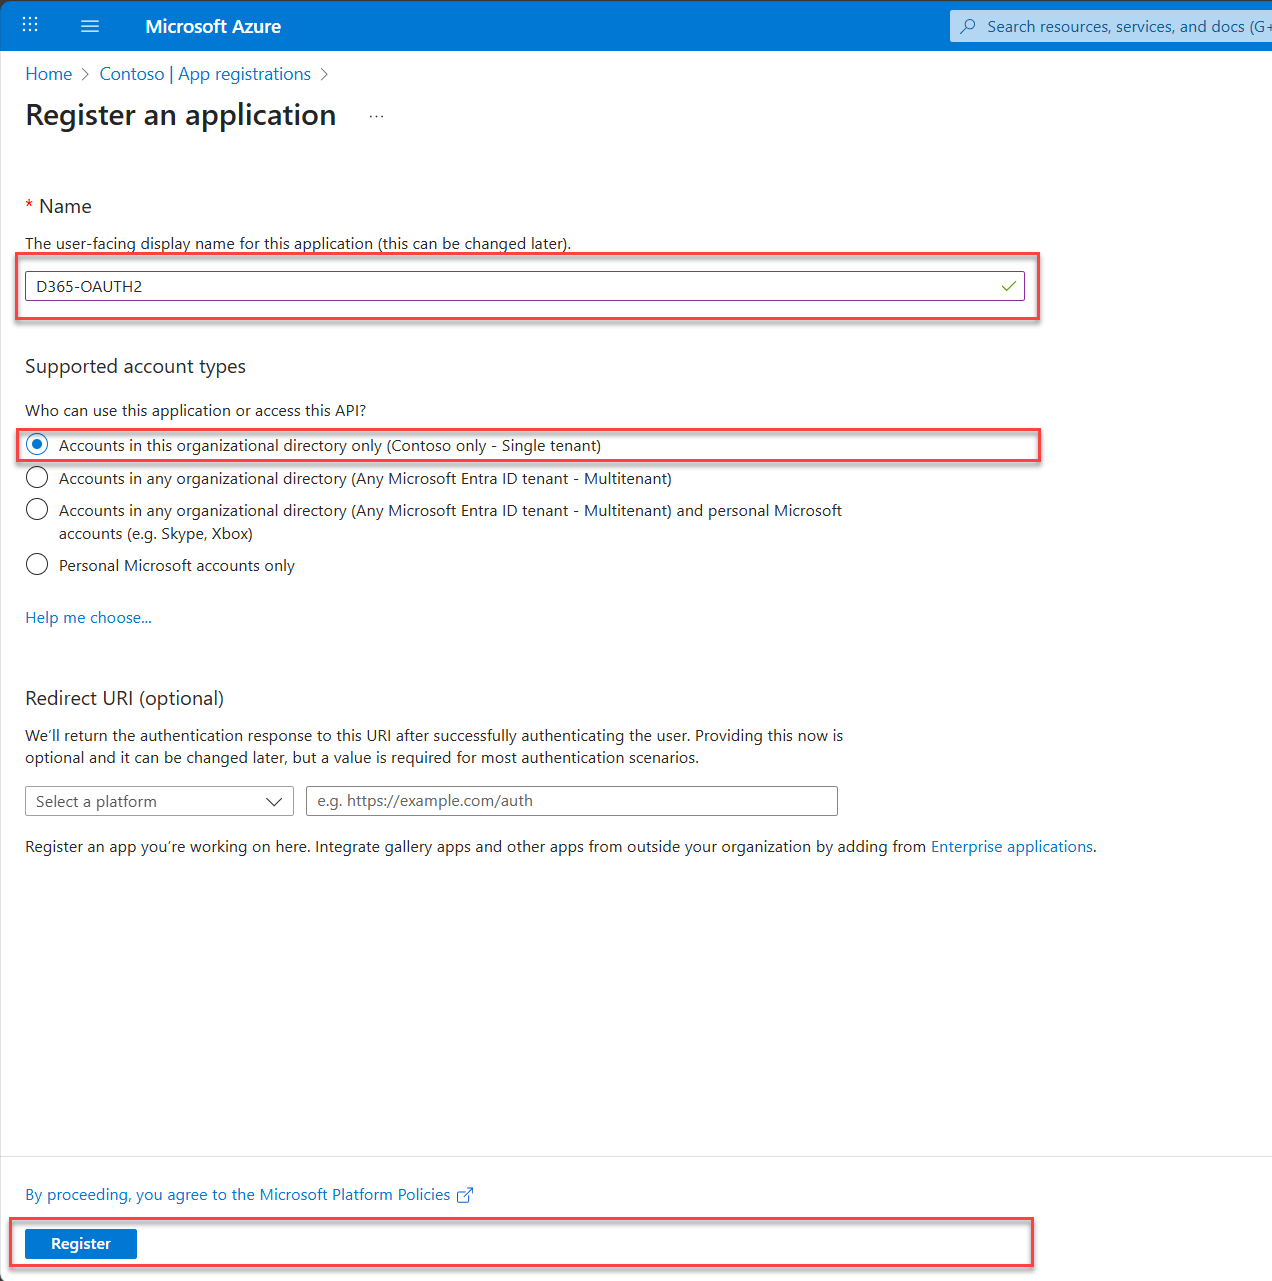
6. Fill Out the Registration Form
A page titled Register an application will appear. Here, you’ll enter the following demo parameters to bring your app to life.
- Name: D365-OAUTH2
This is your app’s name. Make it meaningful, something that echoes its purpose. In this case, we’re keeping it simple and demo-friendly. - Supported account types: Choose Accounts in this organizational directory only (Single tenant)
if you’re keeping things internal.
If you’re planning to allow access from other tenants or personal Microsoft accounts, pick accordingly. This choice defines who can request tokens from your app. - Redirect URI (optional):
If you already have a URI where Azure should send the auth response, enter it here.
For web apps, it might look like https://localhost:5001/signin-oidc.
You can skip this for now and add it later if you're still wiring things up.
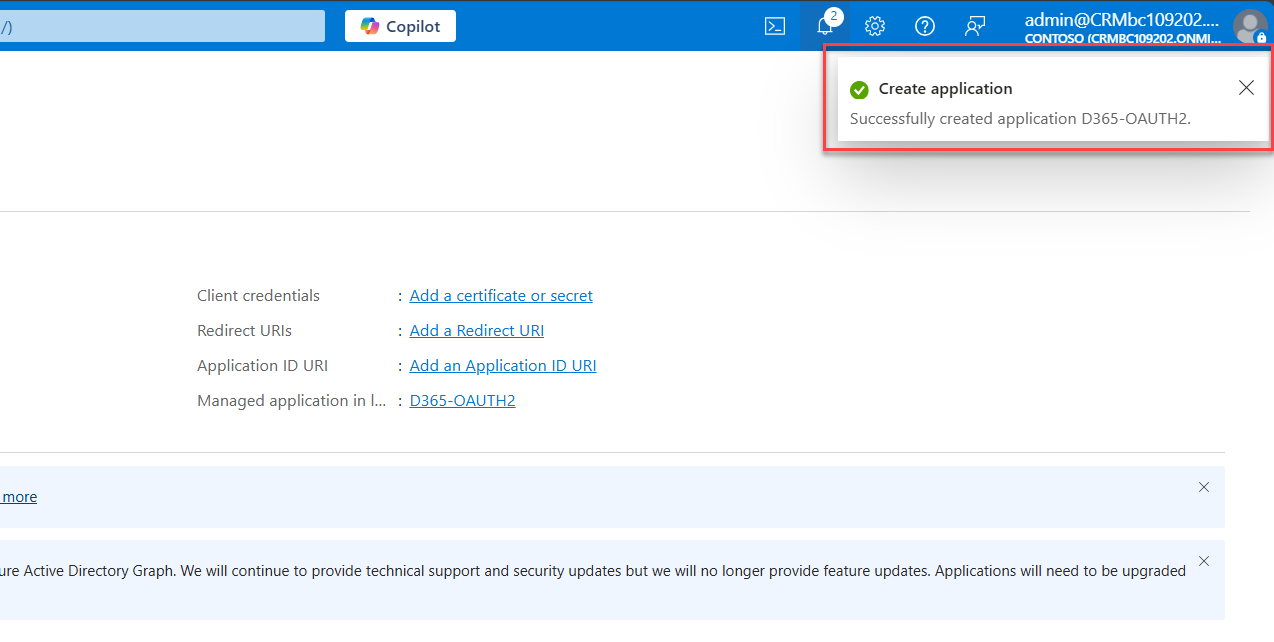
Once you’ve entered the details, hit Register. Bam Bam Boom. Your app is now registered. You’ve summoned its identity into existence.
A notification will appear at the very top-right of your screen, flagging it's completed.
Step 2: Register the Client App (Confidential Client)
This app will request tokens to access the API.
1. Open the App registrations page
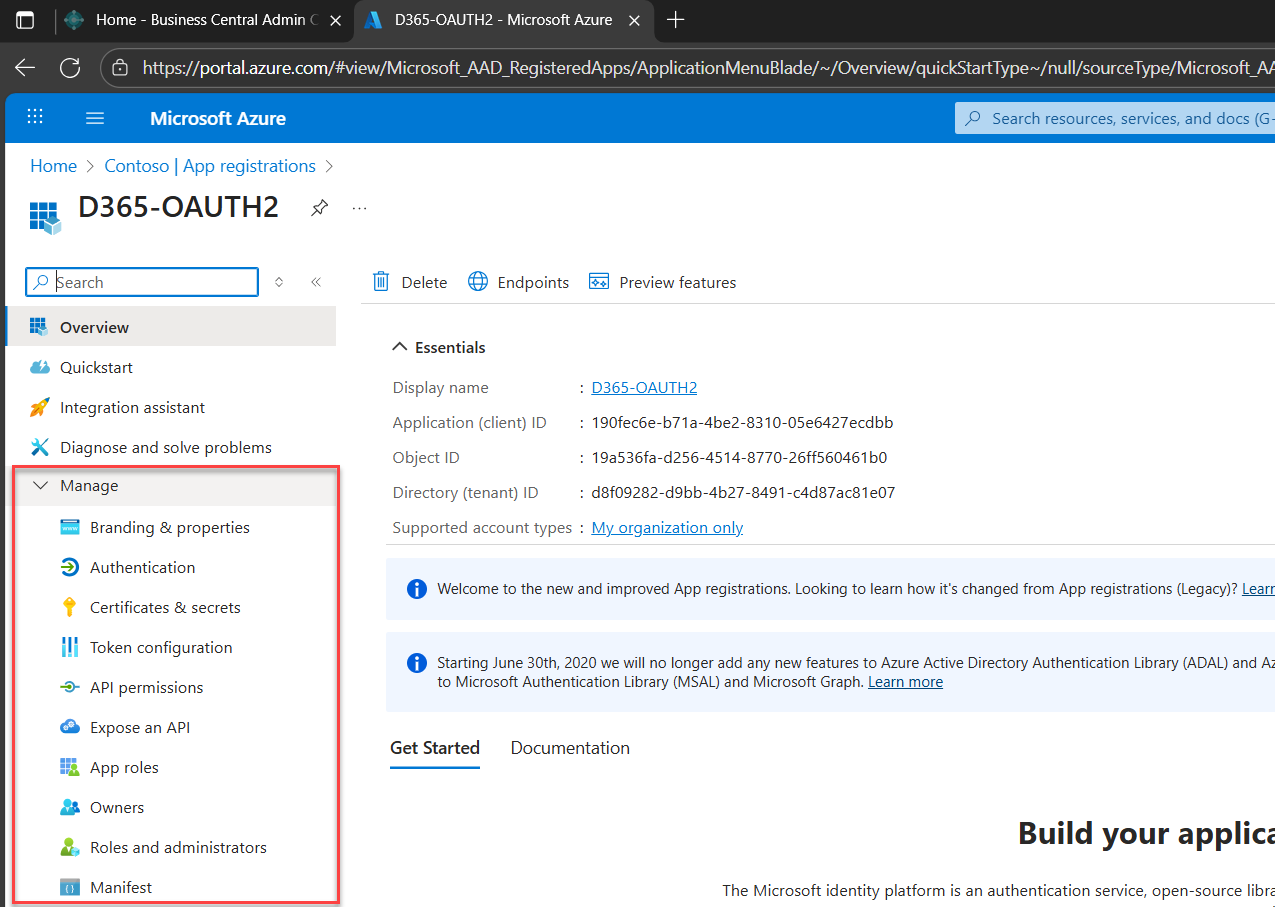
Locate the app you created in Step 1, D365-OAUTH2. Once you hit Register, Azure will generate your App Registration and reveal your app’s properties and attributes.
2. Tap into the Manage tab
In the left-hand panel, click Manage to expand your app’s configuration options. This will reveal your app properties and attributes.
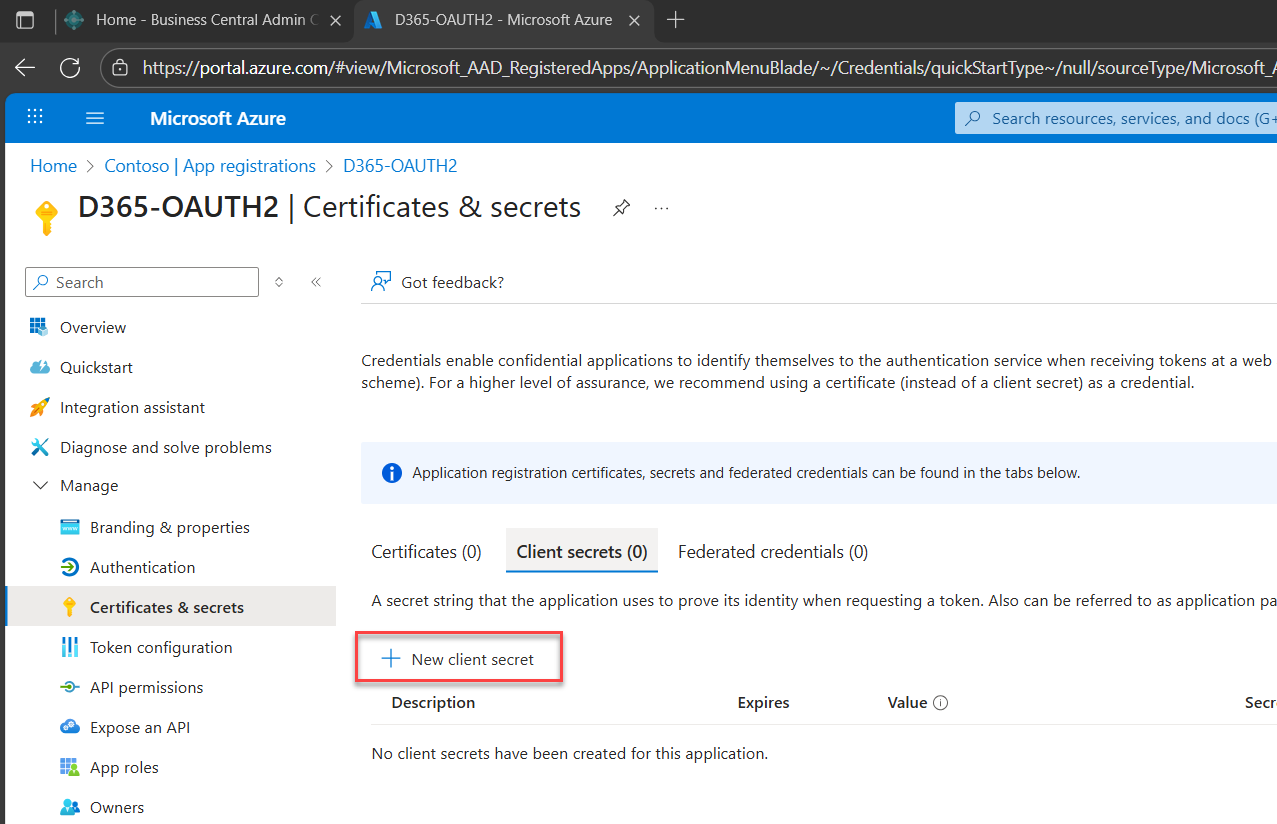
3. Navigate to Certificates & Secrets
Under Manage, select Certificates & Secrets. You’ll see three tabs:
- Certificates
- Client secrets
- Federated credentials
For now, focus on Client secrets.
4. Create a new client secret
Under the Client secrets tab, click + New client secret.
✨ App Secrets 101
Did you know: OAuth2 client secrets are like the private handshake between your app and the authorization server. They’re part of the credentials your app uses to prove its identity when requesting access tokens.
By Definition: A client_secret is a confidential string known only to your app and the authorization server.
Purpose: It authenticates your app during token exchanges, especially in server-side flows like the Authorization Code or Client Credentials grant types.
Analogy: Think of it as your app’s password. Just like you wouldn’t share your email password publicly, you shouldn’t expose your client secret.
5. Defining Security Parameters
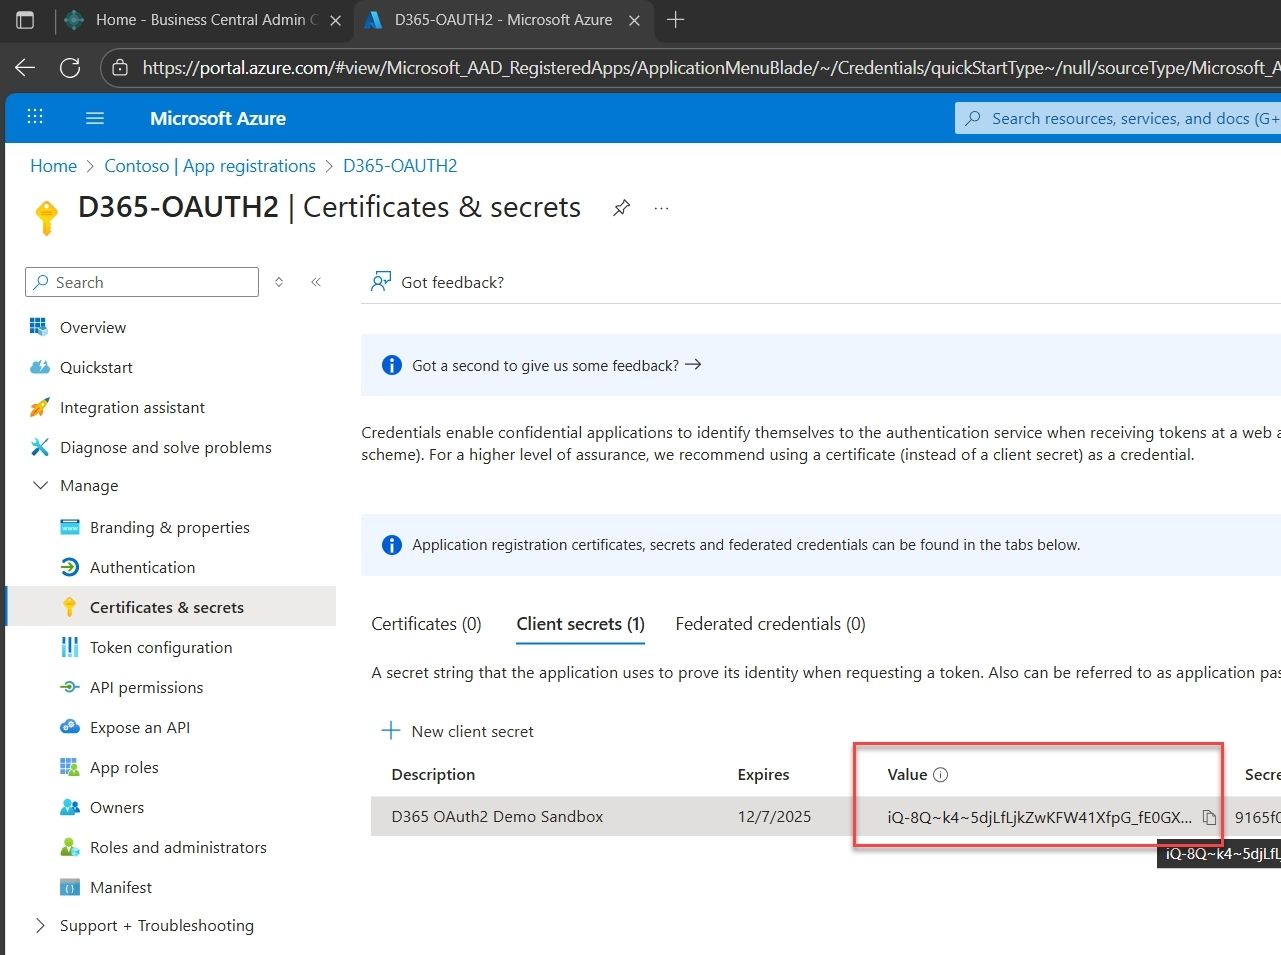
Clicking the New client secret button opens a panel on the right. Define the Description and Expiry, and be sure to store this securely.
For this demo, we’ll use 90 days. But here are some clarity, powered takeaways to guide your real world setups:

Once completed, a notification will appear in the left pane.
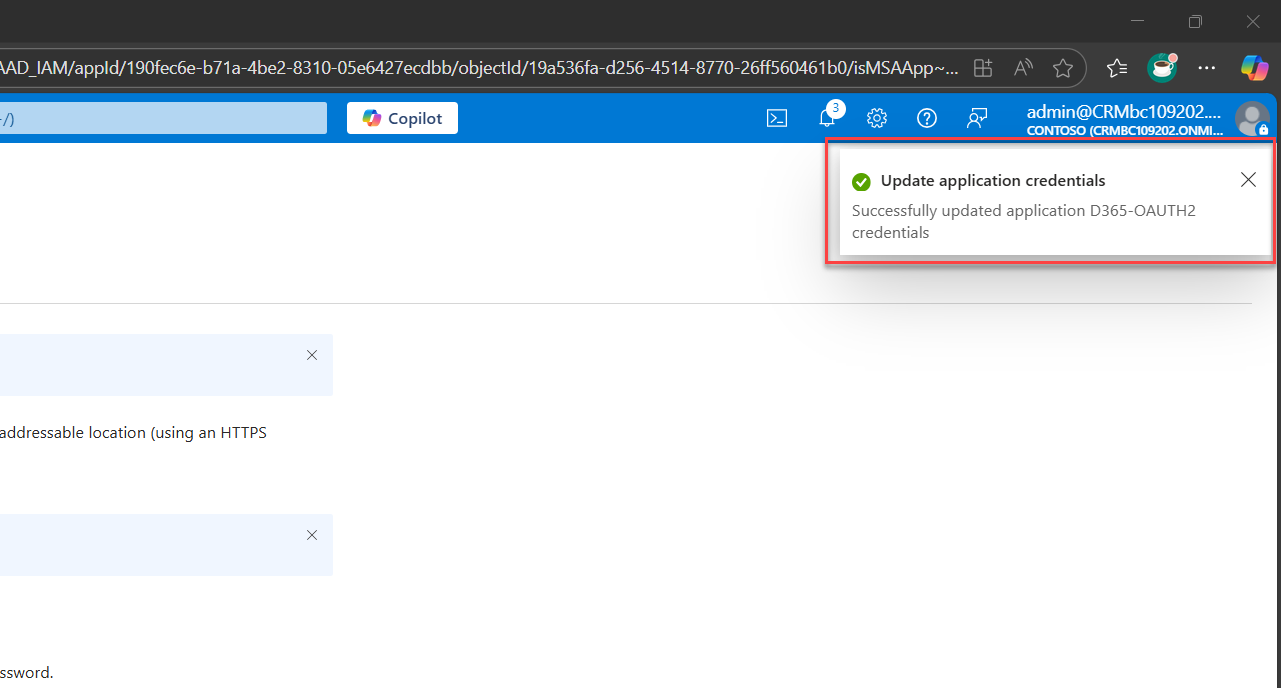
You’ll see a record created under the Client secrets tab. Copy and securely store the value shown in the Value field.

✨ Naming & Expiry Tips
Purpose-first: Include the app name, environment (e.g., UAT, prod), and integration purpose e.g. D365 OAuth2 Demo Sandbox
Avoid ambiguity: “Test” or “default” are legacy traps. Be precise.
Set short lifespans for high-risk environments: Especially for secrets used in CI/CD or exposed contexts.
Align with rotation: If you rotate secrets monthly, set expiry to 35–40 days to allow buffer.
Avoid “never expires” unless justified: Permanent secrets are entropy magnets. If used, document the reason in the description.
Automate reminders: Use monitoring or DevOps to alert before expiry hits.
Step 3: Configure API Permissions for Business Central
Now that D365-OAUTH2 is registered and equipped with its client secret, it’s time to grant it purposeful access. This step links your app to the Business Central API, allowing it to request tokens with the correct scope, no ambiguity, no excess.
Think of this as defining the boundaries of trust: what your app can access, and how confidently it’s allowed to do so and I hope you are enjoying so far this thing.
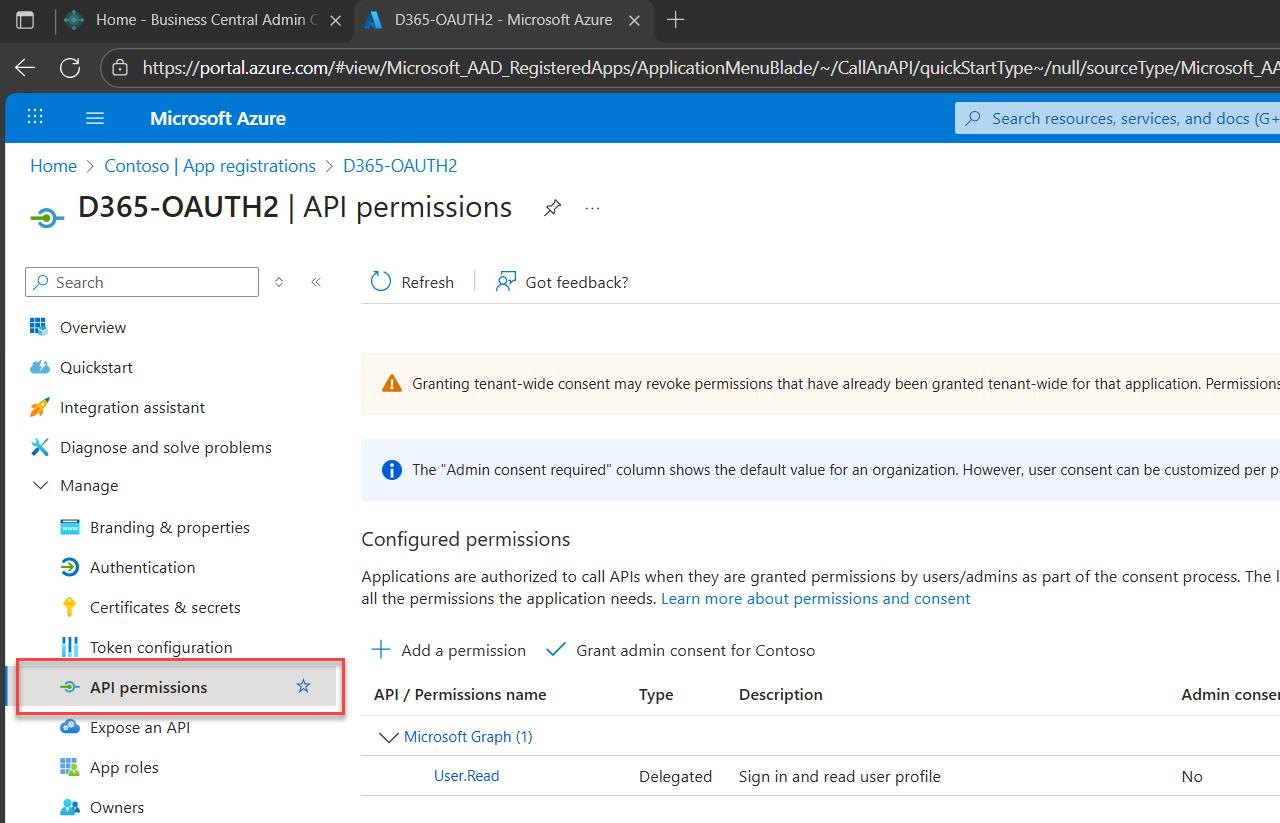
1. Navigate to API permissions
In your app registration (D365-OAUTH2), navigate to the API permissions section. This is where access begins.
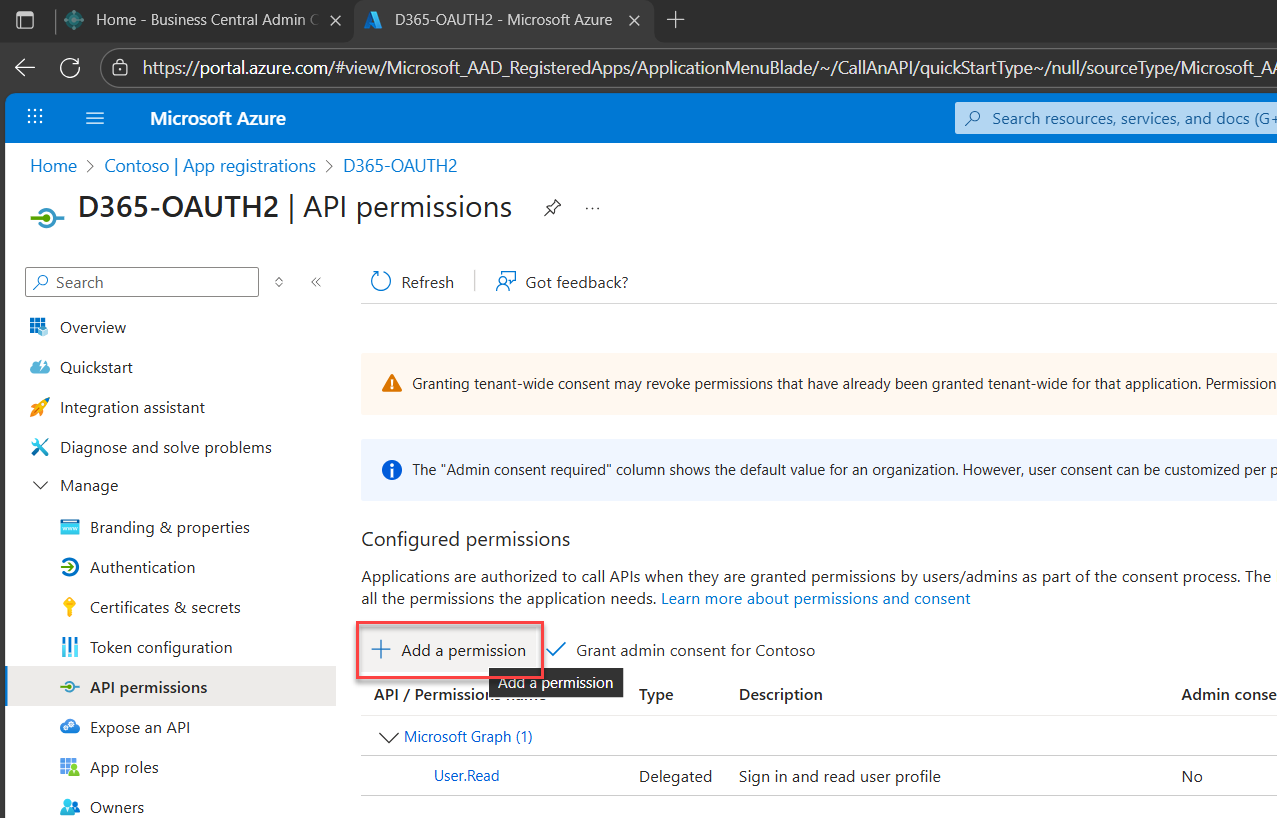
2. Click Add a permission
You’re about to define what your app is allowed to access. No guesswork, just intentional scope.
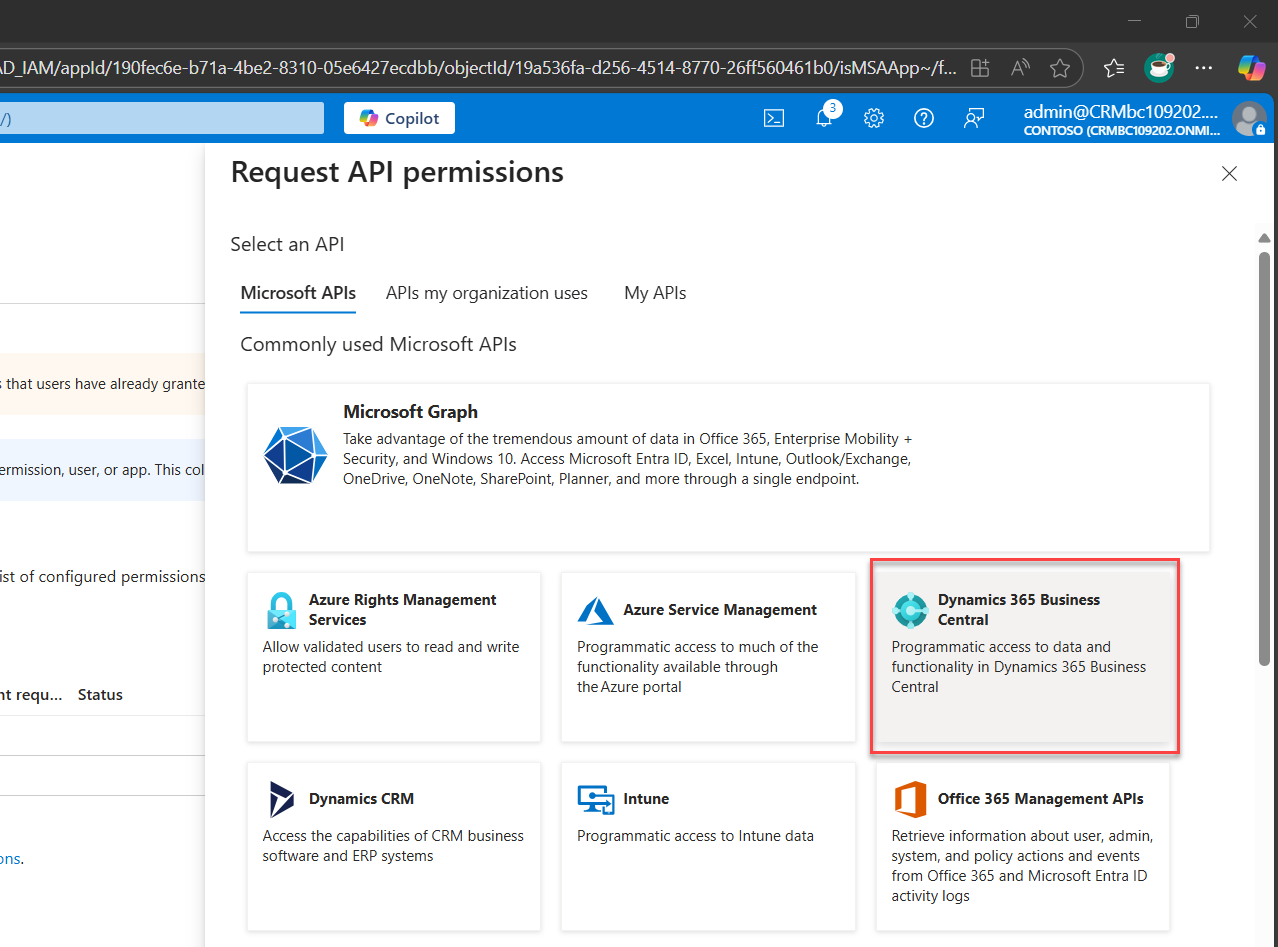
3. Select “Request API permissions” → Choose “Dynamics 365 Business Central”
This tells Azure: We’re connecting to Business Central, Not a public APIs, no noise, just your protected resource.
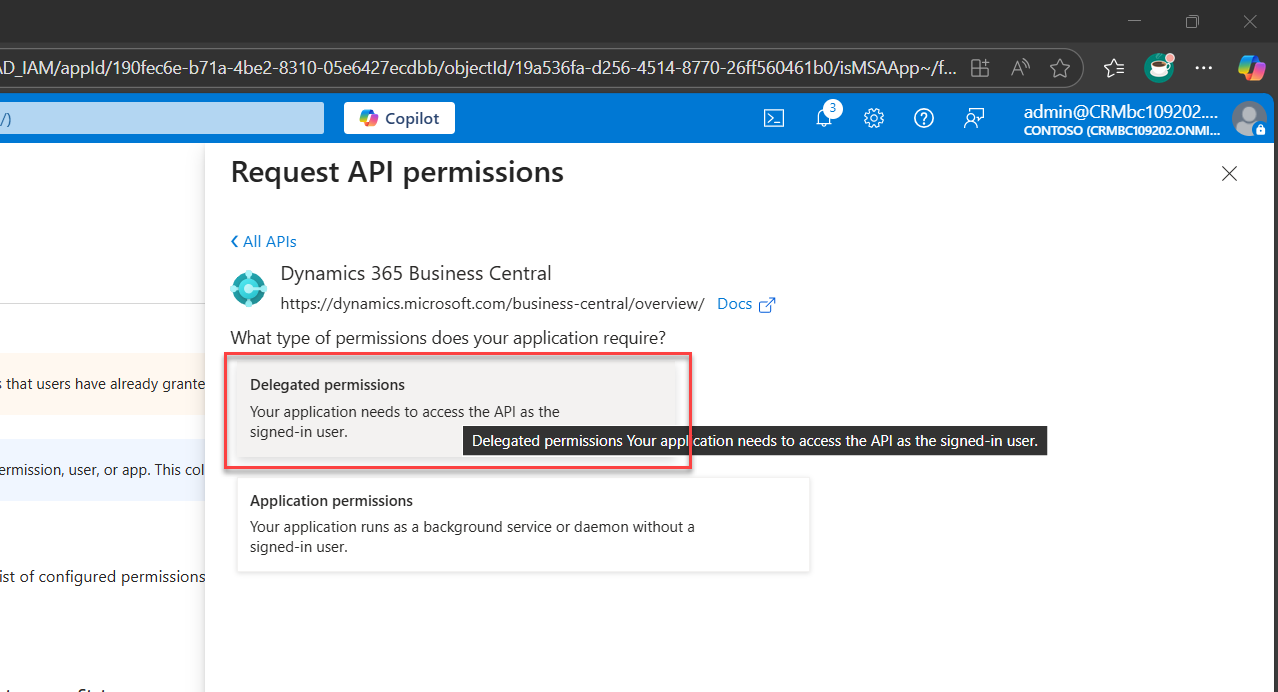
4. Choose your permission type
You’ll configure both permission flows to support flexible access:
-
Path A: Delegated Permissions
Use this when your app acts on behalf of a signed-in user. Ideal for user-driven flows. -
Path B: Application Permissions
Use this when your app acts as itself, without user context. Perfect for background jobs, integrations, or automation.
4A. Select the appropriate permission scope for Delegated Permission
Click Delegated Permissions to reveal sub-sections below, then check all relevant options.
- user_impersonisation to access as a signed-in user
- Financials.ReadWrite.All to access Dynamics 365 Business Central as the signed-in user
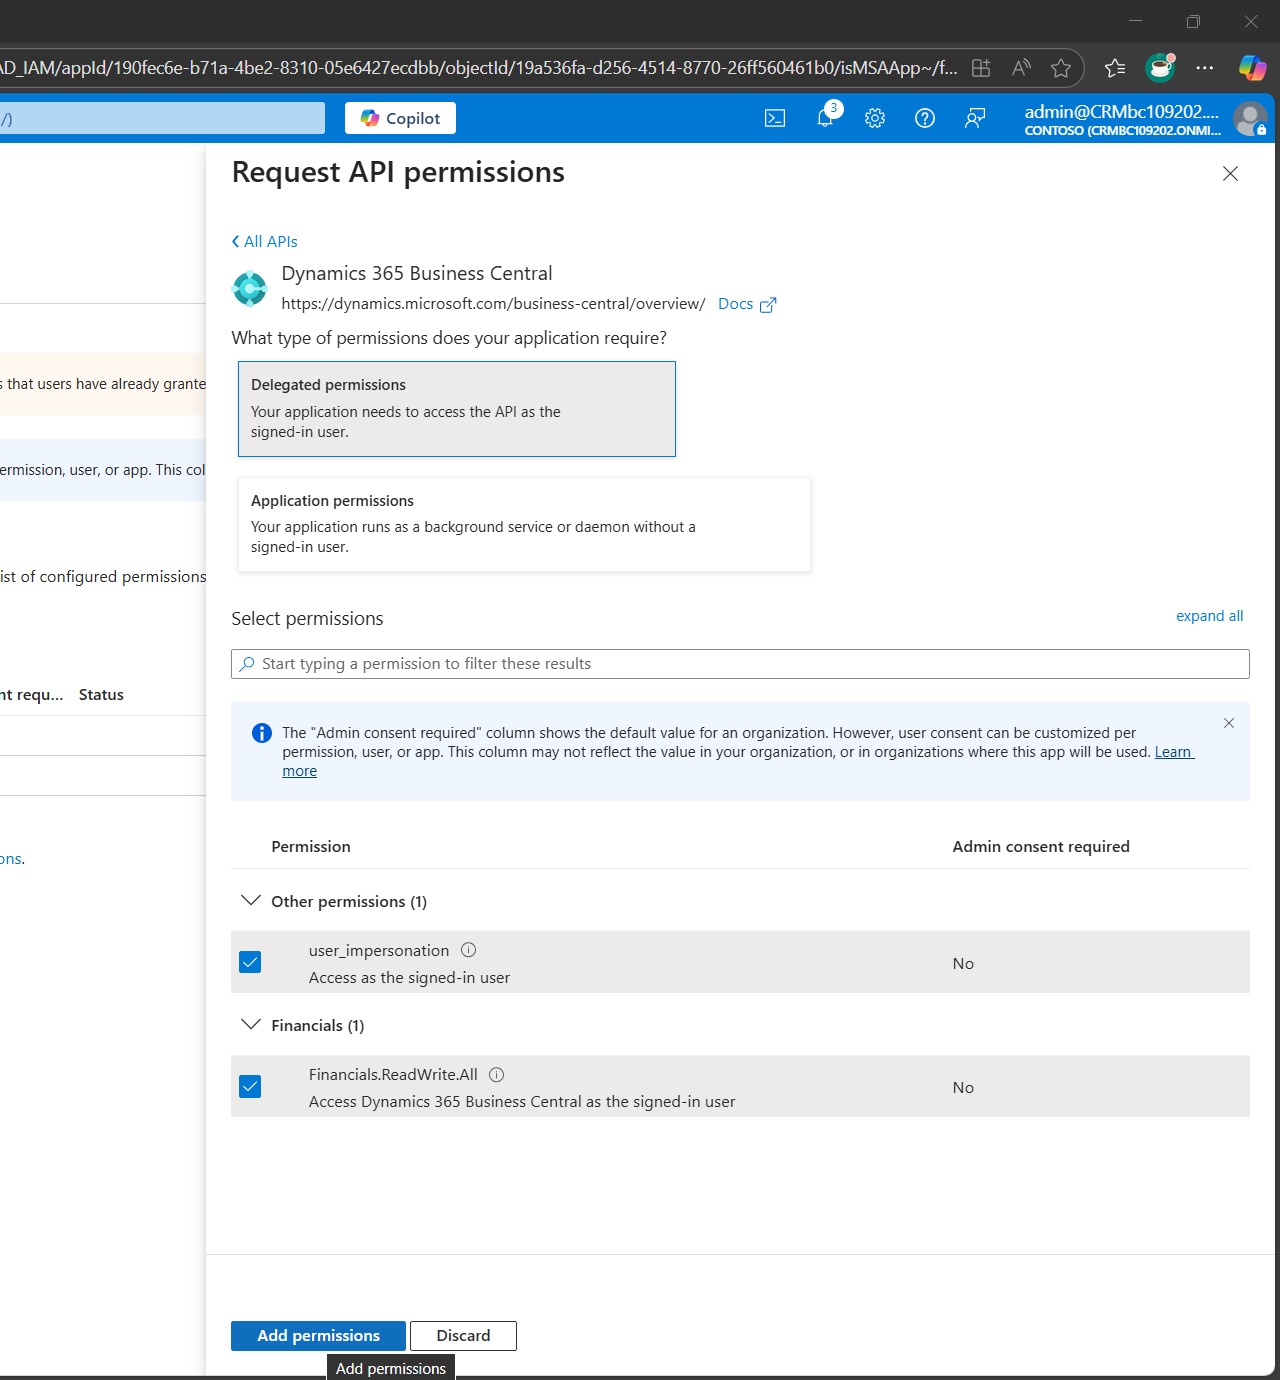
Confirm and apply the selected permission.
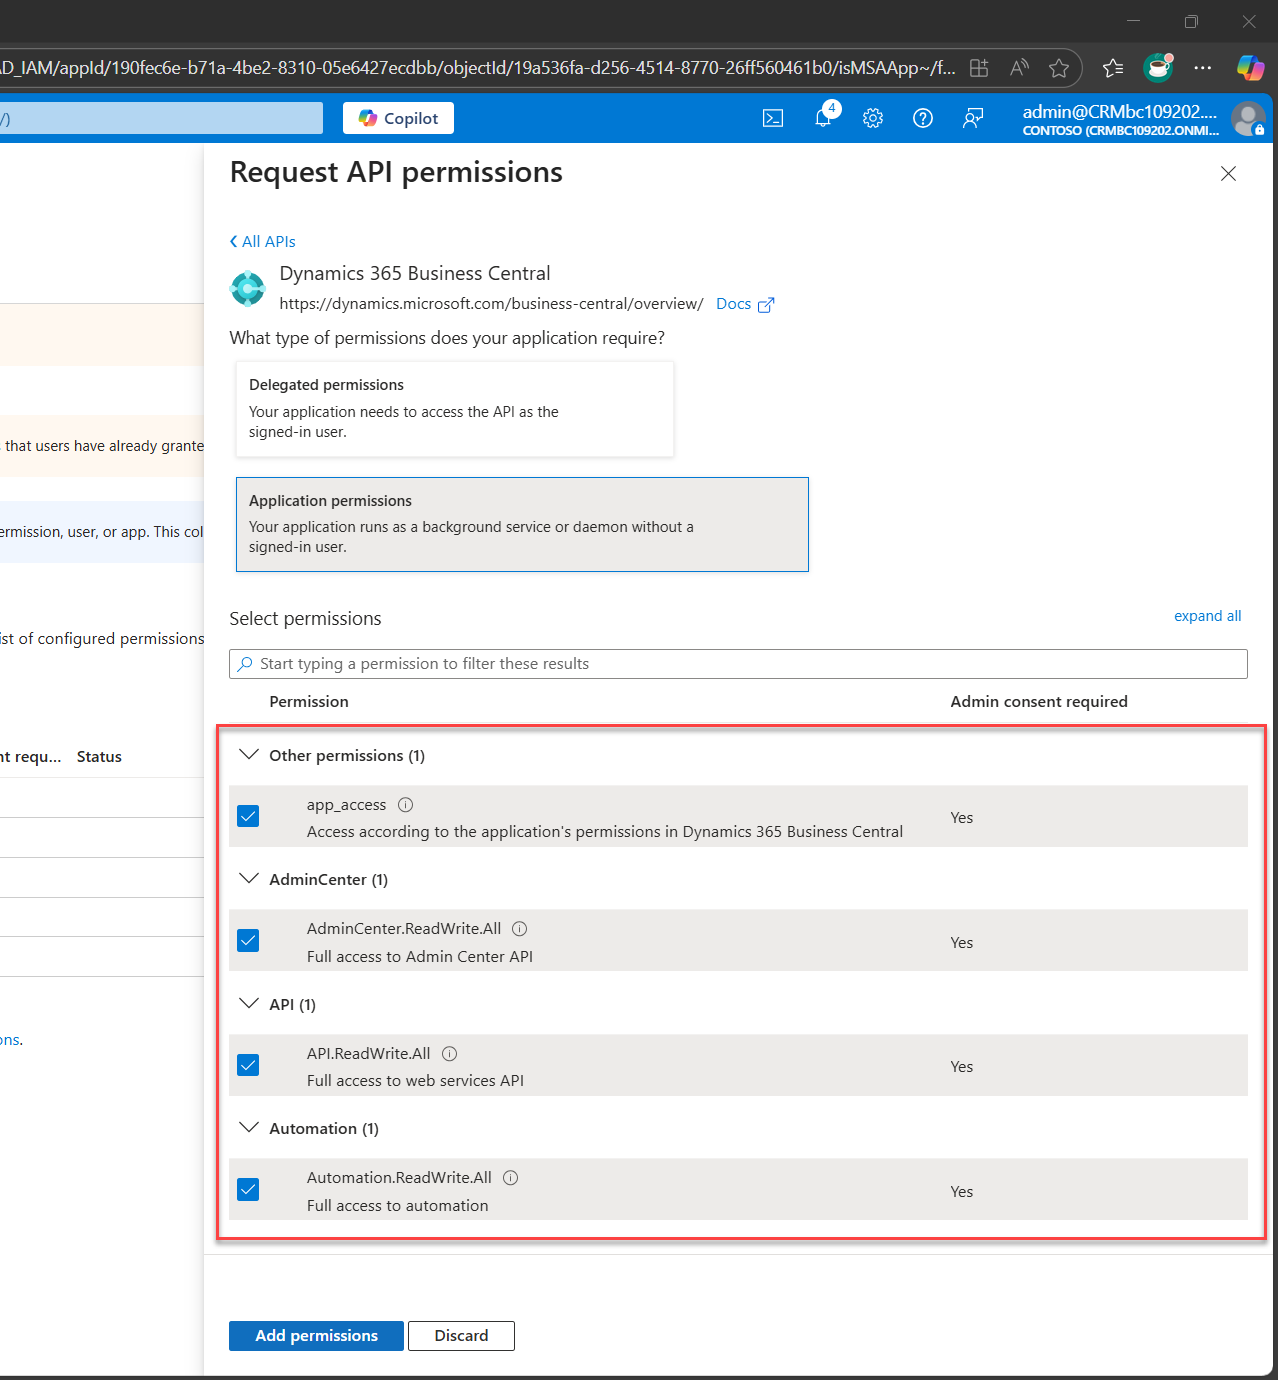
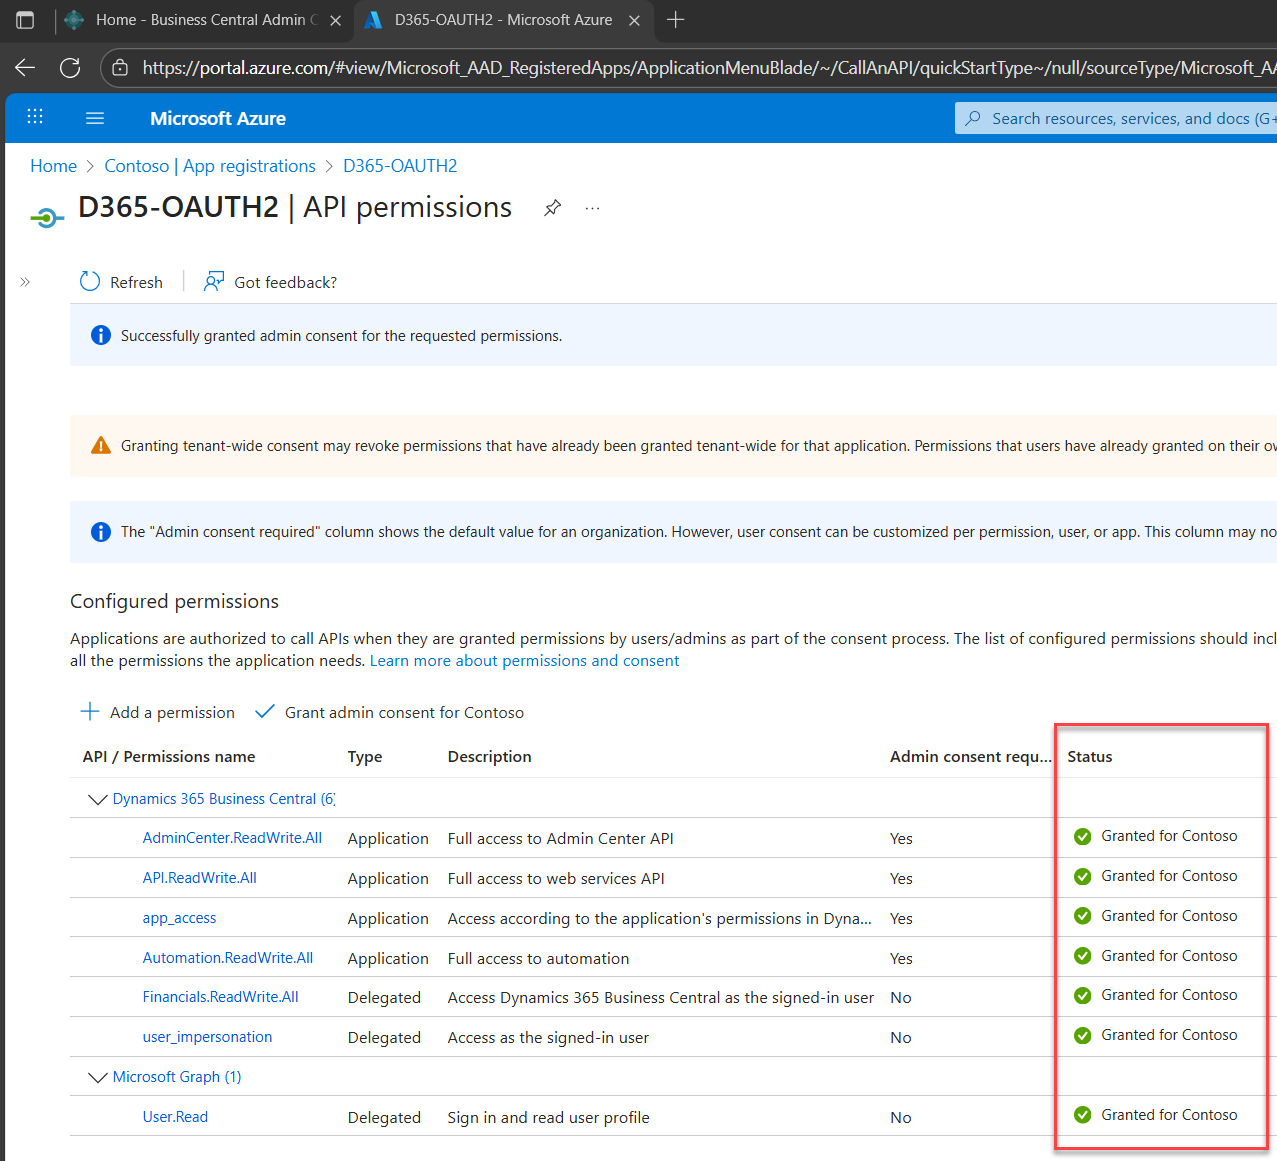
4B. Select the appropriate permission scope for Application Permission
Repeat step 2, but this time select Application Permissions and it will open up sub-sections below and check all Permission
- app_access to access according to the application's permission in D365 Business Central
- AdminCenter.ReadWrite.All to fully Access to Admin Centre API
- API.ReadWrite.All to fully access web services API
- Automation.ReadWrite.All to fully access automation
✨ Disclaimer
For now, we grant all. But in the next scroll, we’ll forge custom permission sets worthy of your app’s true purpose.

Confirm and apply the selected permission.

✨ Quick Need-to-Know Nuggets
Even with API.ReadWrite.All granted in Azure, your app will hit “Access Denied” unless it’s explicitly registered inside Business Central and assigned permission sets.
The Azure side only opens the gate. Business Central decides what’s behind it.
Token ≠ Access
Just because you got a token doesn’t mean you have access.
Business Central will happily issue a token even if the app isn’t registered inside BC or lacks permission sets. The error only shows up when you hit the endpoint.
Environment Scope Matters
Tokens are scoped to the environment (sandbox vs production).
If your token was issued for sandbox, it won’t work on production endpoints, even if the permissions are identical.
Consent ≠ Setup
Admin consent in Azure ≠ app setup in Business Central.
You can grant all the permissions in Azure, but unless the app is registered in BC and assigned permission sets, it’s still locked out.
SUPER Role Is Forbidden
You cannot assign the SUPER permission set to an Azure AD app.
Even if you try, BC will reject it. You must modularize access with custom permission sets.
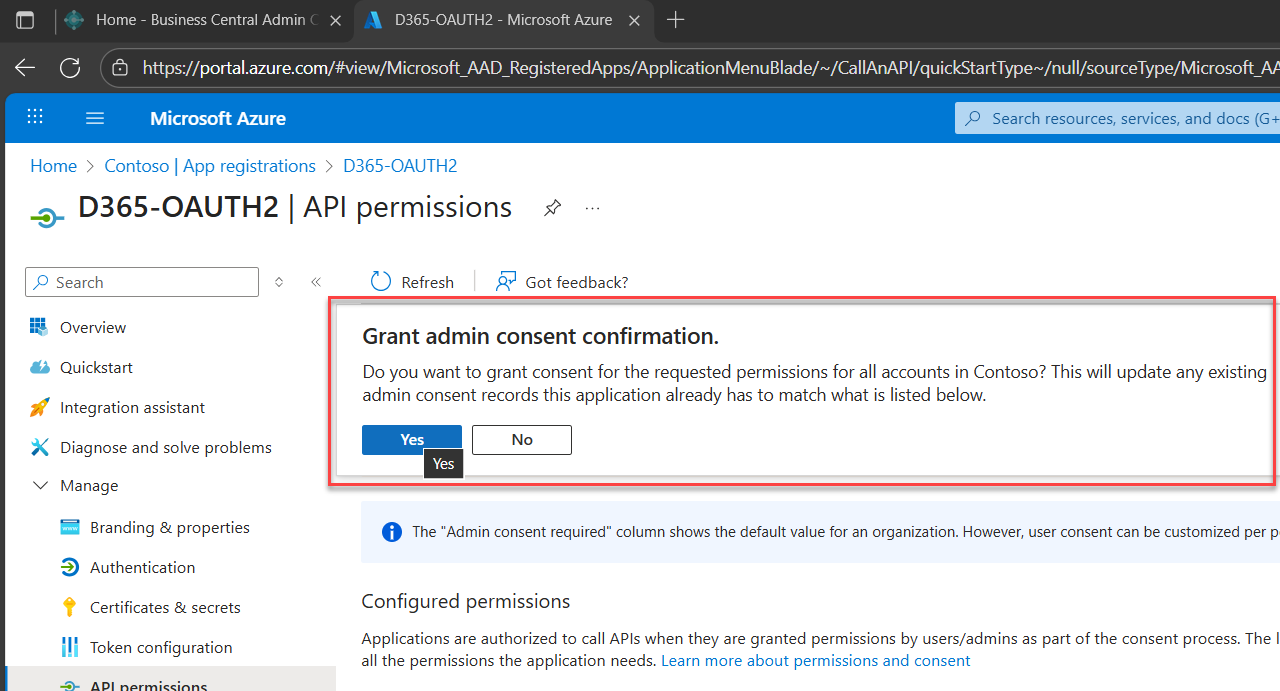
7. Click Grant admin consent (if you're an admin)
This final step activates the permissions across your organization.
A confirmation prompt will appear, click Yes to grant admin consent. Just click yes (but of course, don't just click yes, read it please - it is not EULA! HAHAHAHAHAHA lol)
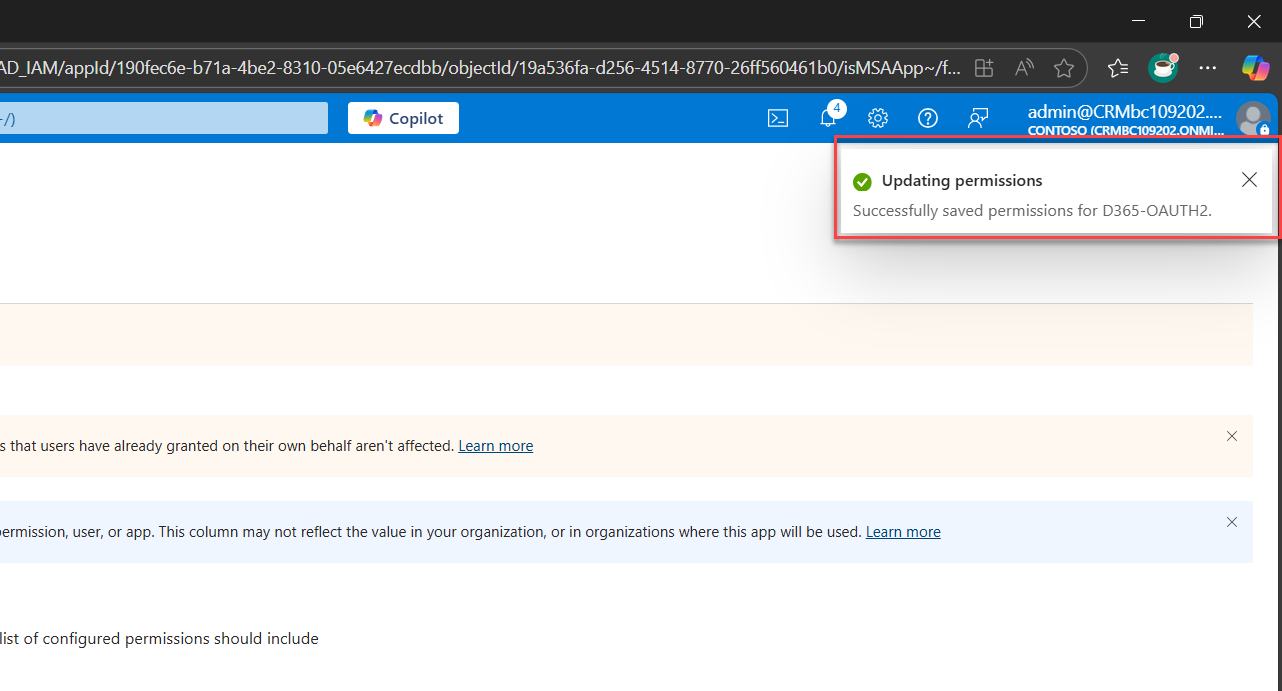
After confirming, a notification will appear at the top-right stating that consent was granted successfully.
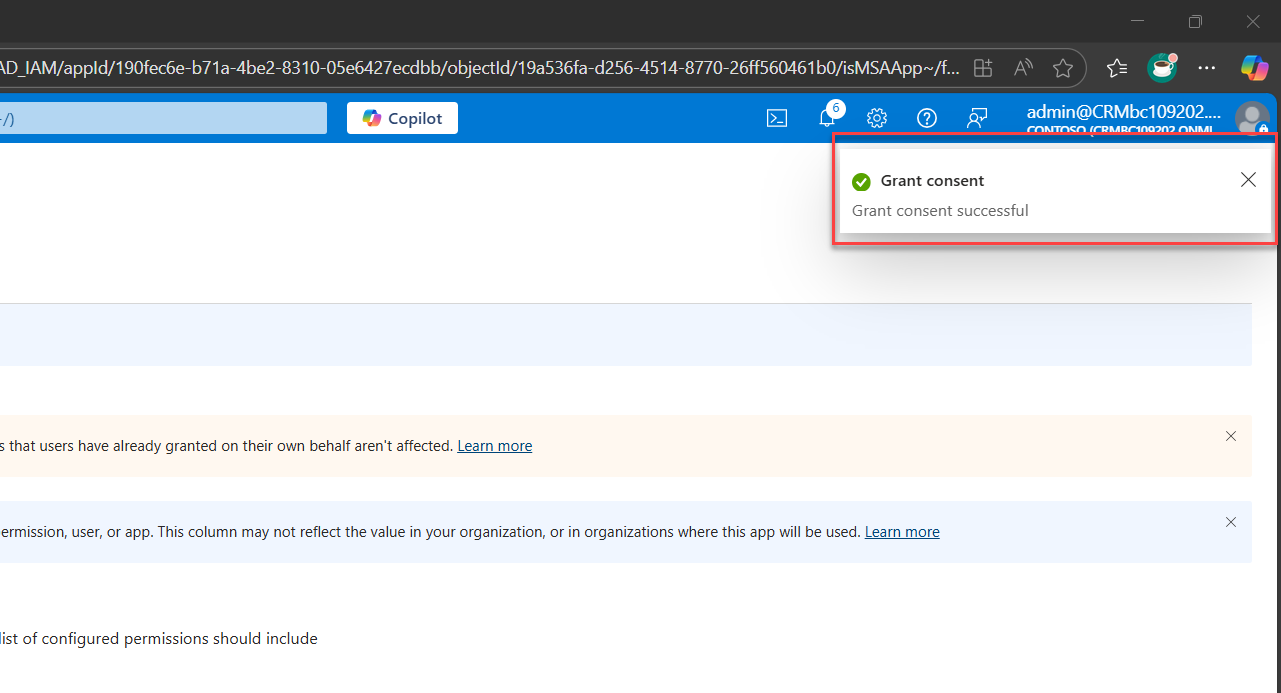
You’ll also see that each permission now shows Granted for organization in the Status column.
Step 4: Wrap-Up
That wraps up the core idea, not just setting up, but explaining the OAuth2 LEGO piece. We won’t cover everything in one go and of course I don’t want you to feel the information overload. Feel free to adapt and explore BCAstronauts!
Setup Patterns That Actually Work
- App Registration Strategy: Register a client app with clear naming that reflects environment and purpose e.g. BC-OAuth2-Client-UAT.
- API Permission Scoping: Assign only the necessary delegated or application permissions, avoid over-granting.
- Redirect URI Precision: Use explicit redirect URIs. Avoid wildcards to maintain security and reduce ambiguity.
- Client Secret Hygiene: Use short lived secrets e.g., 90 days, document rotation schedules, and automate reminders.
- Tenant Targeting: Use single-tenant unless multi-tenant is required, this improves control and reduces complexity.
- Token Endpoint Accuracy: Use the correct token endpoint format (https://login.microsoftonline.com/{tenant}/oauth2/v2.0/token) for your tenant
Mistakes We’ve Made So You Don’t Have To
- Admin Consent ≠ Access: Granting admin consent is required for application permissions, but doesn’t guarantee downstream access.
- Client Secret Mismanagement: Secrets exposed in logs or repos are a major risk. Always store securely and rotate proactively.
- Environment Scope Mismatch: Tokens scoped for one tenant or environment won’t work elsewhere, always align scope and endpoint.
- Redirect URI Typos: Even minor mismatches between configured and actual URIs will break the flow—double-check everything.
- Over-granting Permissions: Assigning broad permissions “just to make it work” creates long-term risk. Start minimal.
Ready to Bite: Let’s Unlock This Beast ✨
What I’ve Learned the Hard Way
Monitor Secret Expiry: Integrate expiry alerts into CI/CD or Azure Monitor to prevent silent failures.
Document is everything: Include screenshots, examples, and “What to Check First” callouts to guide setup.
Visualize the Flow: A diagram showing app registration, token request, and permission grant helps anchor understanding.
TL;DR & What’s Next
Setting up OAuth2 in Azure is the foundation for secure, scalable integrations with Business Central APIs. By registering a client app, assigning scoped permissions, managing secrets intentionally, and defining precise redirect URIs, developers create a reliable token acquisition flow. This setup is modular, repeatable, and essential for modern API access.
In the next article, we’ll explore how to bridge this Azure setup into Business Central, covering app registration inside BC, permission set design, and access validation rules. We’ll also walk through token testing, troubleshooting flows, and user-friendly onboarding strategies.
Support the Community
♻️ Repost to support the Microsoft Dynamics 365 Community and follow Jeffrey Bulanadi for technical insights above and beyond Business Central, AL development, and scalable integration architecture.
Demo Repository
Explore my GitHub sample showcasing OAuth2 setup logic, token acquisition flow, and onboarding scaffolds: OAuth2 Setup and Automation Part 1 on GitHub
✨ Part 2 is live: Learn How to Configure Entra, Set Up Postman, and Validate OAuth2 Token Flow View blog
Helpful References
OAuth2 and OpenID Connect Protocols – Microsoft Identity Platform
Azure App Registration – Microsoft Learn
Business Central API Access – Microsoft Docs
Join the Conversation
Share your thoughts, ask questions, or discuss this article with the community. All comments are moderated to ensure quality discussions.
No comments yet
Be the first to start the conversation!
0 Comments
Leave a Comment